

A new client just asked you the question every agency owner hears in week one.
“So when do posts actually start?”
You have their signature. You have their first payment. But there’s still nothing on their feed. And every week you spend setting things up is a week the client pays you and sees nothing back.
That slow start costs more than time. In a Wyzowl survey of customers, 63% said the onboarding they expect after buying factors into whether they buy at all, and 86% said they’d stay more loyal to a business that invests in getting them started well. The first few weeks set the tone for the whole relationship.
Onboarding is slow for one simple reason: you start over with every new client. You build the intake, the audit, the strategy, and the first calendar again, the same way you did last time. That eats your week.
This isn’t another checklist. It’s a simple process you run the same way every time:
- Claude does the thinking (intake gaps, competitor scan, gap analysis, strategy, brief)
- A form collects the answers
- SocialPilot puts the posts live
And because it’s a process, you’ll see the exact prompt to paste into Claude at every step below.
New Client Onboarding Process, at a Glance:
- Intake (Claude + a form tool like Typeform or Tally) — the client fills one form, and Claude reads it and asks about anything missing.
- Audit (Claude + SocialPilot MCP) — pull the client’s current posts and numbers from every connected account.
- Competitor Scan (Claude + Apify MCP) — scrape 3 to 5 rivals to see what they post, how, and how often.
- Gap Analysis (Claude) — turn the numbers and the scan into a short list of what’s missing.
- Strategy Memo (Claude) — content themes, how often to post, revision limits, and what “approved” means.
- Calendar Setup (Claude + SocialPilot MCP) — build and schedule the first two weeks of posts.
- Client Brief (Claude + Slack MCP, plus email) — send the plan and the approval link.
Once you connect a few tools, the whole thing runs in a single Claude chat. Here is what to set up first.
Your onboarding isn’t slow because you’re slow. It’s slow because three things happen one after another, and each one waits on the last. None of it is the actual posting.
- First, access. You’re collecting logins, brand files, past numbers, and a list of who approves what. Each item sits with a different person, and each one comes back whenever that person gets around to it.
- Second, answers. With no clear approval rules, first drafts come back with notes like “make it pop.” Then it loops: “Can we tweak this?” “Not feeling it.” “Maybe something punchier?” Every round burns hours.
- Third, scope. Nobody agreed on how many revision rounds a post gets, what “approved” means, or when the first post goes out. So the plan drifts, and the client goes from excited to unsure within a few weeks.
This isn’t a talent problem. It’s a systems problem. And a system is exactly the kind of thing a tool can handle for you.
You don’t have to take our word for it. Operators are already wiring AI into their onboarding.
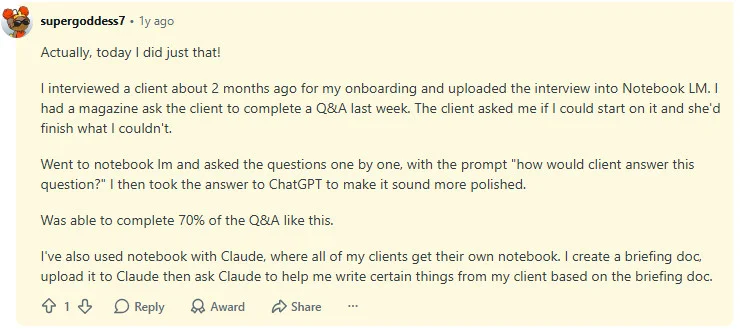
— a freelancer in r/notebooklm, who kicks it off by recording the client interview and uploading it during onboarding.
The pattern is the same everywhere: give the AI the client’s context once, and let it do the repeat drafting. The process below just makes that repeatable.
The Automated Onboarding Pipeline From Intake to Client Brief
Here’s the process, step by step. The whole idea is that nothing starts from a blank page. Claude does the thinking, a form gives it the client’s answers, and SocialPilot turns the finished plan into scheduled posts. Each step below shows which tool runs it, the exact prompt to paste, and what you should see back.
Connect These Tools First
Before you run the process, connect a few tools to Claude so it can pull real data and act, not just chat. An MCP (Model Context Protocol) connection is just a way to let Claude use an outside tool, like reading your SocialPilot account or scraping a page. Set these up once in Claude Desktop (or claude.ai with connectors), and every future client runs on the same setup.
| Tool | What it does in this process | How you connect it |
| SocialPilot MCP | Reads the client’s posts and numbers for the audit (Step 2), and schedules the calendar (Step 6) | Connect through its MCP integration |
| Apify MCP | Scrapes competitor posts for the scan (Step 3) | Add it from Claude’s Extensions directory with an API token |
| Slack MCP | Sends the client brief to their Slack channel and reads the reply (Step 7) | A one-time edit to your config file |
| Intake form (Typeform or Tally) | Collects the client’s answers for Step 1 | Share the form link, then paste the responses into the chat |
For the full setup walkthrough, see how to set up Claude for your agency.
Below is the full workflow, with the tool responsible for each step and the exact Claude prompt where one applies.
Step 1 — Turn Client Intake Into a Structured Process (Claude + a Form Tool)
Start by cutting down the back-and-forth email. Instead of a kickoff call where you take notes, send one form built in a tool like Typeform or Tally. Claude writes the questions, and the form collects the answers.
Your form should capture:
- Brand voice and tone (how should the brand sound?)
- Content preferences (topics, formats, and content to avoid)
- Social account access and required permissions
- Approval workflow (who reviews content, and how do approvals happen?)
- 3 to 5 key competitors for market context
- Brand differentiators (what makes the business unique?)
- Target audience and ideal customer profile
- Current performance metrics (followers, engagement, leads, or other KPIs)
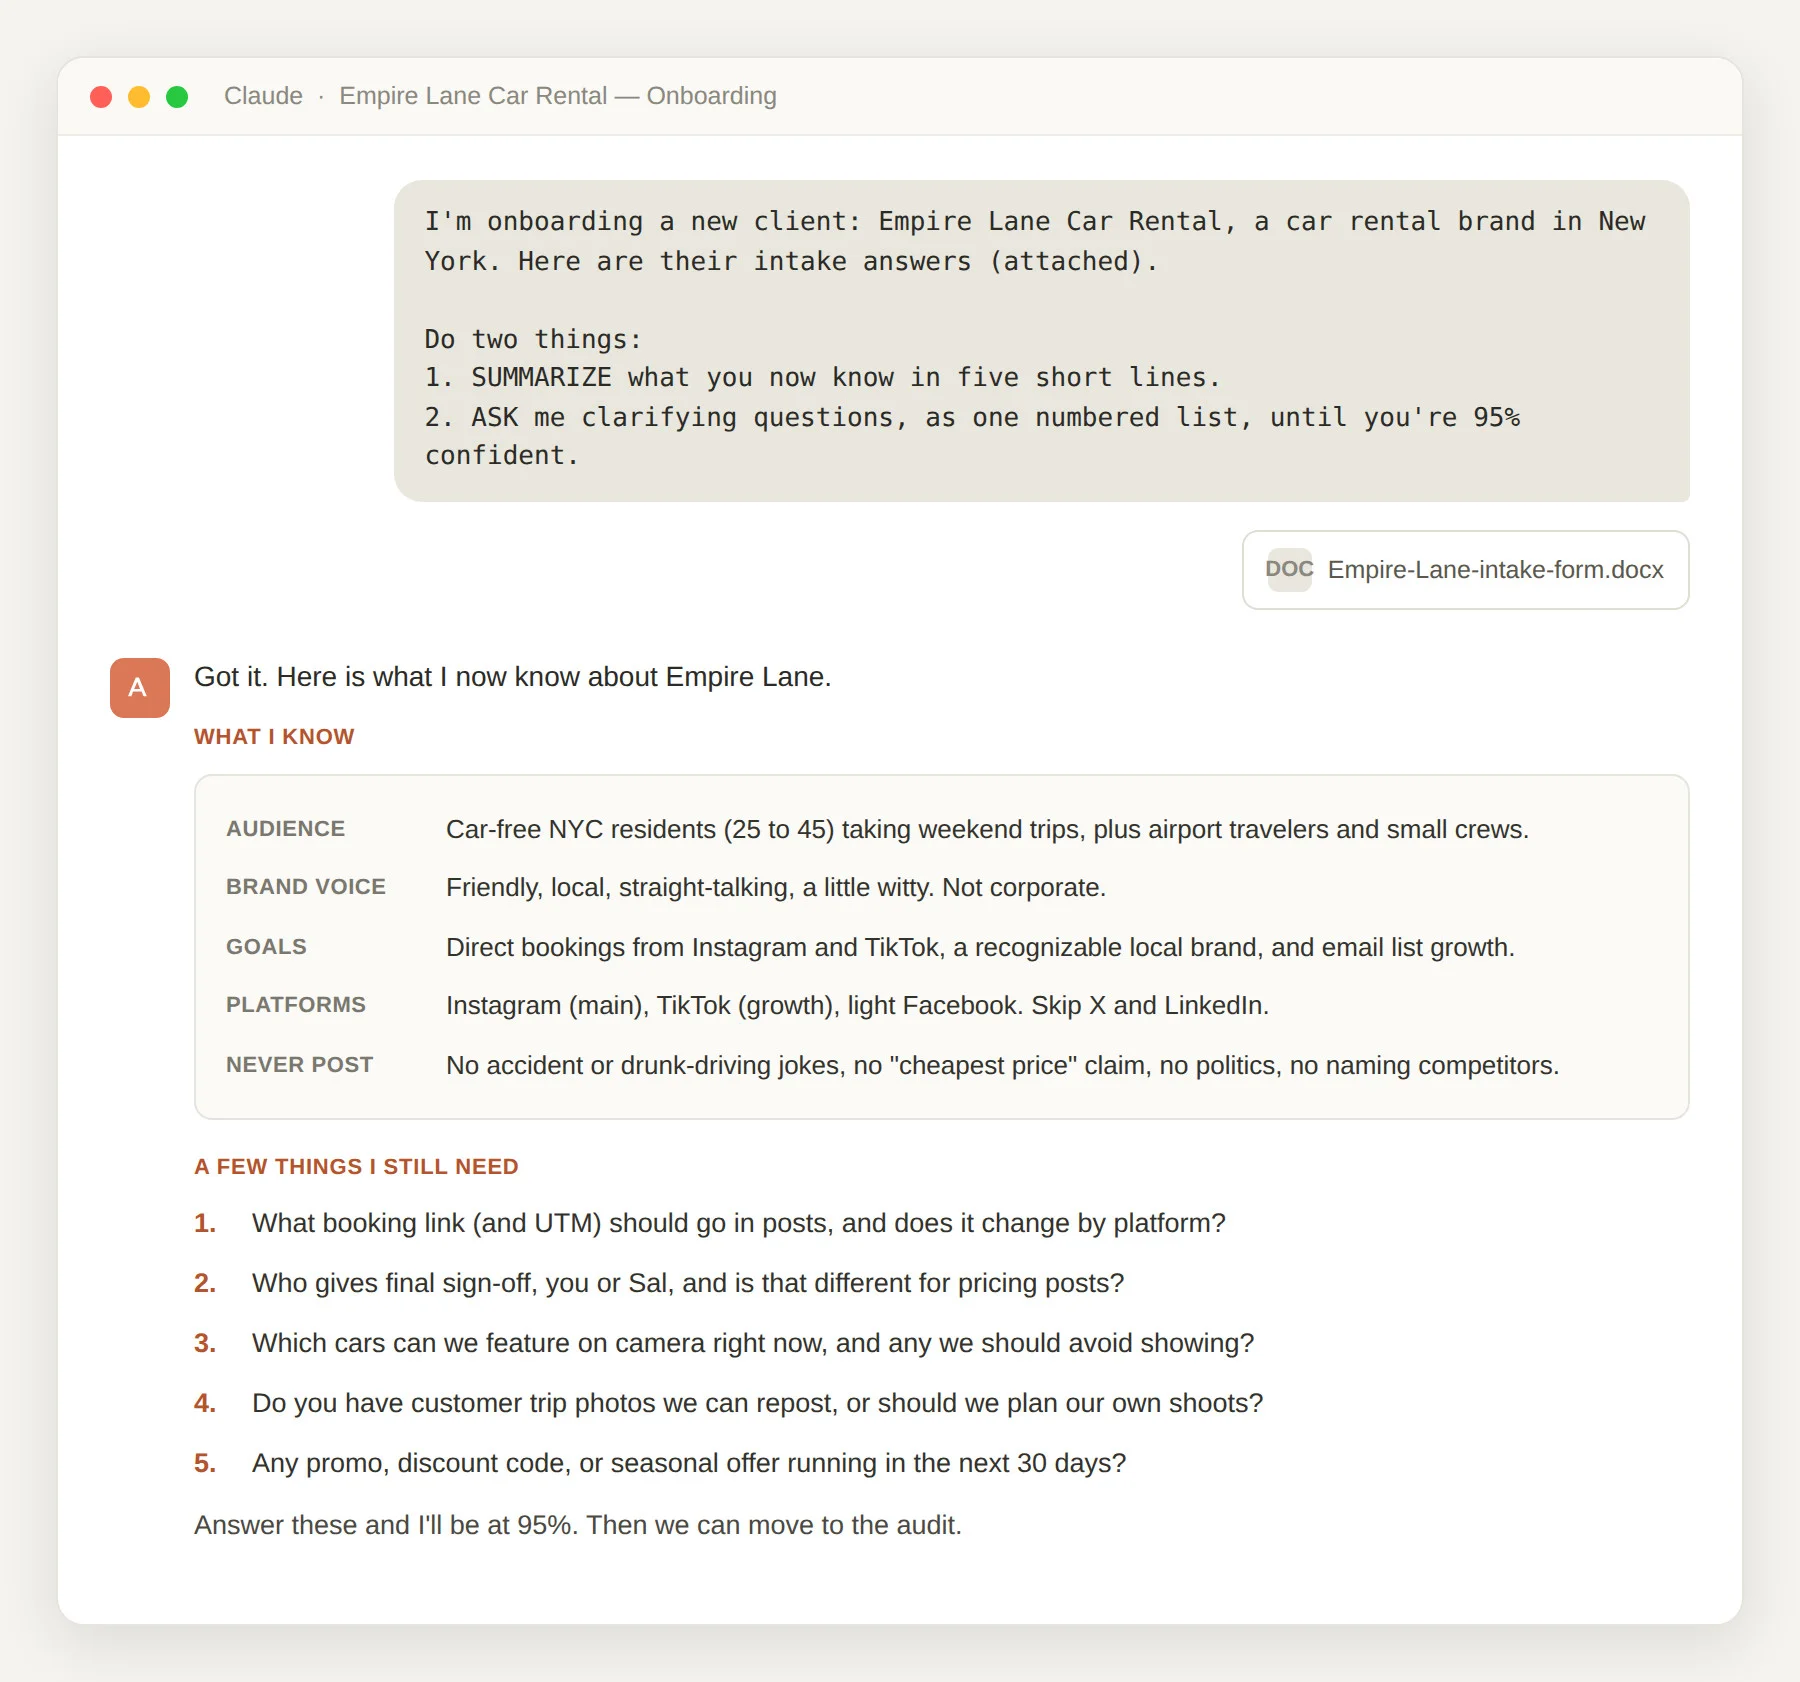
Then let Claude fill in the gaps. Paste the form answers into the chat and give it this prompt:
Here are their intake answers: [paste the form responses]
Do two things:
1. SUMMARIZE what you now know in five short lines: audience, brand voice, goals, platforms, and what they never want posted.
2. ASK me clarifying questions, as one numbered list, until you are 95% confident you understand their brand voice and offer.
What you’ll see: Claude gives you a five-line summary, then a numbered list of follow-up questions about anything thin or missing. You answer them in the same chat, so a plain form turns into a real conversation. Some managers add a target too, like getting access sorted in a day or two, which one onboarding guide puts at 24 to 48 hours. So you have a deadline from day one.
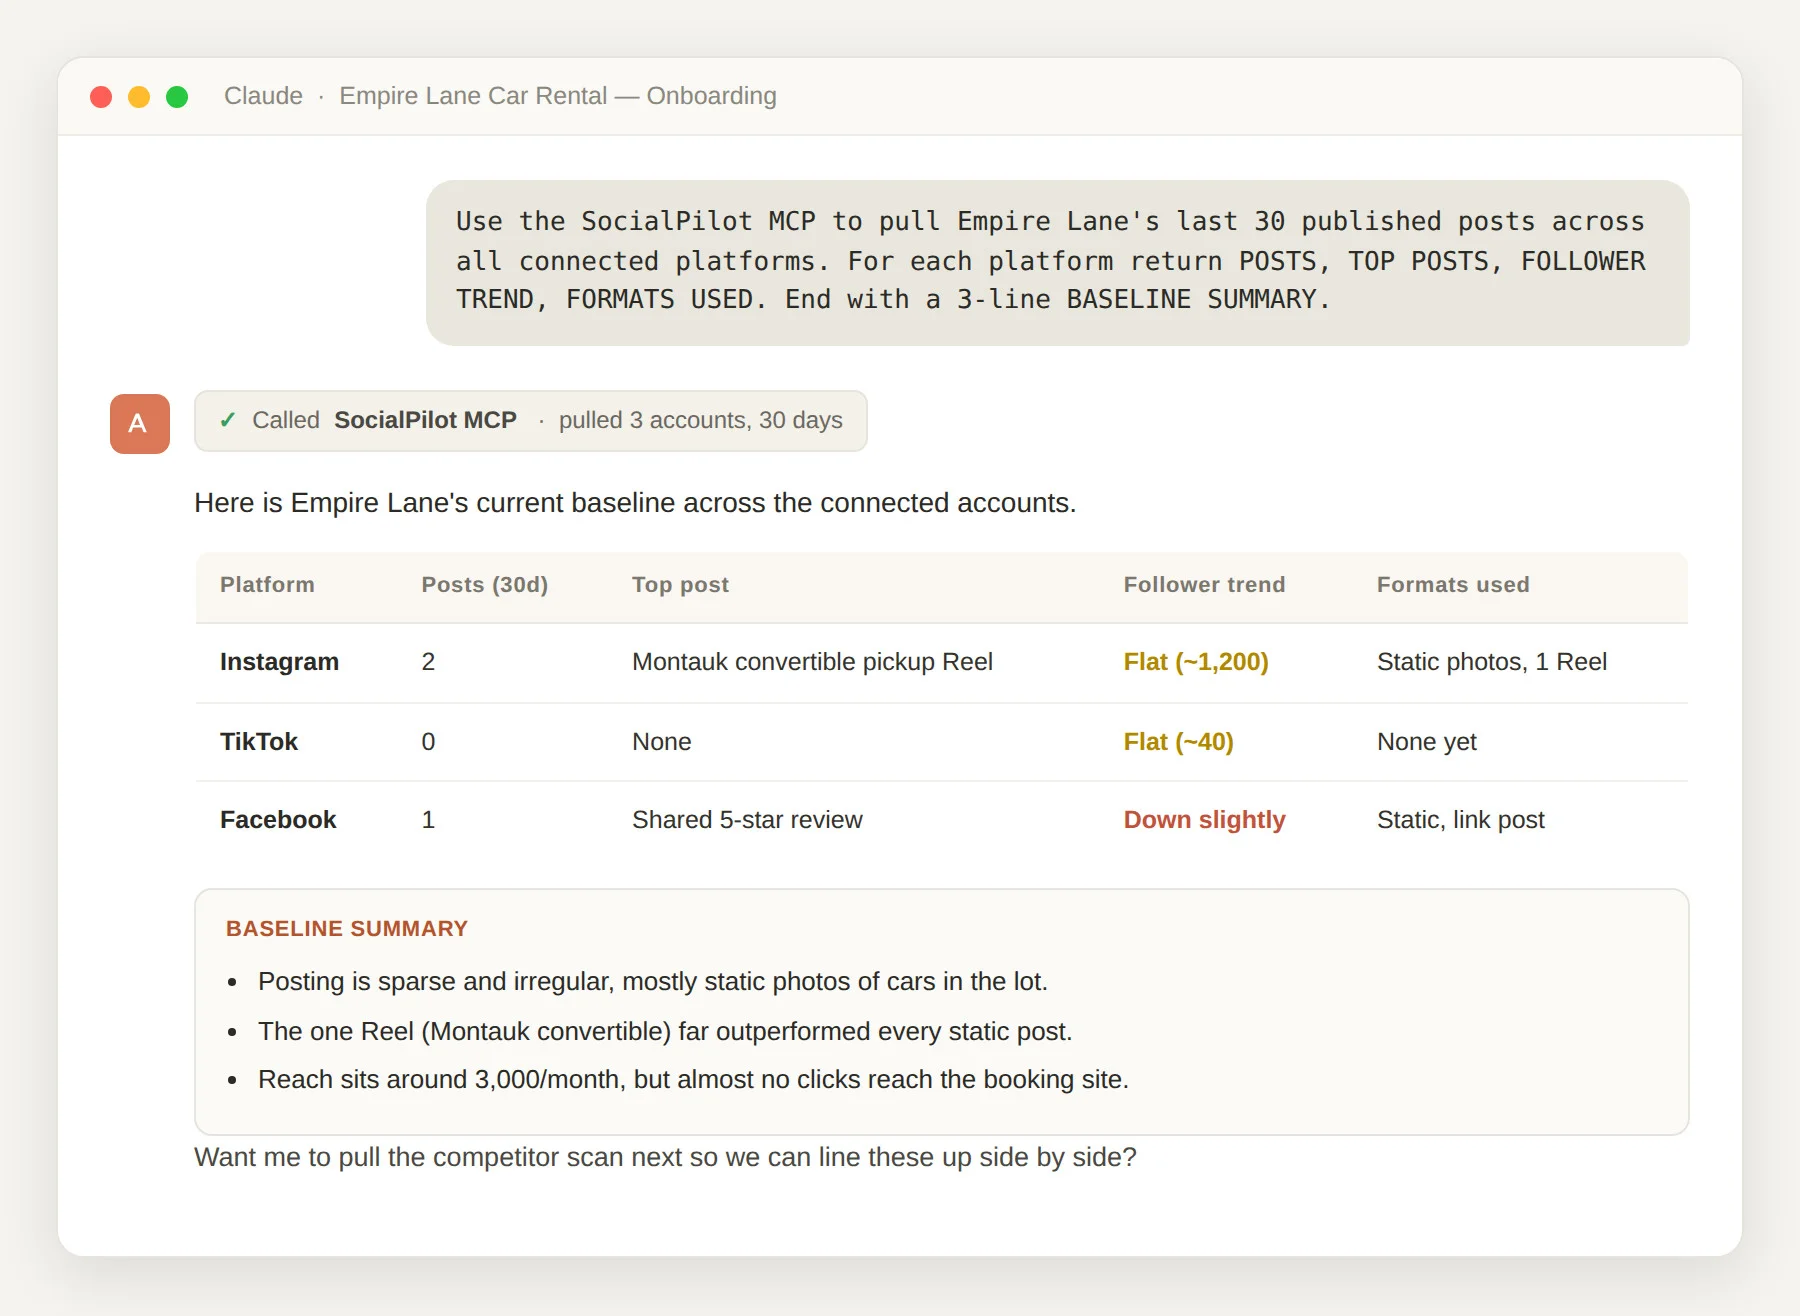
You can’t plan next month until you know what last month looked like. Before Claude touches strategy, you need the client’s real starting point. Which accounts are active, what’s been posting, and how it did. Doing that by hand from each app is slow, and the numbers never quite line up.
Connect the client’s accounts in one workspace so you can manage every client account from a single dashboard.
Then let Claude pull the numbers for you with this prompt:
For each platform, return:
– POSTS: Last 30 published posts
– TOP POSTS: the 3 best by engagement, with format and topic
– FOLLOWER TREND: up, flat, or down
– FORMATS USED: reels, carousels, static, stories
End with a 3-line BASELINE SUMMARY of what’s working and what’s thin.
What you’ll see: Claude pulls the client’s posts, follower growth, and top posts straight into the chat, with no logging into five apps. That baseline is what it reads in the next two steps.
Step 3 — Competitor Scan (Apify MCP)
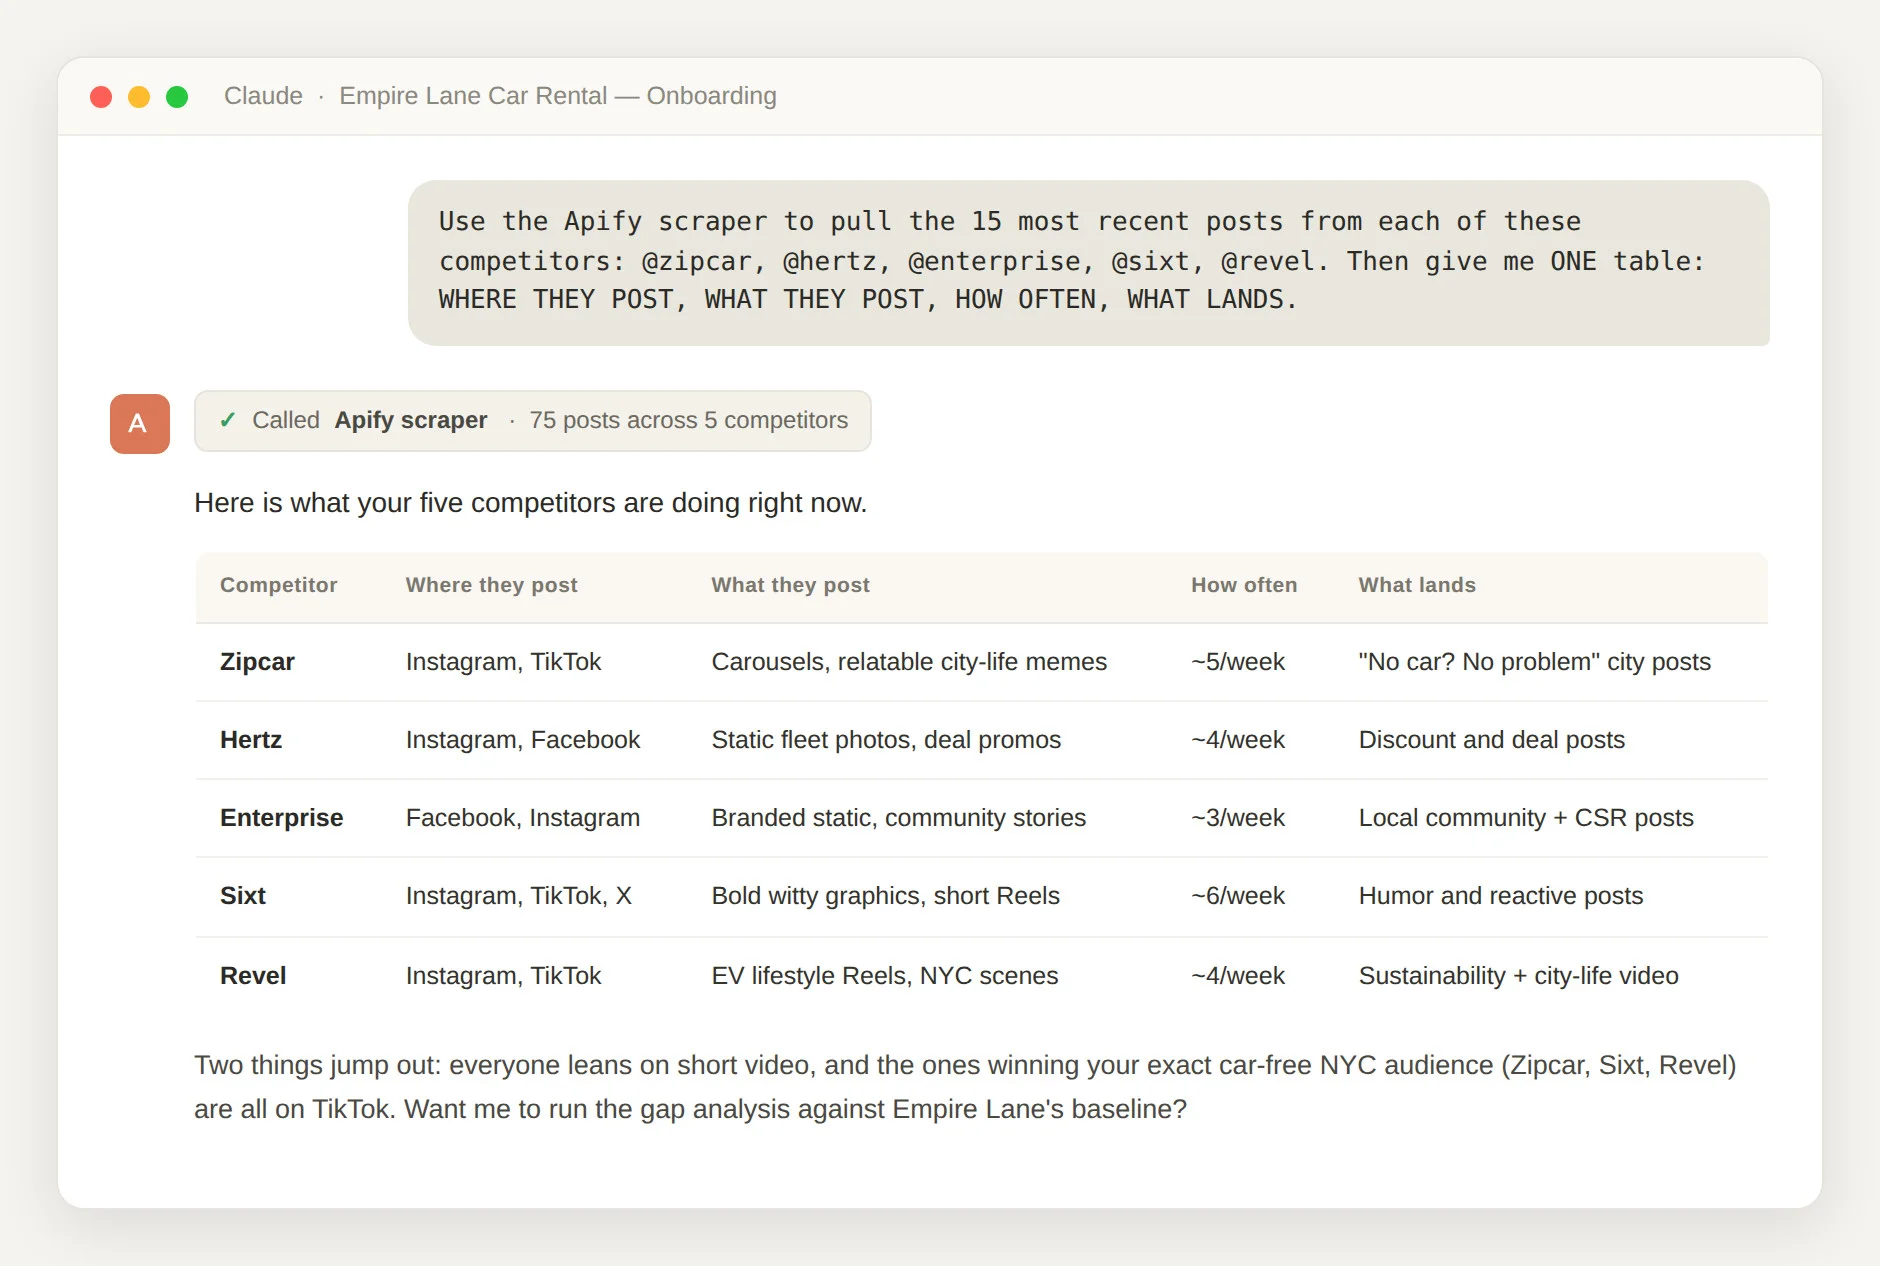
You already asked for three to five competitors in the intake. Now Claude turns those names into a clear read, instead of a vague “they post a lot.” Give it this prompt:
For each post, capture: platform, format, topic, date, and engagement.
Then give me ONE table across all competitors with these columns:
– WHERE THEY POST: active platforms, and where they’ve gone quiet
– WHAT THEY POST: top formats (reels, carousels, static, long-form)
– HOW OFTEN: rough posts per week, per platform
– WHAT LANDS: the post types pulling the most comments and shares
What you’ll see: Claude scrapes the competitors’ recent posts and fills in the four columns below, using their real activity, not a guess.
| What Claude checks | What it looks at | Why it matters |
| Where they post | Which platforms each rival is active on, and where they’ve gone quiet | Shows where attention is actually being won |
| What they post | Reels, carousels, plain posts, long-form, user photos | Tells you which format to lead with |
| How often | Rough posts per week, per platform | Sets a fair target for the client’s calendar |
| What lands | Which posts pull comments and shares | Points to what the audience likes |
For the by-hand version, our walkthrough on how to run a competitor analysis covers the numbers to track. Claude does the reading and spots the patterns in one go, so you’re not clicking through five profiles all afternoon.
Step 4 — Do Gap Analysis Using Claude Reasoning
Now you have two things: the client’s starting point from Step 2 and the competitor scan from Step 3. Claude puts them side by side and points out where the client is behind.
Give it this prompt to Claude:
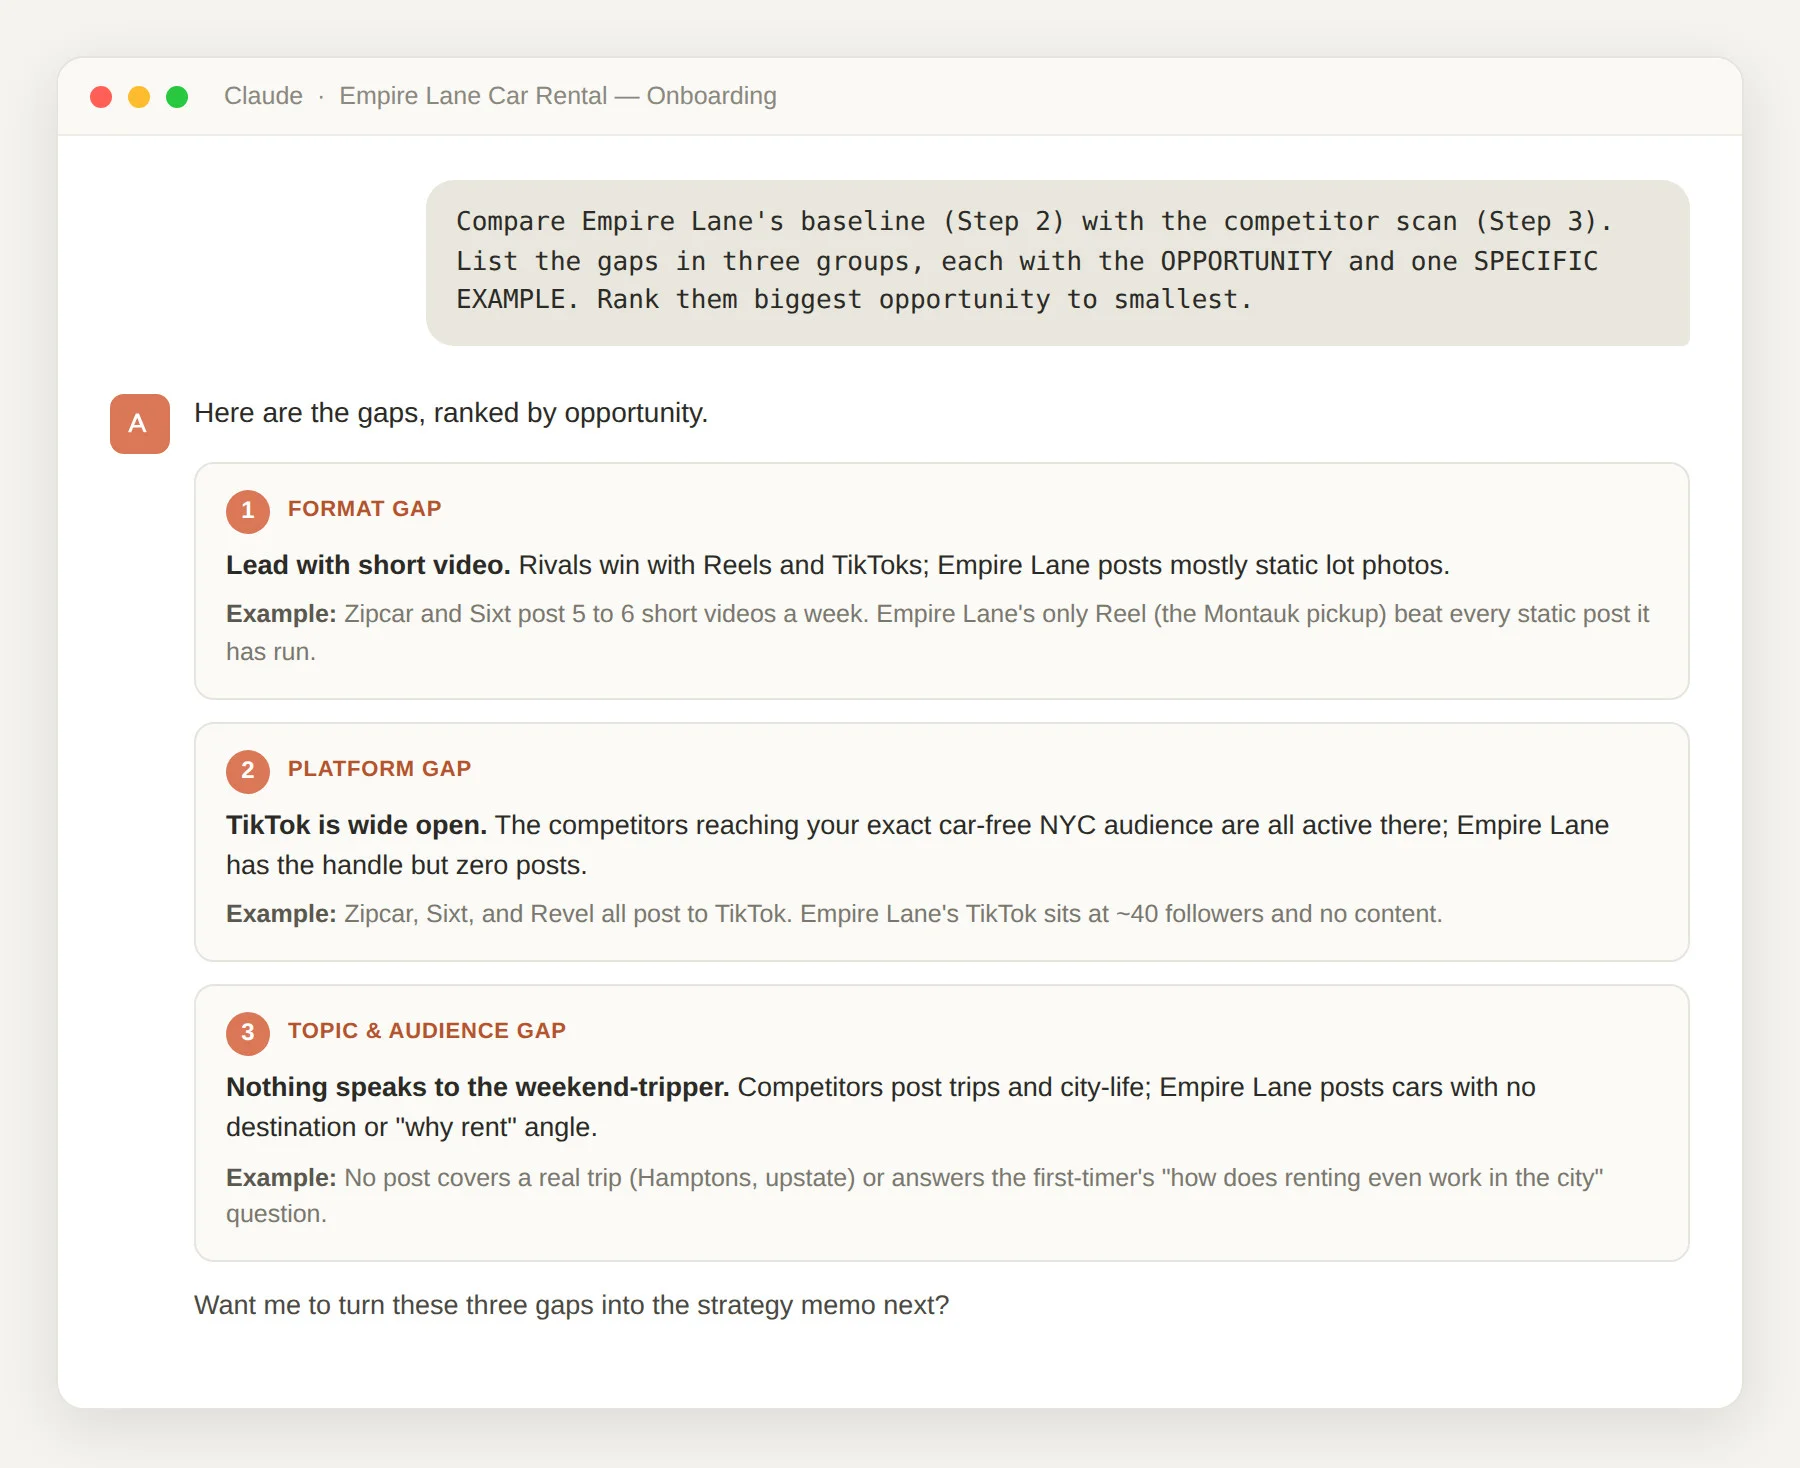
List the gaps in three groups. For each gap, give the OPPORTUNITY and one SPECIFIC EXAMPLE from the data:
– PLATFORM GAP: where rivals are active and the client is quiet
– FORMAT GAP: formats that work for rivals but are missing here
– TOPIC AND AUDIENCE GAP: people or topics the client ignores
Rank the gaps from biggest opportunity to smallest.
What you’ll see: a ranked list of named gaps, not “do more,” but exactly what’s missing and why it matters.
| Gap type | The question Claude answers | Example |
| Platform gaps | Where are competitors active and the client quiet? | “Rivals post Reels four times a week; client posts none.” |
| Format gaps | Which formats work for rivals but are missing here? | “Carousels pull comments; client posts only plain images.” |
| Topic and audience gaps | Which people or topics is the client’s content ignoring? | “Nothing speaks to the small-business buyer.” |
This is where onboarding stops feeling generic. Every gap is based on this client’s own numbers and this client’s own rivals. A stock template can’t give you that.
Step 5 — Ask Claude to Generate a Strategy Memo for Your Client
The gap analysis tells you what’s wrong. The strategy memo says what you’ll do about it. This one is for your team, not the client. Claude turns the gaps into three to five content themes (the topics every post ties back to) and sets the rules that keep the account from turning messy.
Two of those rules matter most, and both belong here, not in some fuzzy “expectations” chat later. The revision limit sets how many rounds a post gets before it goes out. The approval rule sets what “approved” actually means. Sort out both now, and you head off the endless feedback loop before it starts.
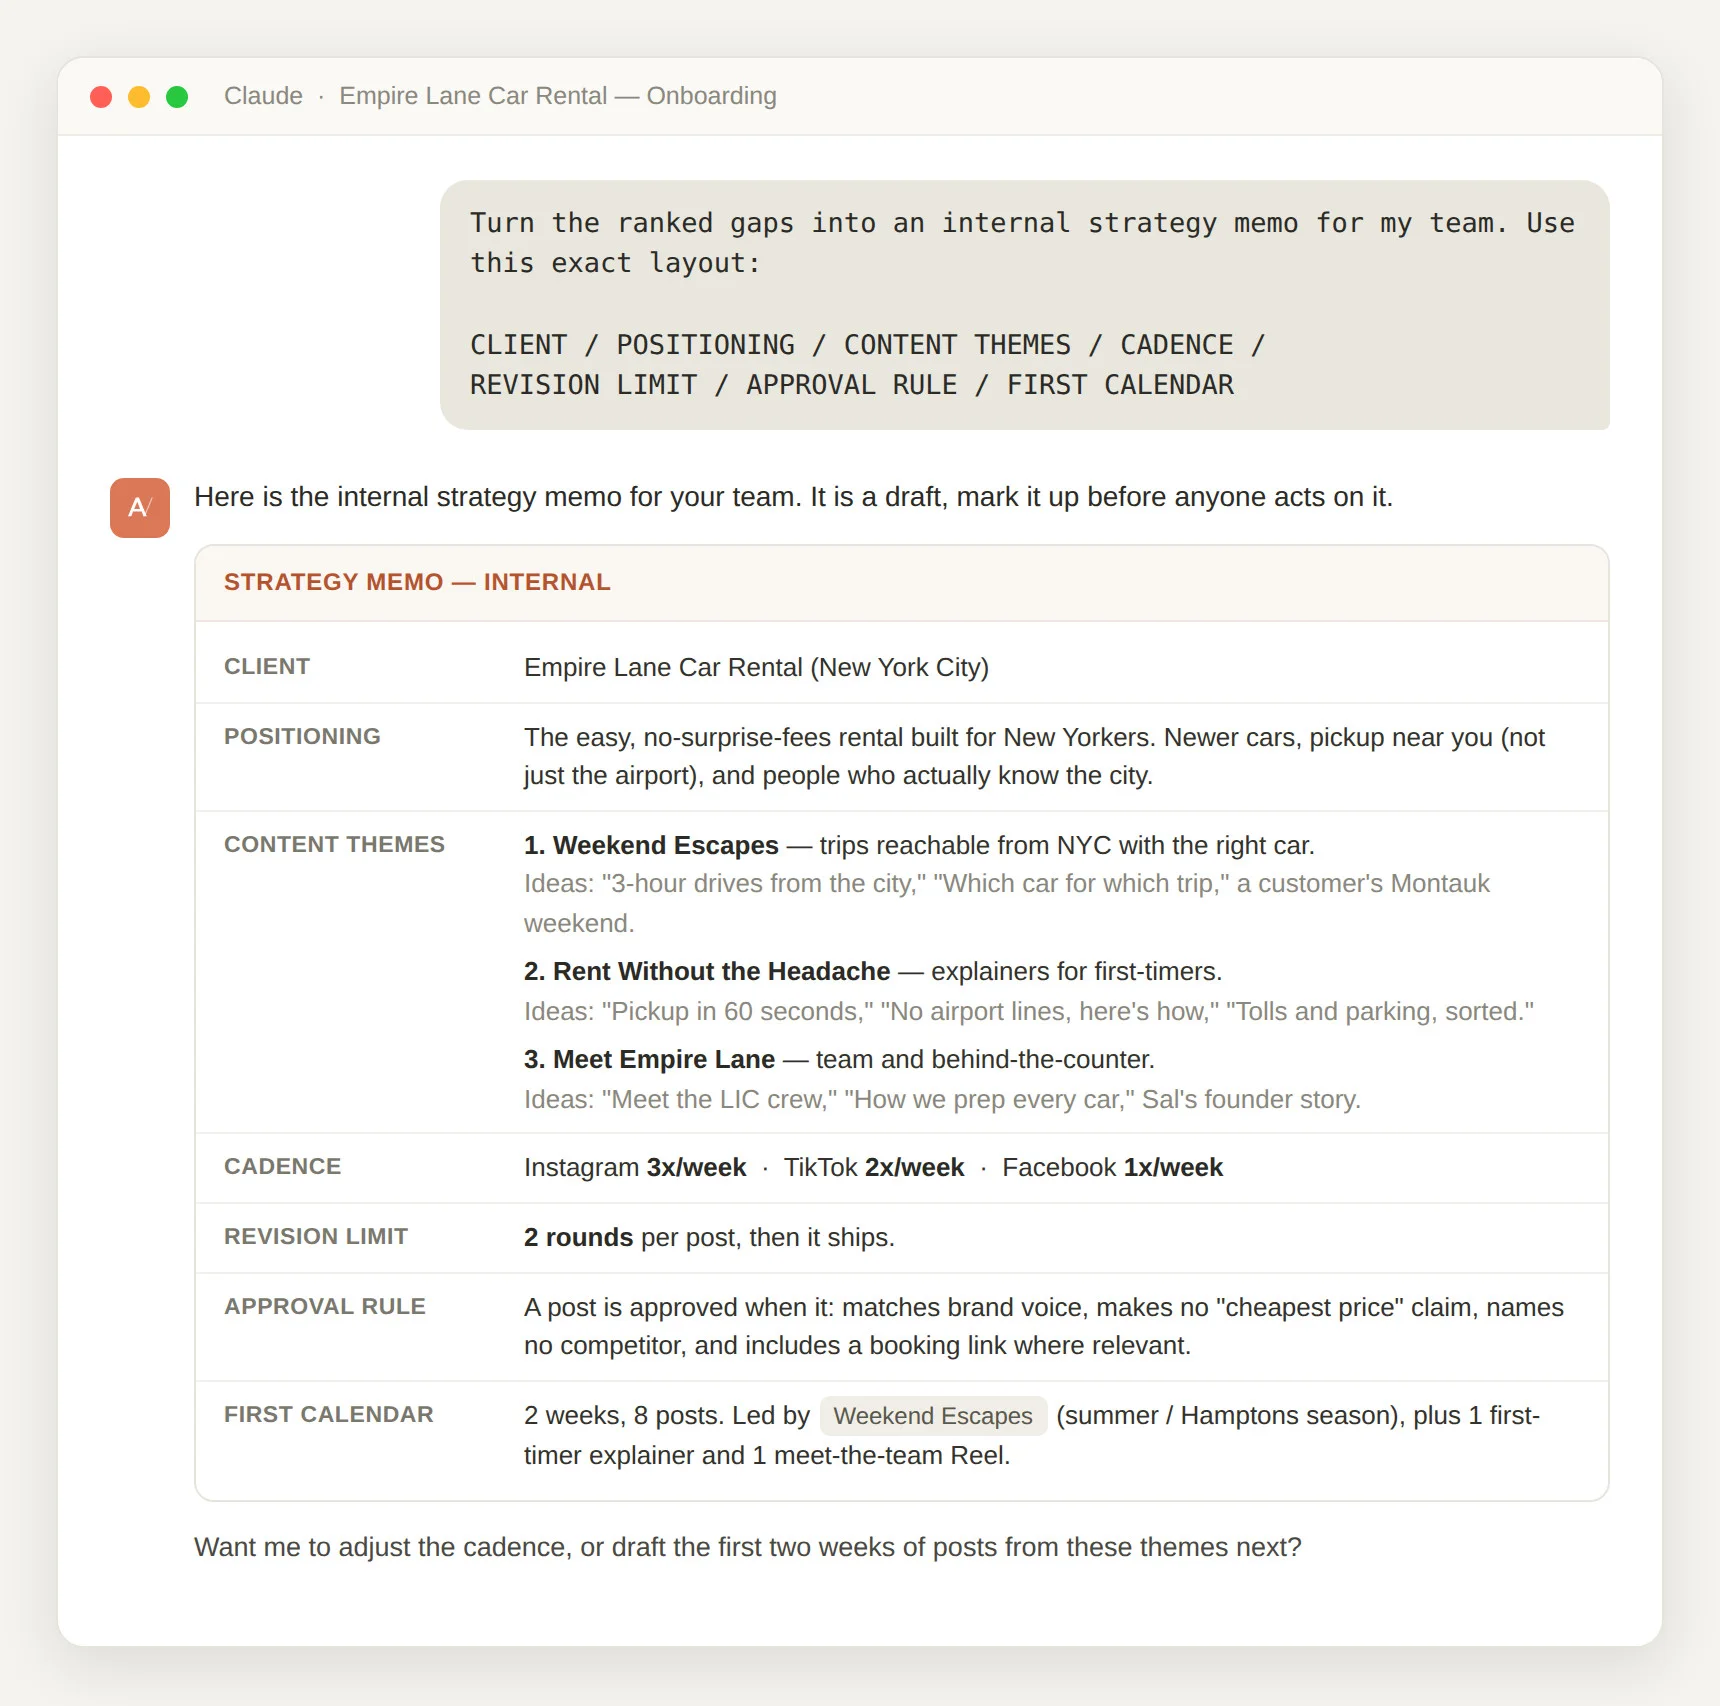
Give Claude this prompt:
CLIENT: [Client Name]
POSITIONING: one line on how they stand out from rivals
CONTENT THEMES: 3 to 5 themes, each with 2 to 3 post ideas
CADENCE: posts per week, per platform
REVISION LIMIT: how many rounds a post gets before it publishes
APPROVAL RULE: the checklist a post must pass to be “approved”
FIRST CALENDAR: what the opening two weeks will cover
What you’ll see: Claude drafts the internal memo in exactly that layout. You read it, mark it up, and change anything before anyone acts on it.
| Memo section | What it holds |
| Positioning | One line on how the client stands out from rivals |
| Content themes | Three to five topics, each with two or three post ideas |
| How often | Posts per week per platform, based on what rivals do |
| Revision limit | How many rounds a post gets before it publishes |
| Approval rule | The short checklist a post has to pass to count as approved |
| First calendar | What the opening two weeks will cover |
Databar’s own numbers show how big this change is. Onboarding work that “typically requires a senior strategist spending 20 to 40 hours” drops “to 4 to 8 hours” once the thinking is set up this way, per Databar. That’s the gap between a client who waits and a client who sees a plan in a few days.
The memo is a plan, but it won’t post anything by itself. Step 6 turns the themes into a real two-week calendar, so the first posts have actual dates. Building it from the memo takes four moves:
- Create a client workspace and connect the accounts you checked in Step 2.
- Drop each content theme into slots on the calendar, using the posting rate the memo set.
- Draft the first two weeks of posts (Claude can write these in the client’s voice from the intake) and load them in one by one or as a bulk upload.
- Send every post through the approval step, so nothing goes out before sign-off.
You can hand the whole thing to Claude with this prompt:
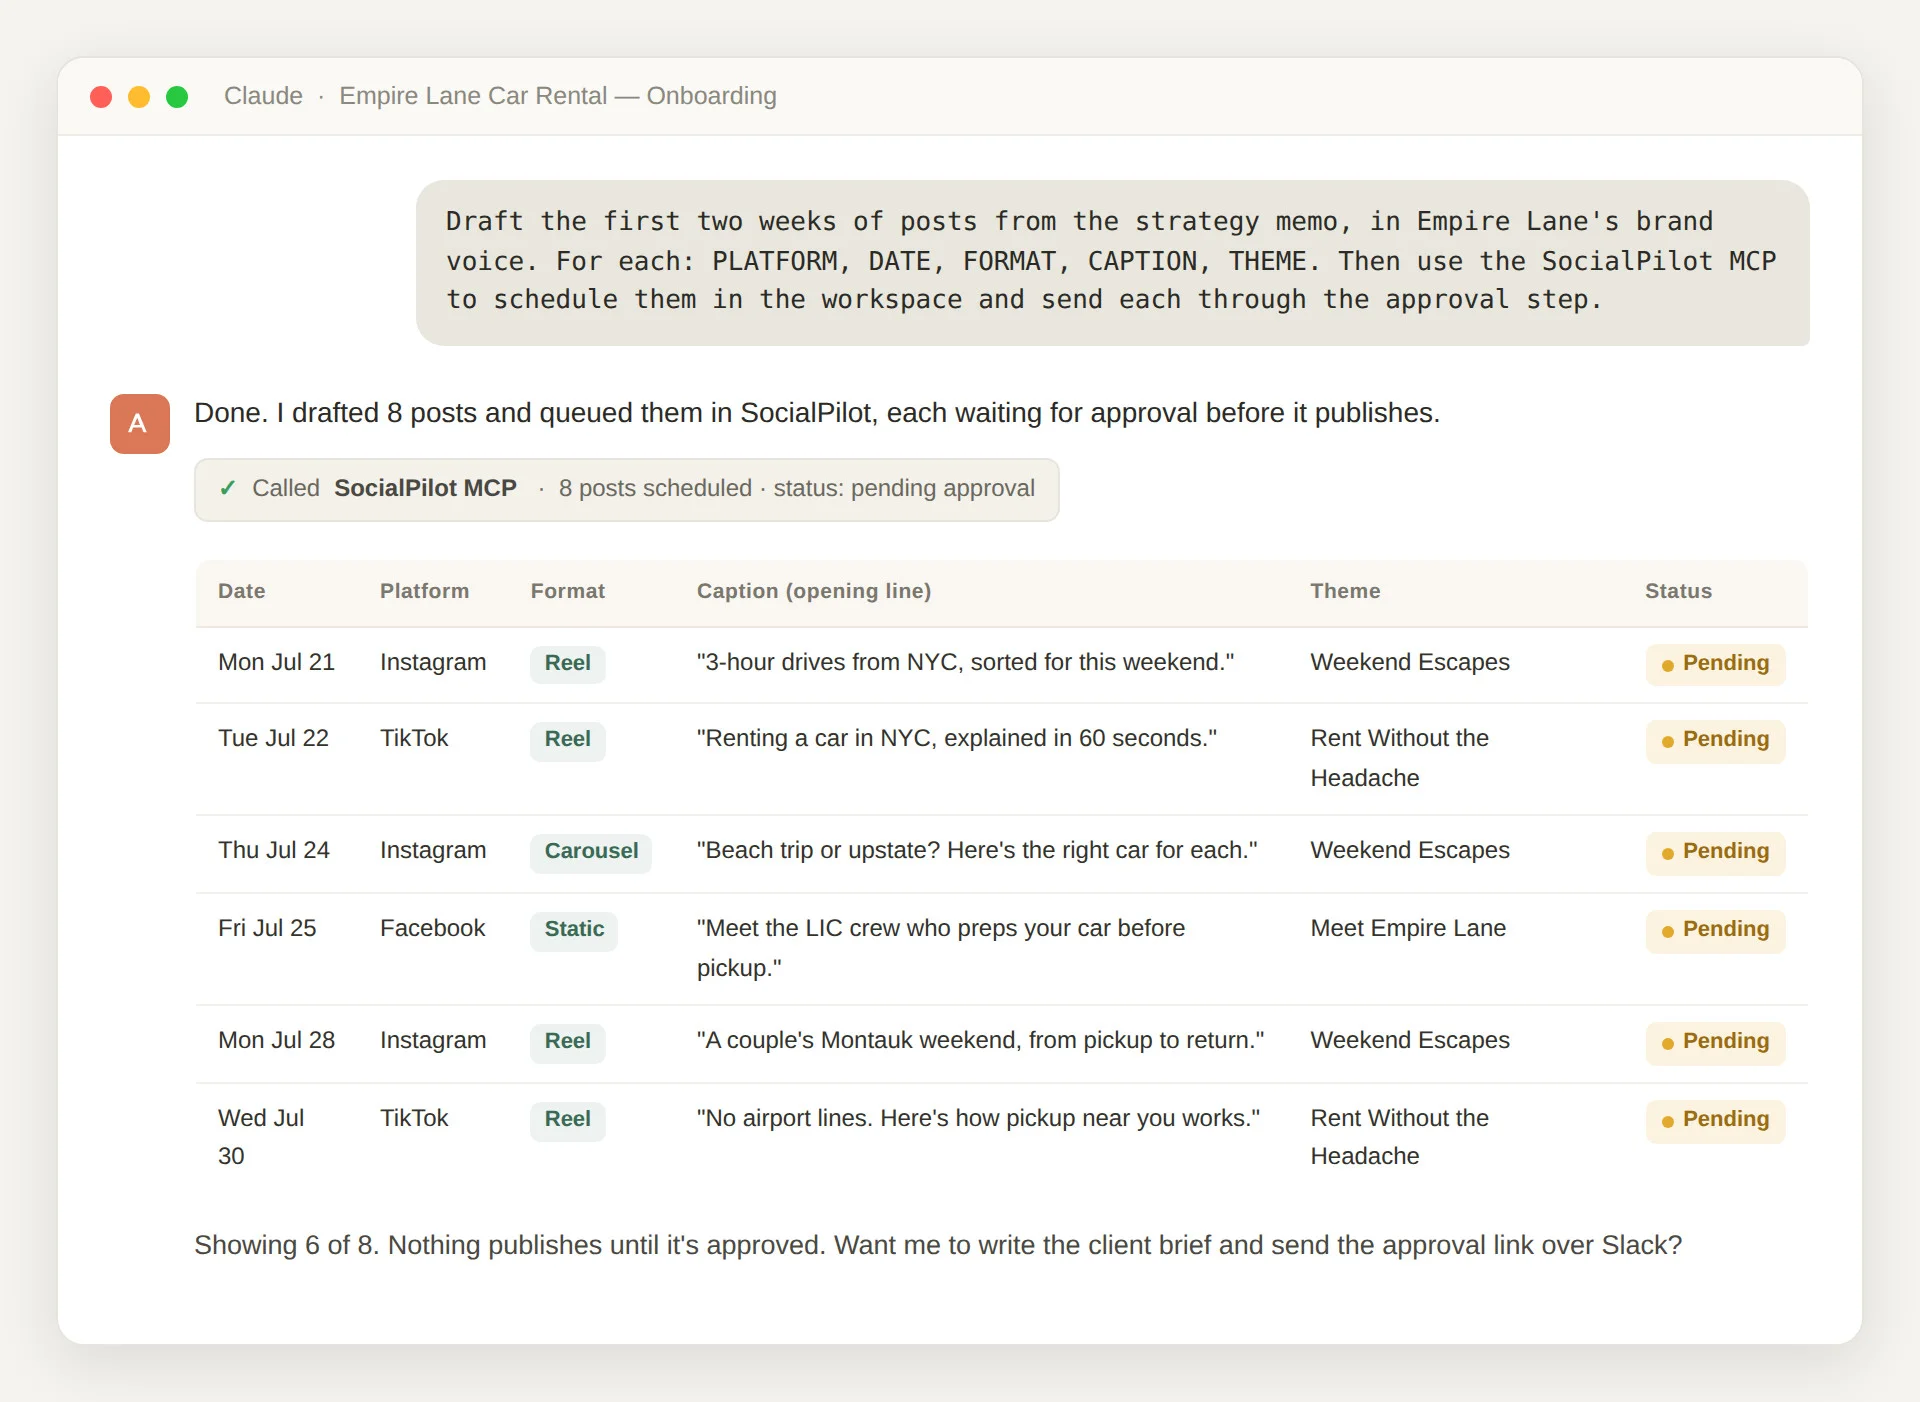
For each post, include:
– PLATFORM and DATE
– FORMAT: reel, carousel, static, or story
– CAPTION: ready to publish
– THEME: which content theme it maps to
Then use the SocialPilot MCP to schedule all of them in [Client Name]’s workspace, and send each post through the approval step so nothing publishes without sign-off.
What you’ll see: Claude writes the posts and queues them in SocialPilot on the dates you set, each one waiting for approval.
Our guide to build a content calendar covers the planning side. The point here is that the calendar and the schedule live in the same place. So the memo becomes real, dated posts in one sitting, instead of a file nobody opens again.
Step 7 — Ask Claude for the Client Brief (Sent by Slack and Email)
The last step answers the “when do posts start?” question head on. Claude writes a short brief from the strategy memo, the positioning, the themes, how often, and the first two weeks.
Give it this prompt:
CLIENT: [Client Name]
THE PLAN: 3 lines on positioning and the content themes
POSTING: how often, per platform
FIRST TWO WEEKS: 4 to 6 sample posts, with dates
APPROVE HERE: [SocialPilot approval link]
Then use the Slack MCP to post this brief to [client’s Slack channel] and read their reply back to me.
What you’ll see: Claude posts the brief in the client’s Slack, adds the approval link, and can read their reply back to you. You send it where the client already talks to you: a Slack message for the quick yes, and an email for the record.
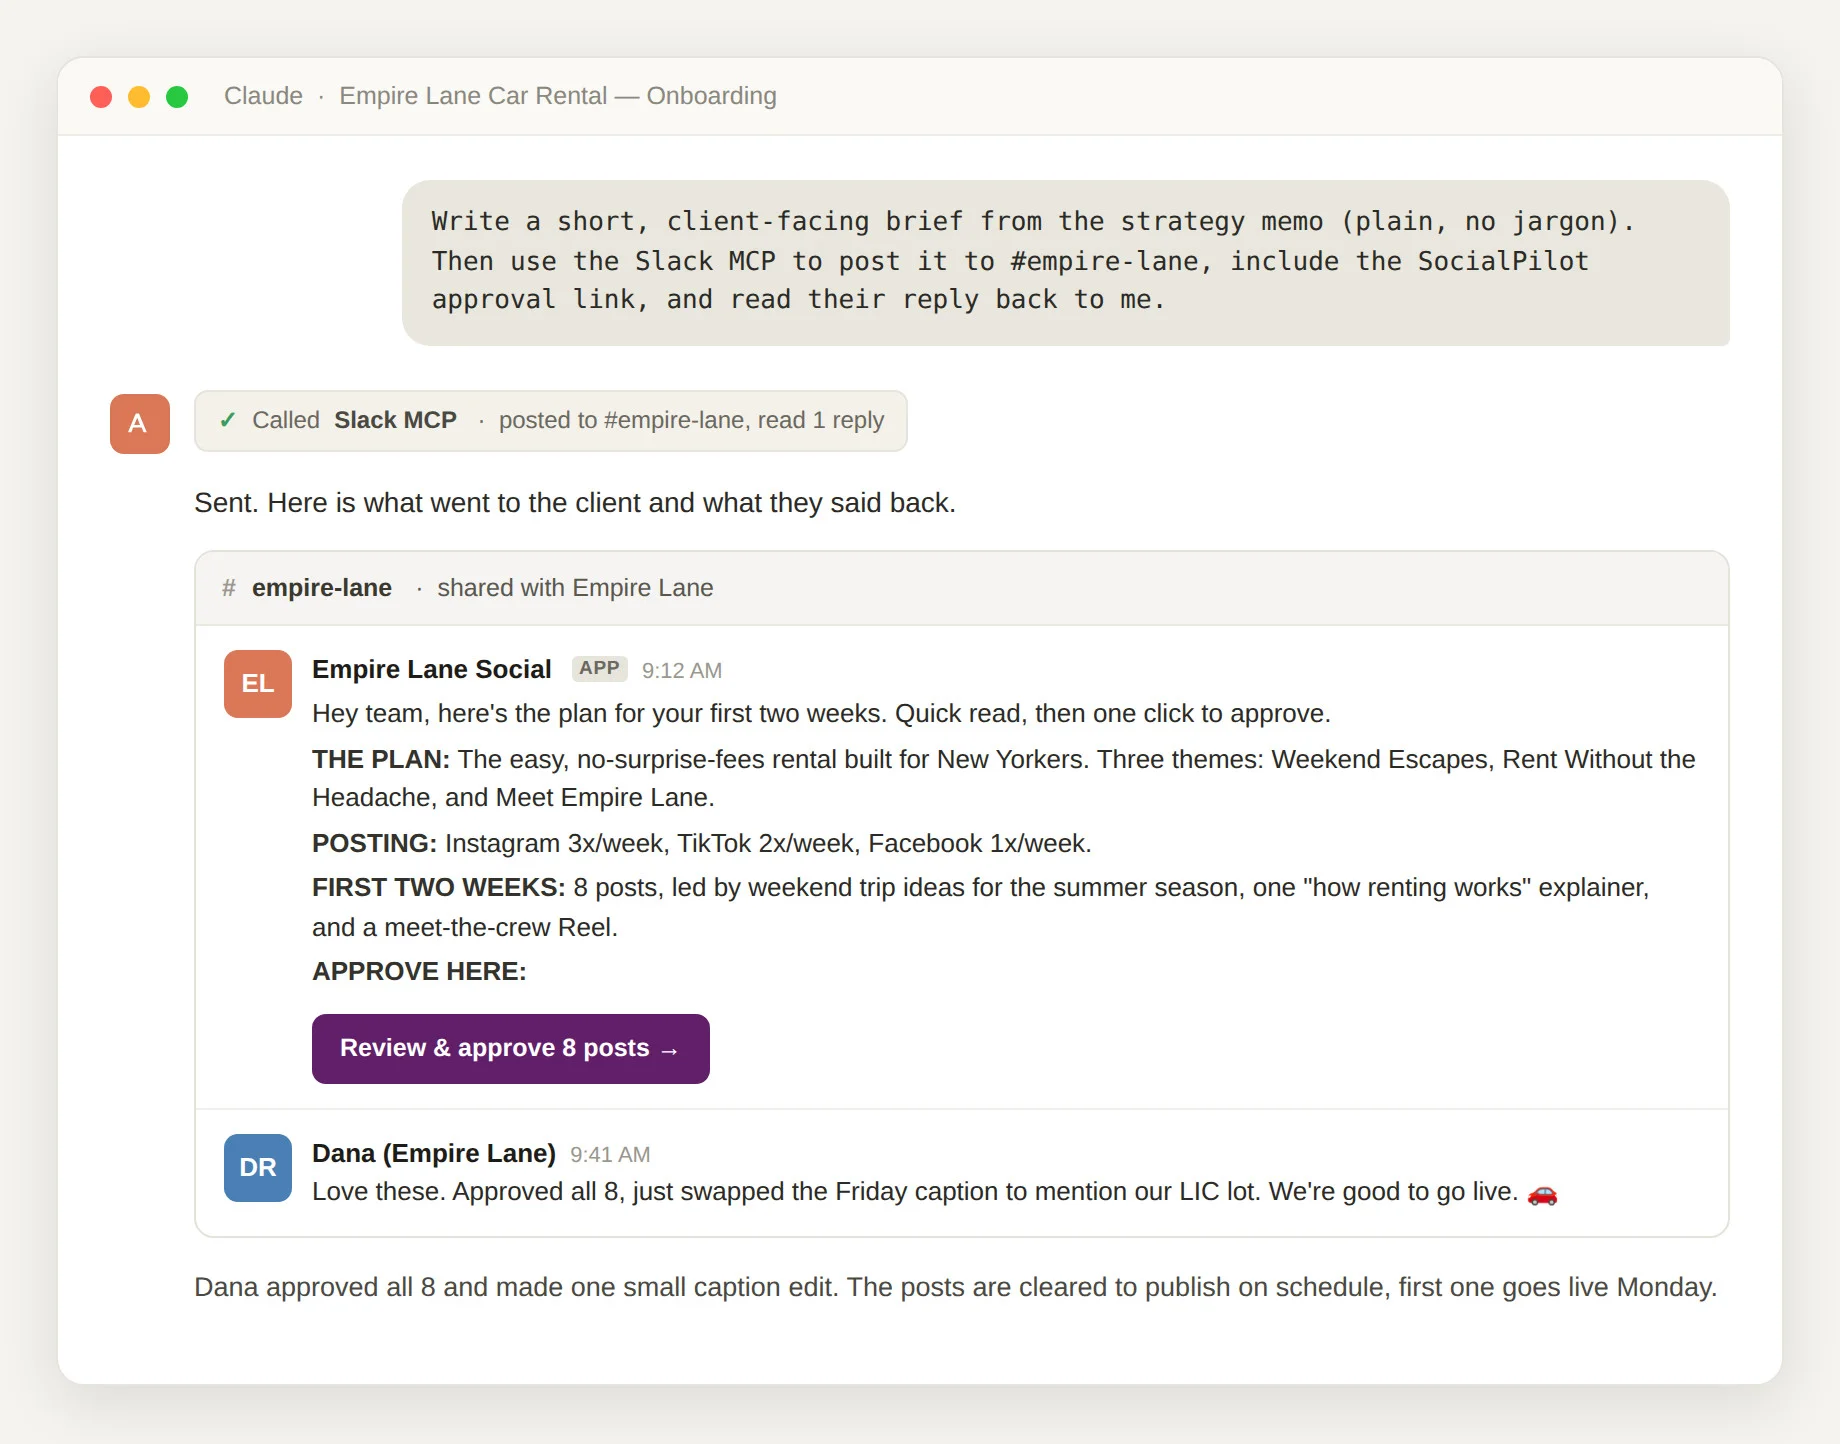
The brief ends with one link. It’s the SocialPilot approval link, where the client reviews the scheduled posts and approves them from their phone. Sending sign-off through client approval workflows in the same tool that will post them turns the content calendar approval process into one tap, not “another 40 minutes gone.” The client sees real, dated posts in week one, and you get a clean yes instead of a comment thread.
Realistic Onboarding Timelines Without the 30 or 90-Day Myth
You’ve seen onboarding sold as a fixed calendar. Thirty days here, ninety days there. Don’t put much weight on that number.
A fixed day count is really just a guess, because how long it takes depends on how fast the client hands over access and answers, not on a template.
What’s actually true: onboarding has a shape, even if it doesn’t have a fixed schedule. It moves through three stages:
- Housekeeping: access, files, and permissions
- Gathering: intake, audit, and competitor context
- Doing: strategy, calendar, and the first live posts
The process above skips none of them. It just takes the starting-over delay out of each one, so you move in days, not weeks.
That kind of compression matches what the broader research shows. McKinsey estimates that today’s generative AI can automate the tasks that absorb 60 to 70% of the time employees spend working, and that in marketing alone it could lift productivity by 5 to 15% of total marketing spend.
Campaigns that once took months, McKinsey notes, can now ship in weeks or even days. Onboarding is the same story: the thinking that used to fill a week gets done in an afternoon.
Speed isn’t the goal by itself. It’s how you stop losing money. Every day a paying client has nothing live is a day you’re working for free on that account. And the system stays put, because it lives in the tools, not in one person’s head.
The Sprint You Build Once Runs for Every Client After
This isn’t just about saving a few days. It’s that your next client sees value in week one instead of week four, and the process you set up once runs the same way for the client after that.
Onboarding stops being the part of the job you dread. And it shows the client early that hiring you was the right call. If you want to see where the posts go live, SocialPilot’s plans show the workspace, scheduling, and approval pieces that finish the job.


 Join 55,000+ social media managers


