Keeping up with Facebook content often feels like a full-time job, but it doesn’t have to be. Between brainstorming ideas, designing visuals, writing captions, and trying to post at the “right” time, it’s easy to feel stretched thin.
That’s where scheduling comes in. By planning and scheduling posts in advance, you can free up productive hours, stay consistent, and keep your feed active without being glued to your screen 24/7.
And consistency isn’t just a buzzword; it’s a proven engagement booster. According to Buffer, creators who posted at least once a week for 20+ weeks saw 450% more engagement per post than those who posted fewer than five times during the same period.
In this guide, you’ll learn how to schedule Facebook posts step by step, using three effective methods from Meta’s native tools to advanced scheduling platforms that let you bulk schedule.
Content Table:
- How to Schedule a Post on Facebook Page
- How to Schedule Post on a Facebook Group or Community
- How to Schedule a Facebook Story?
- How to Schedule Post on Facebook Using AI?
- How to Manage Scheduled Posts on Facebook?
Whether you’re managing a brand, agency, or personal page, these methods will help you boost engagement, save time, and take the stress out of your social media workflow.
Ready to dive in? Let’s get started.
How to Schedule a Post on a Facebook Page?
Scheduling posts on Facebook can help you reach your audience at the best times, but before you get into the scheduling process, here are a few things you need:
Make sure you have an active Facebook business page with permission from the administrator or editor. If you don’t have one, learn how to create a Facebook business page in a few minutes.
With these essentials in place, you’re ready to start the process. For those managing multiple social platforms, you might also want to explore comprehensive strategies for scheduling social media posts across different channels to maximize your content’s impact and maintain consistency across your entire social media presence.
How to Schedule Facebook Posts on Desktop
Meta Business Suite is a native tool from Meta and offers an easy way to schedule posts and reach your audience at the optimal times. Here are simple steps on how to use Meta Business Suite and schedule posts natively:
Step 1: Log in to Your Facebook Page
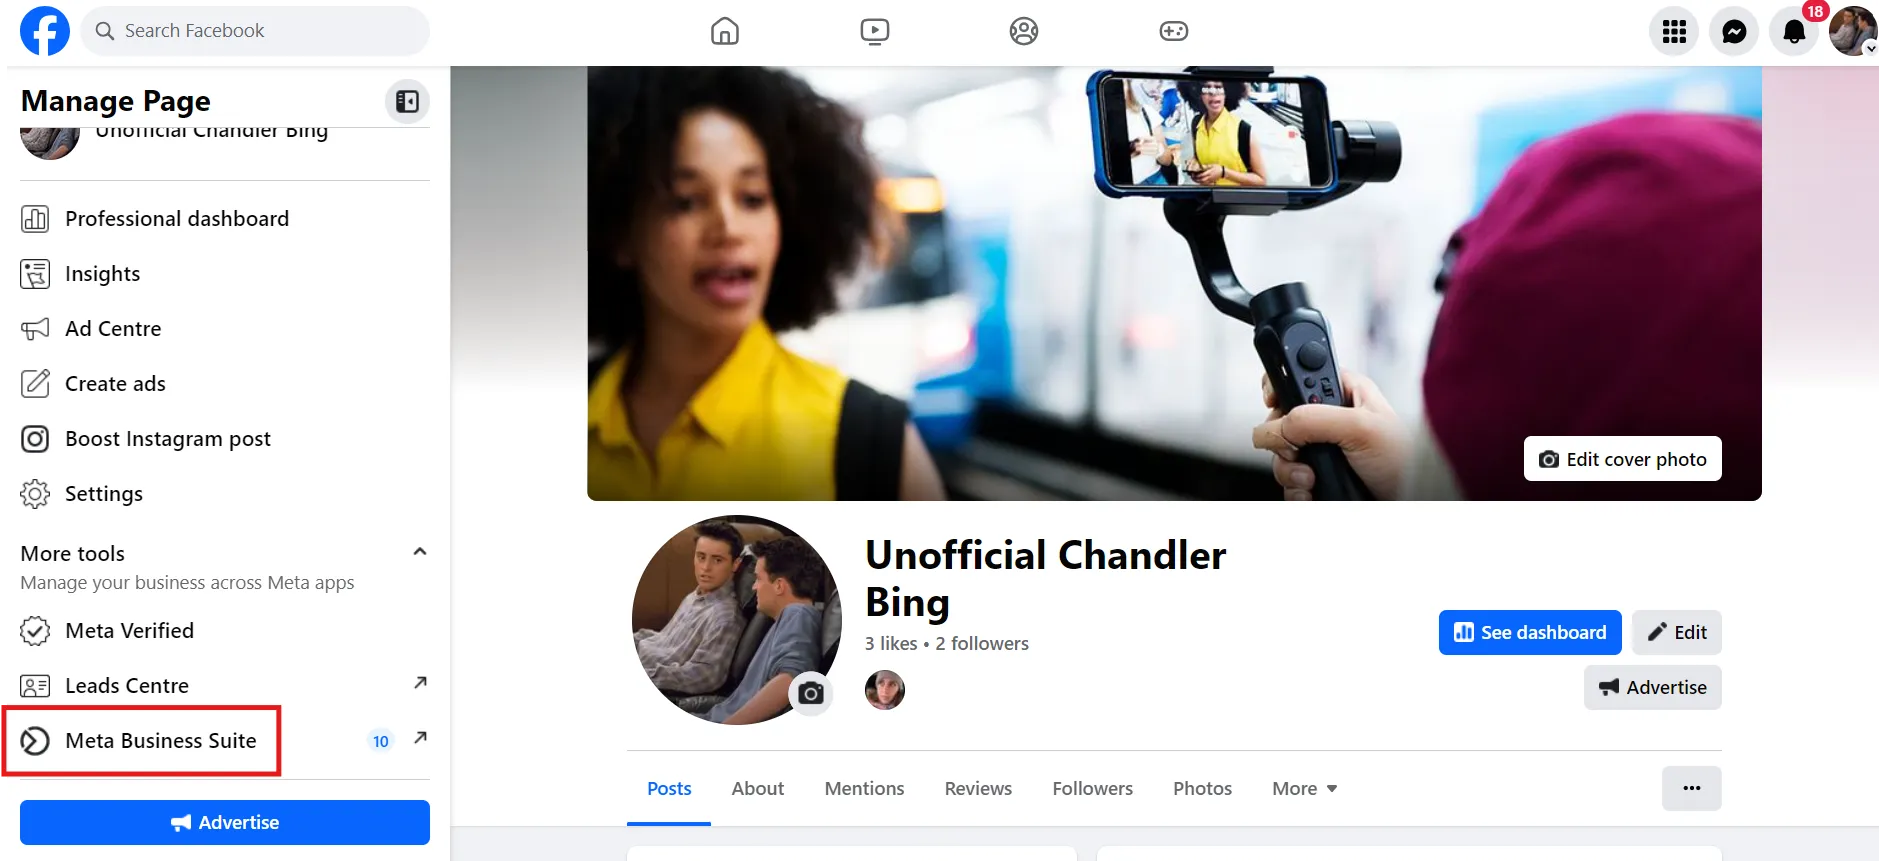
Start by logging into your Facebook account and selecting the profile from which you manage your business page. From the sidebar, click on “Meta Business Suite.”
Step 2: Select Planner from Meta Business Suite
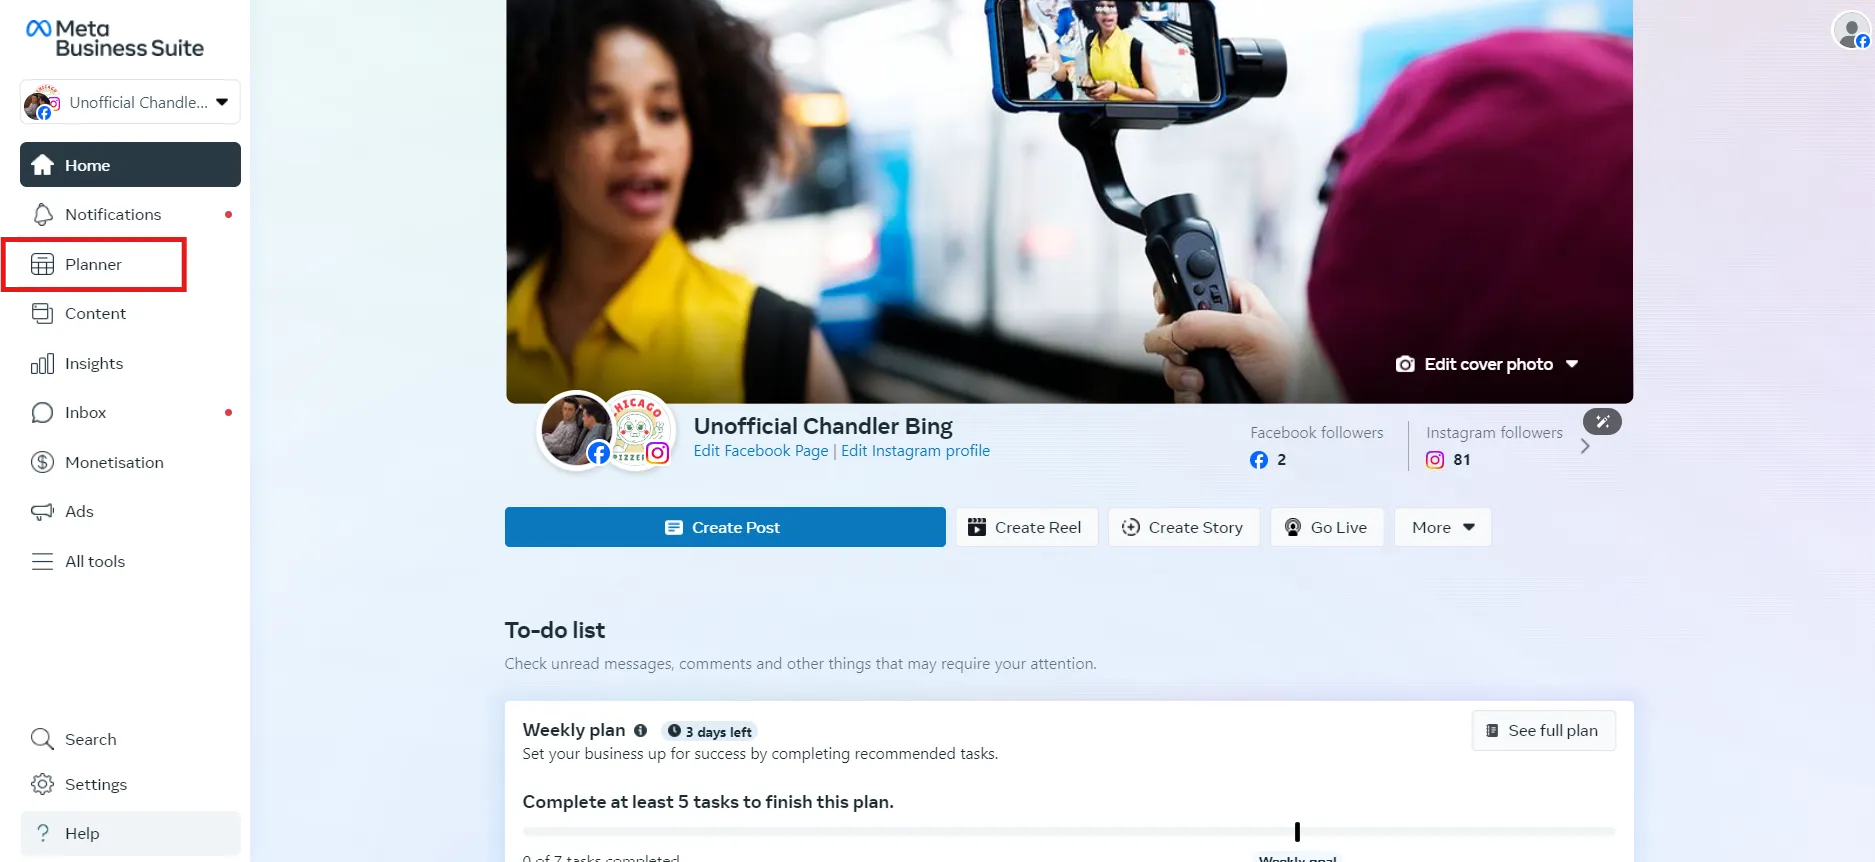
Once you’re in the Meta Business Suite, click “Planner” from the sidebar. This will open a calendar view.
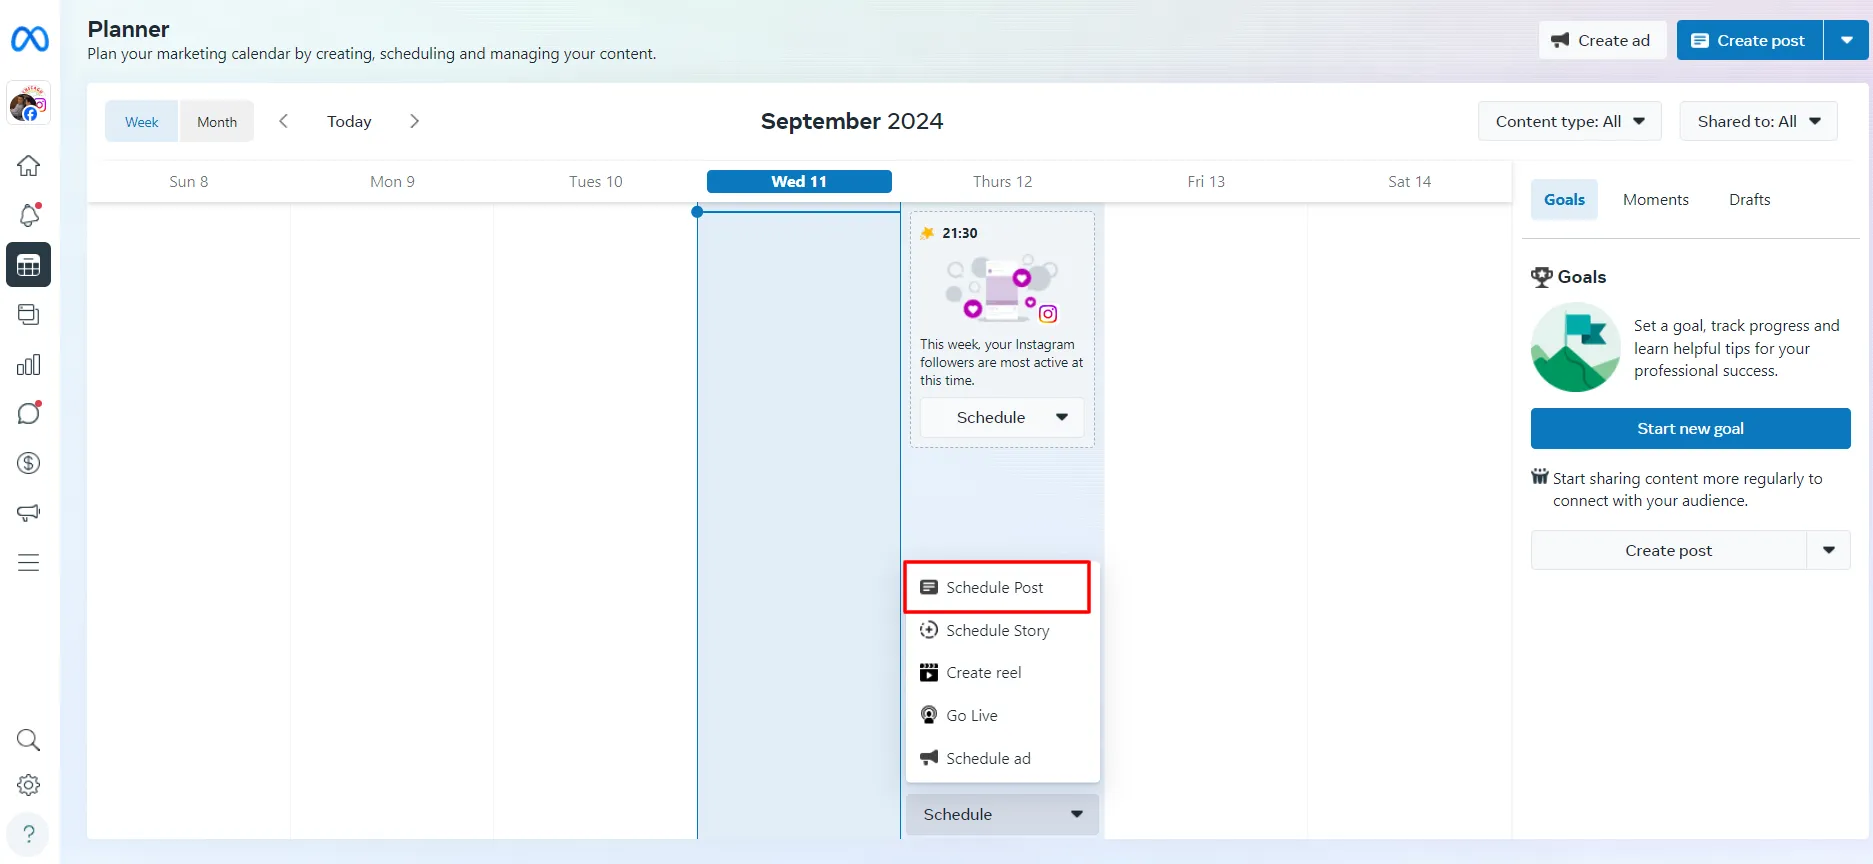
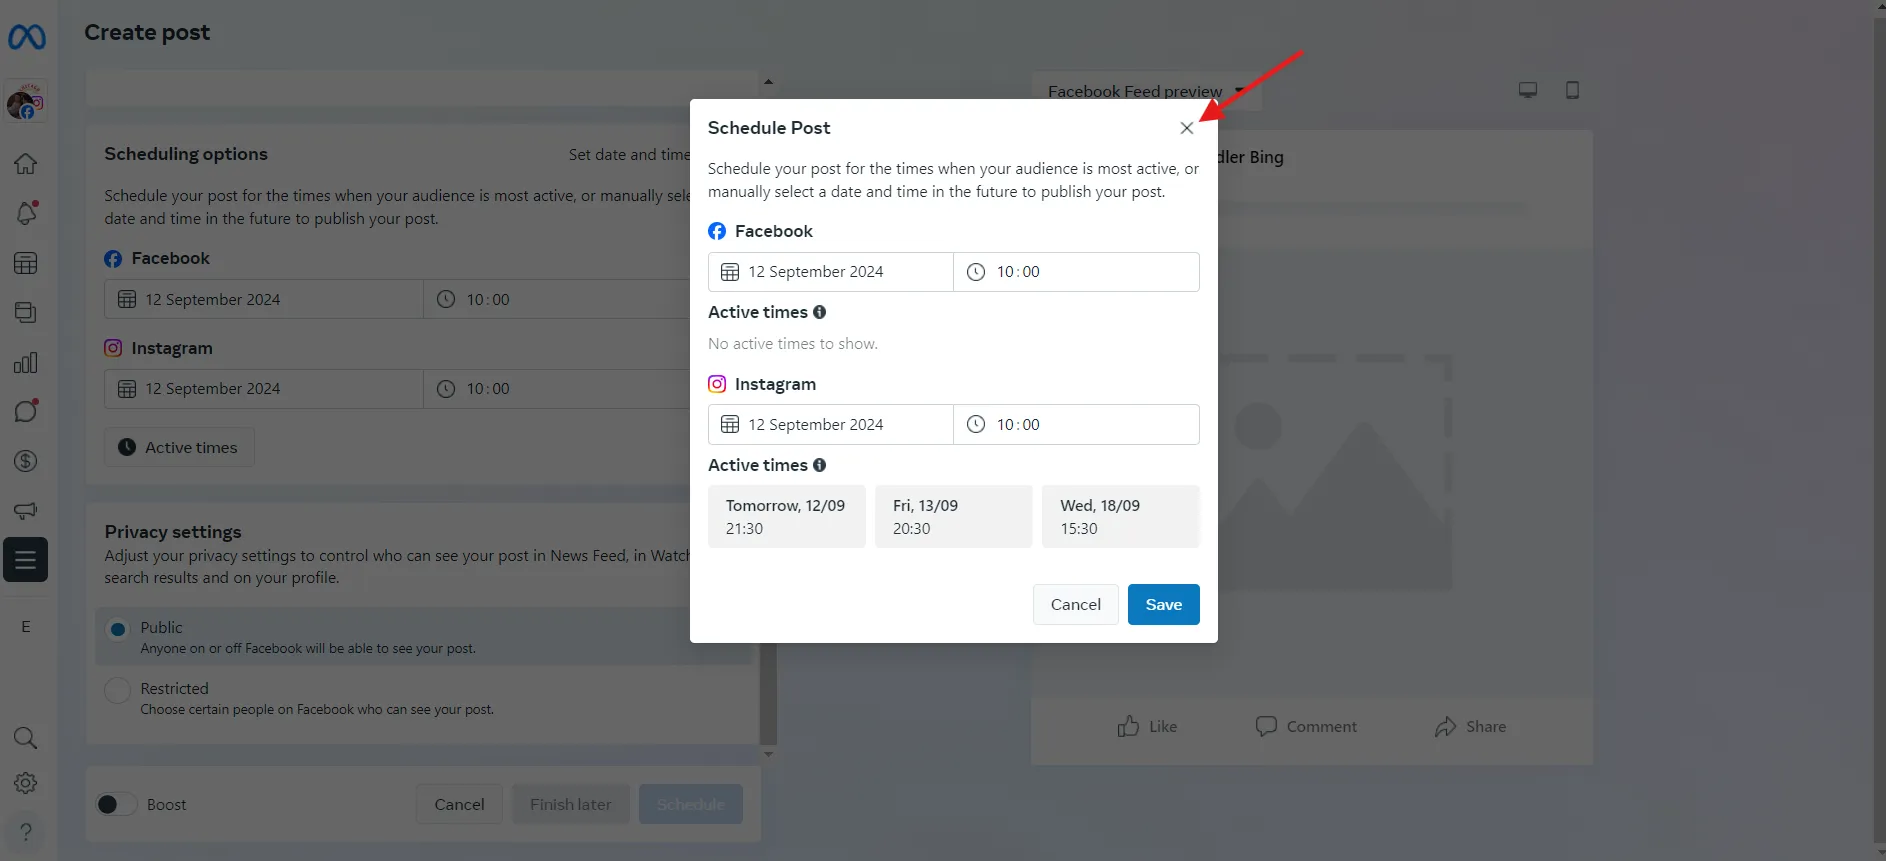
From here, choose the date you want to schedule your content, click the “Schedule” drop-down menu, and then “Schedule Post.”
Close the pop-up and move to the post-creation process.
Step 3: Create Your Post
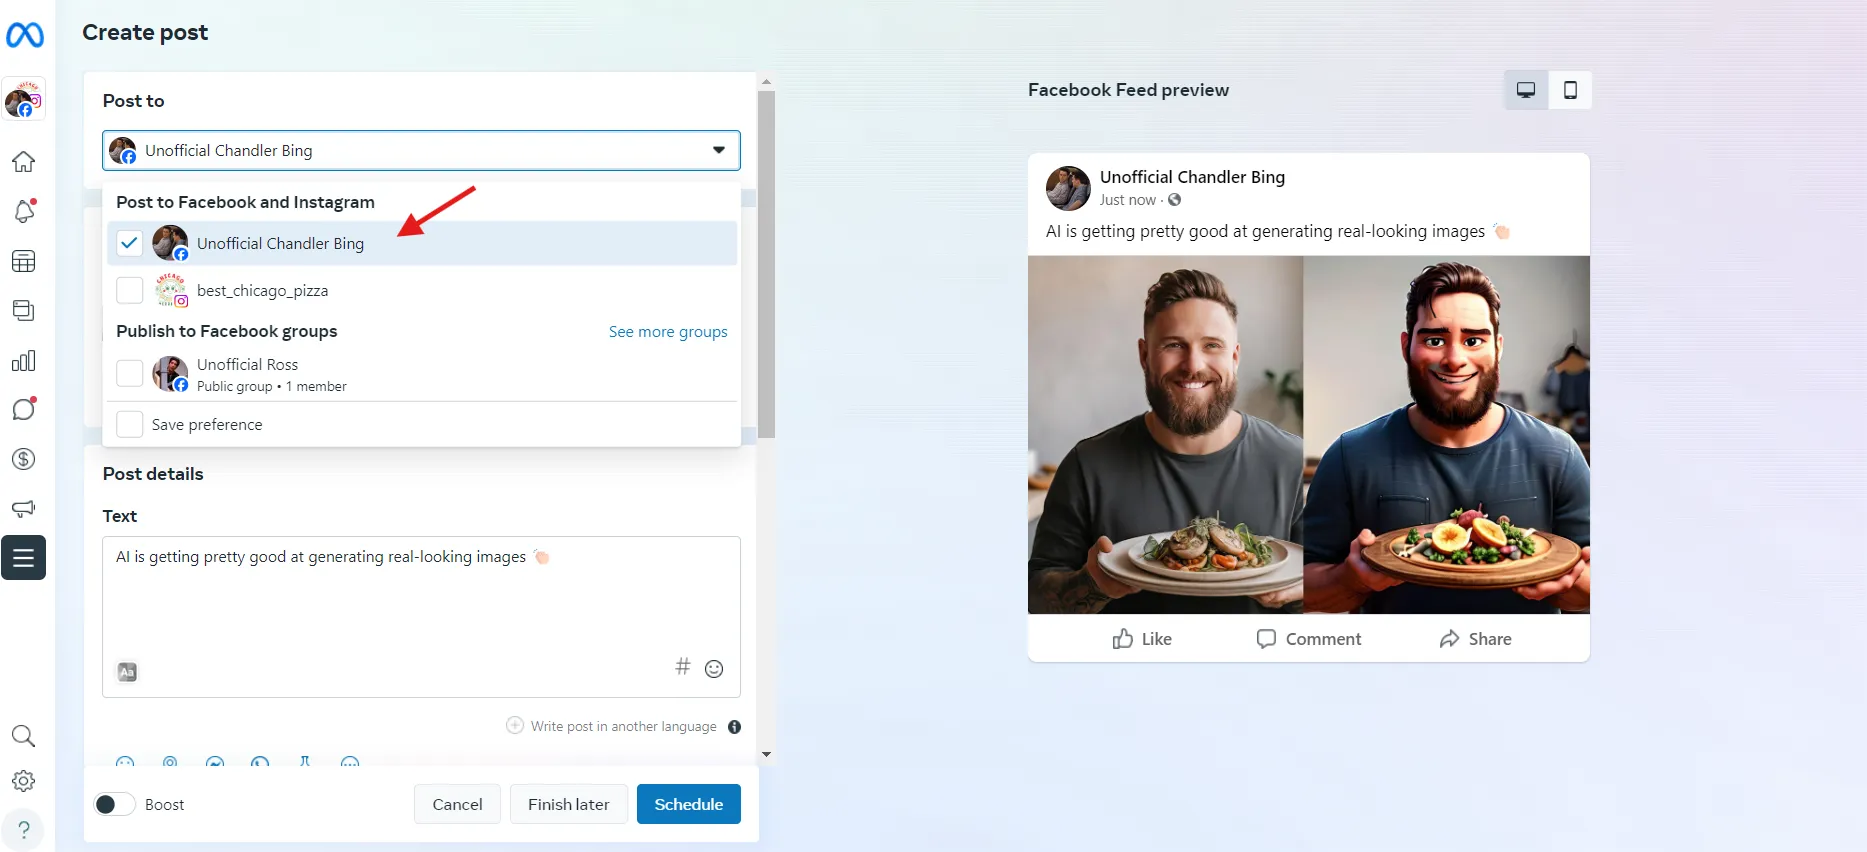
Upload a photo or video for your post and add captions to hook your audience. Select the platform on which you want to post your content. For me, it is Facebook.
Step 4: Schedule Your Post
Once your post is created, the next step is to schedule it. Go to Scheduling options and select the date and time you want to schedule it. If you have been regularly posting on Facebook, you will see the “Active Times,” which are basically when your audience is most active. From the privacy settings, select “Public” and click “Schedule.”
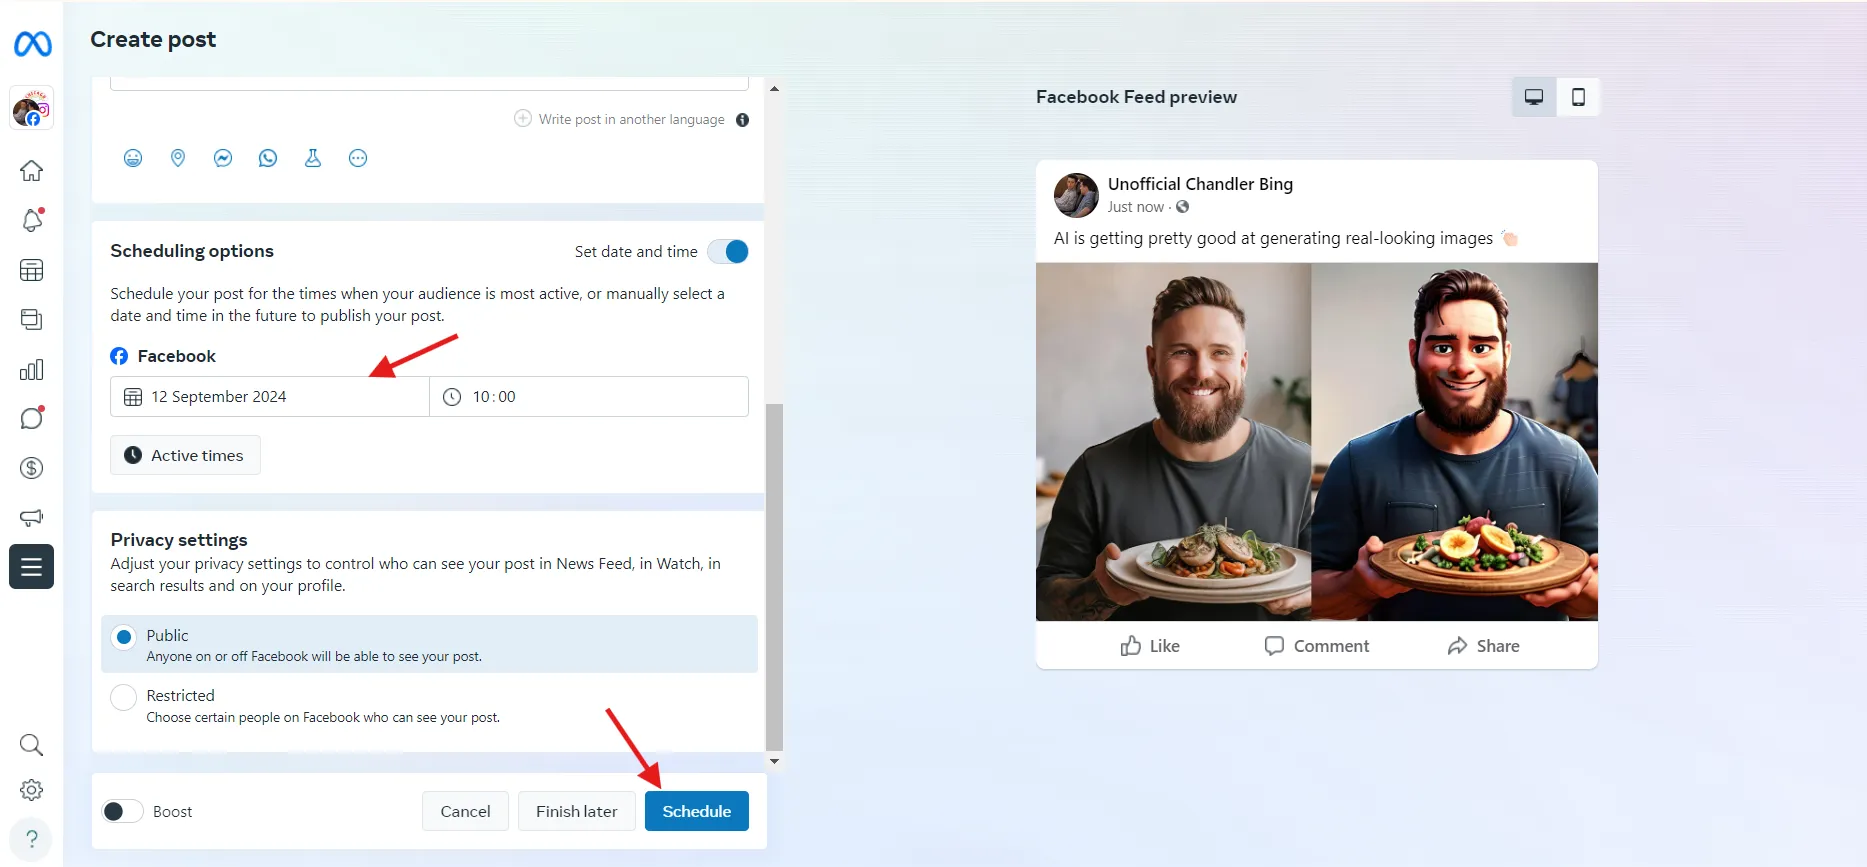
That’s it! You have successfully scheduled your post. If you go to the Planner, you can see your Facebook post there. Repeat the process to plan the rest of your posts.
Note: You can only schedule your posts for up to 30 days.
Limitations of Meta Business Suite
While Meta Business Suite provides an effective solution for scheduling Facebook posts, several limitations remain. Here are some of the common limitations:
- No Bulk Scheduling: Meta Business Suite cannot schedule multiple posts in bulk, which can be time-consuming for users managing high volumes of content.
- Limited Scheduling: You can only schedule your posts for up to 29 days.
- No First Comment Scheduling: Unlike some third-party schedulers, Meta Business Suite cannot schedule the first comment, which can be useful for engagement tactics.
- Lack of Workflow Customization: The tool doesn’t provide features like team collaboration, content approval workflows, or client-specific dashboards, which are available in more comprehensive scheduling tools.
How to Schedule a Post on Facebook Using Mobile
If you’re on the go and need to schedule posts, you can use the native Facebook mobile app to plan your content in advance.
Here is how you can do it:
Step 1: Log in to your Facebook account
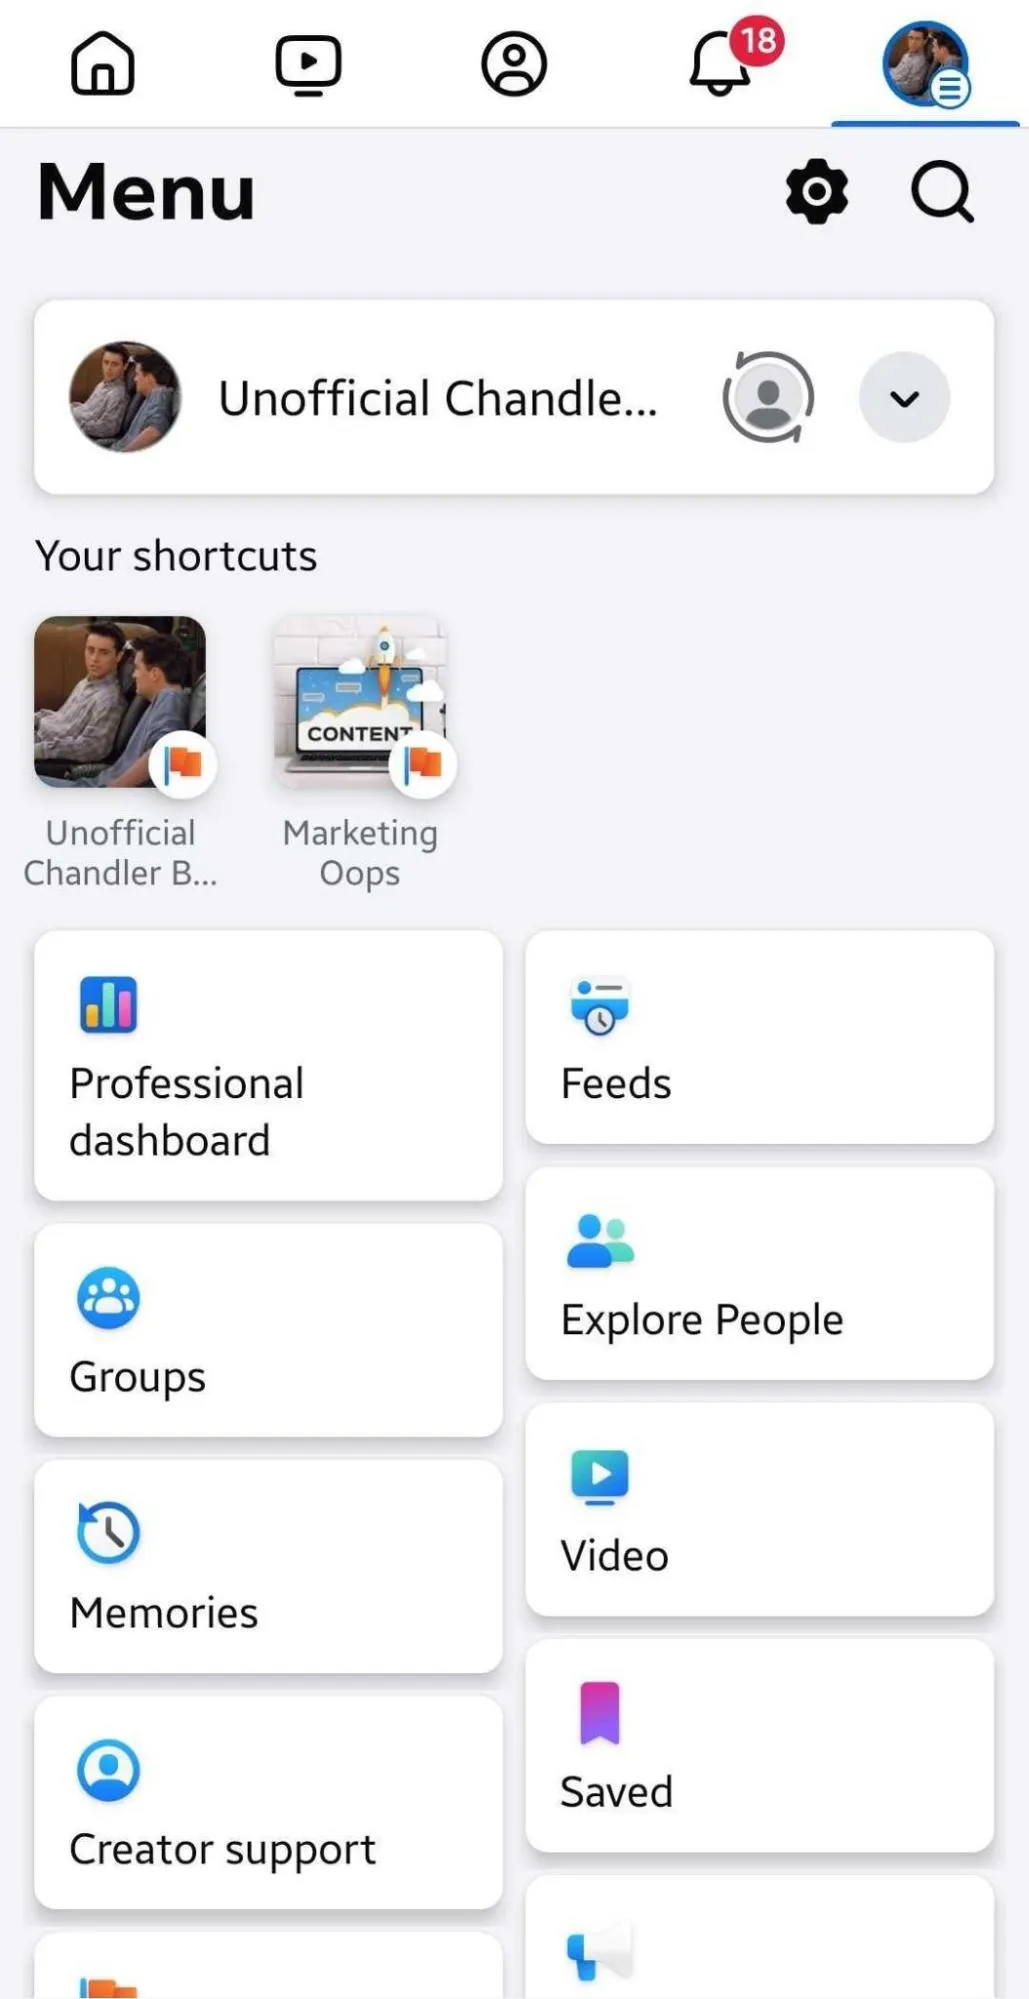
Open the Facebook app and log in to your Facebook account. Navigate to your Facebook profile, click the drop-down, and select your Facebook page.
Step 2: Create Your Facebook Post
Now, from your page, click to create your post. Add creatives and captions, and click “Next.”
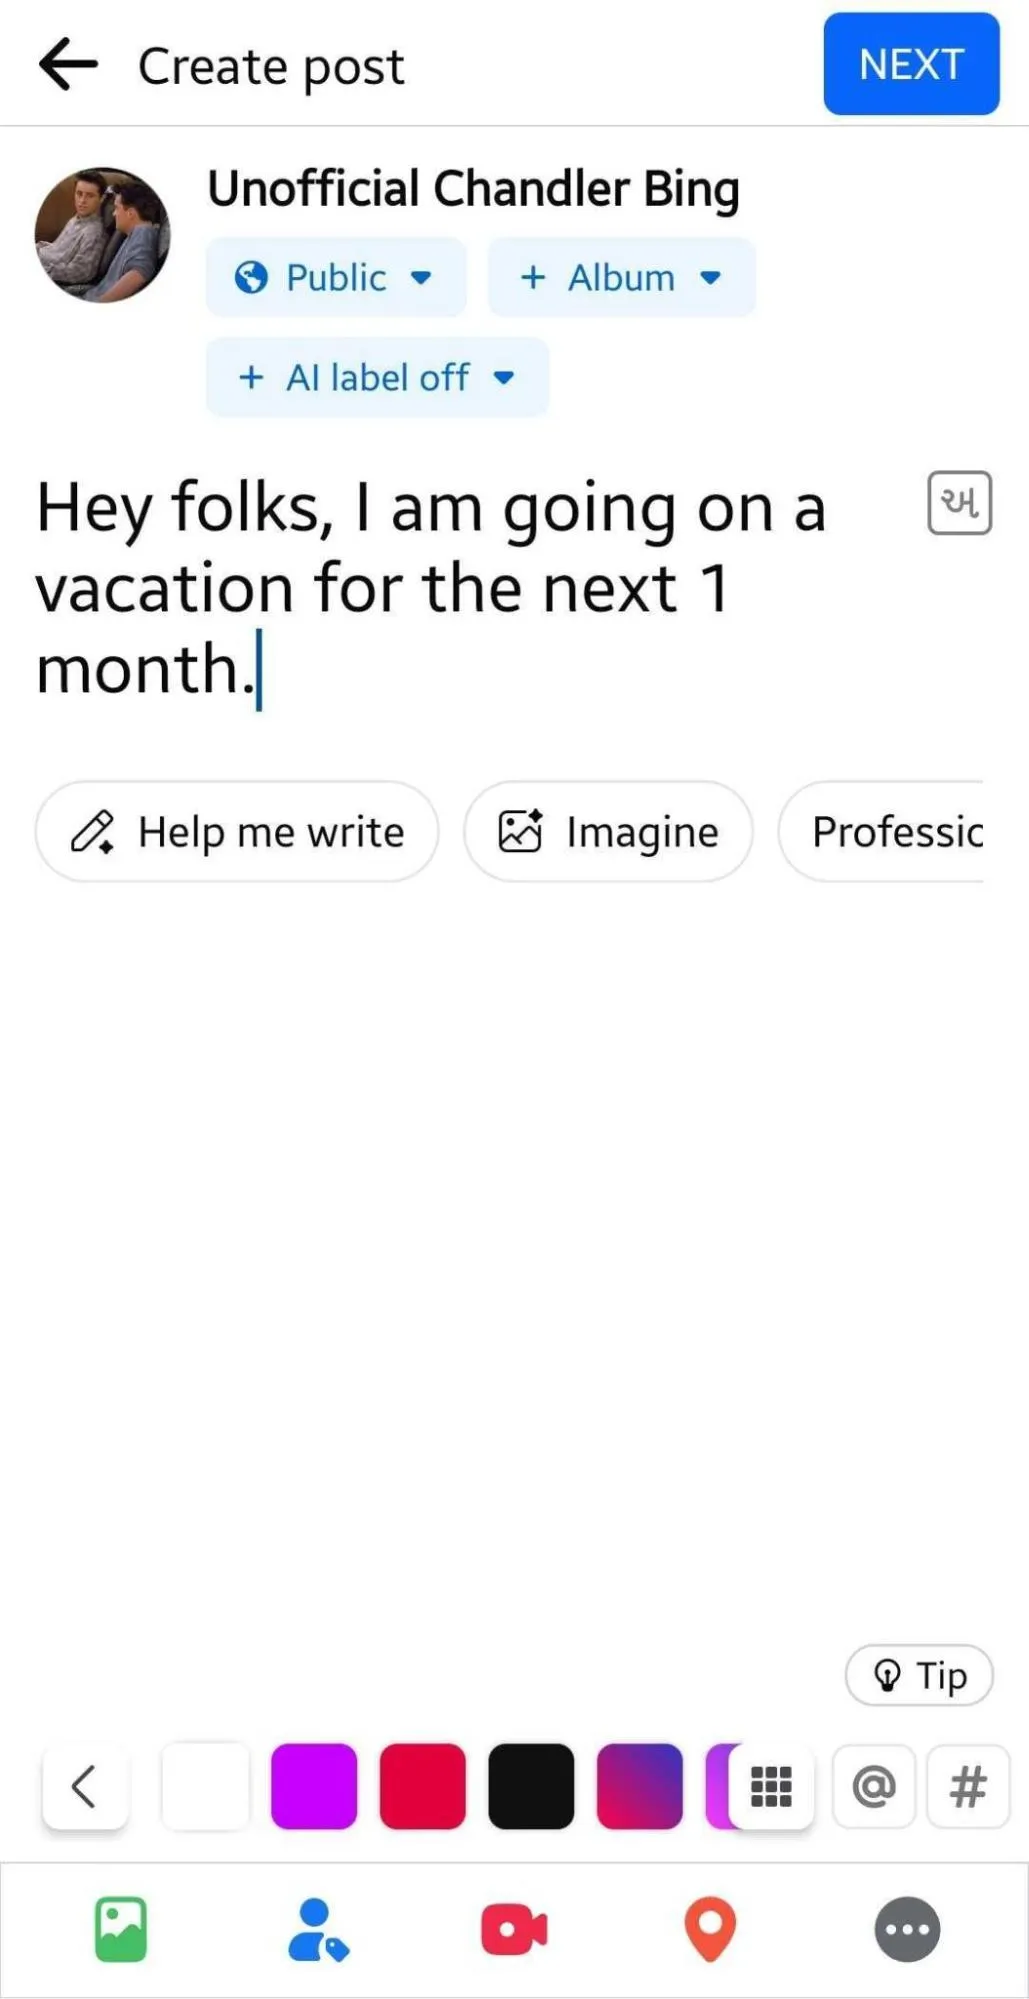
Step 3: Schedule Your Post
Click on the “Scheduling options.
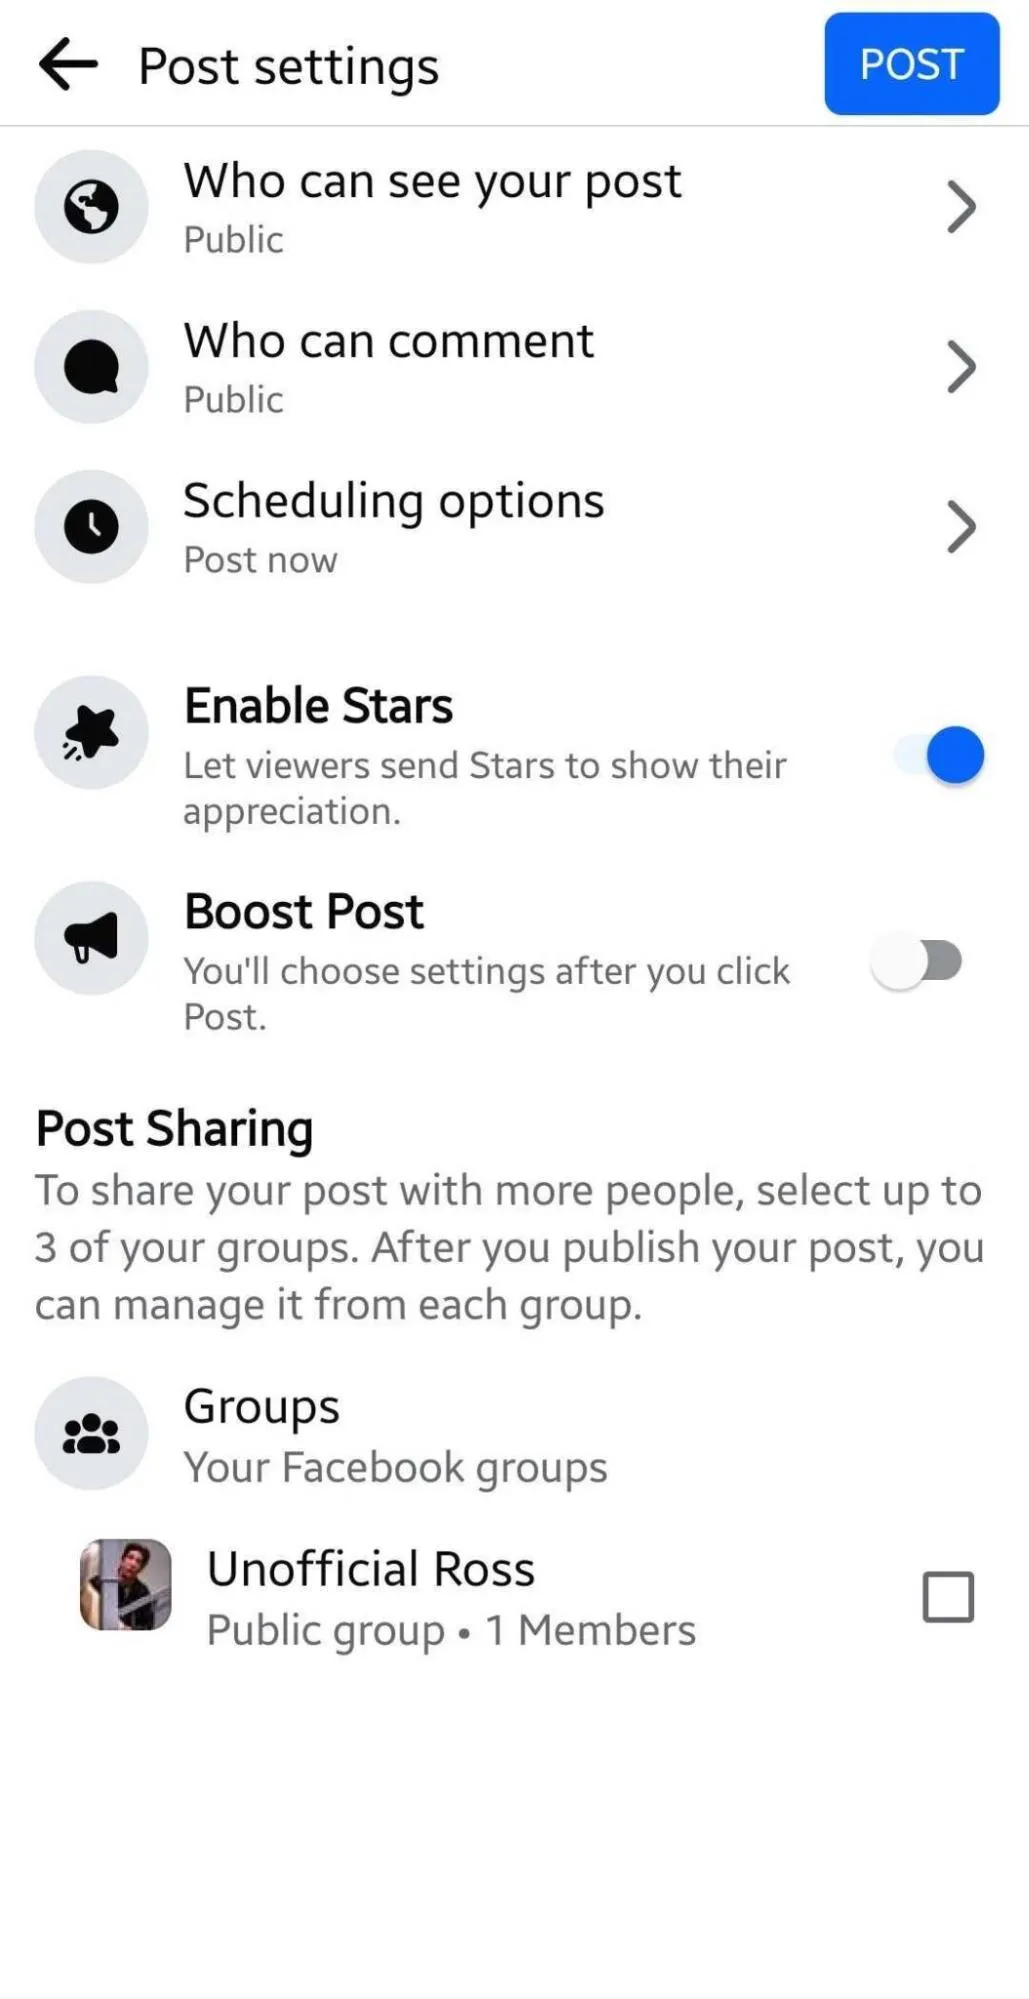
Choose “Schedule for later.” Select the date and time from the calendar. Finally, tap “Post.”
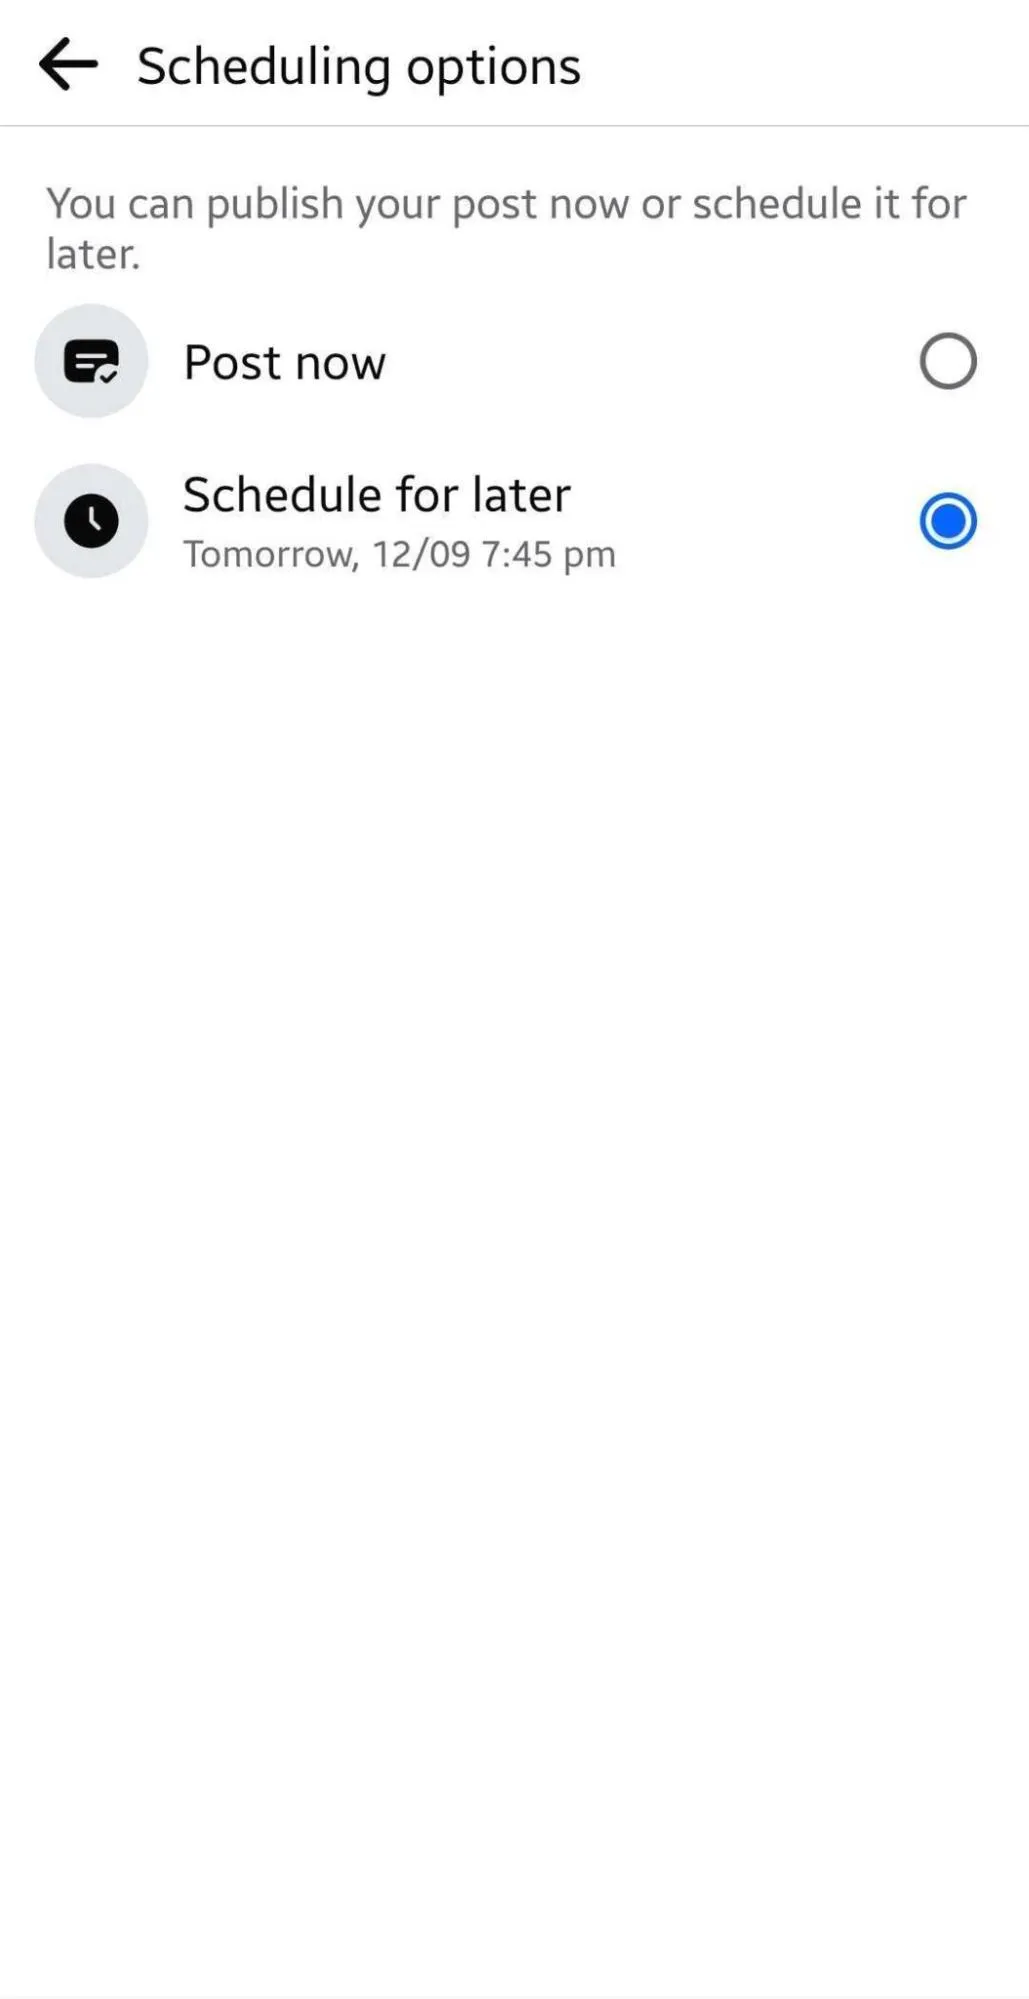
You are done with scheduling your post. Athough the native mobile app is handy when you’re on the go, the tool has numerous limitations.
Limitations of the Facebook Mobile App
- No Bulk Scheduling: The mobile app does not allow users to schedule multiple posts at once, which can be time-consuming for users such as social media agencies or businesses.
- Limited Cross-Platform Posting: You can only schedule posts for Facebook. You cannot do that from the app if you want to post the same content across multiple networks like Instagram and Twitter.
- No First Comment Scheduling: The app does not allow you to schedule the first comment.
- Lacks Team Collaboration: The mobile app lacks collaboration features like approval workflows or team access.
Meta Business Suite and the Facebook mobile app have many limitations that can hinder your social media game. Having Facebook scheduling tools in your marketing arsenal can be a great helping hand in overcoming all these challenges.
How to Schedule Facebook Posts Using Third-party Scheduling Tools?
Scheduling tools simplify content management by allowing you to bulk schedule, post across SM platforms, collaborate with a team, and set approval workflows. SocialPilot is one such tool that lets you efficiently manage all your Facebook marketing tasks.
Want to learn more about the tool? Take a look at this video:
Let’s explore how to schedule Facebook posts using SocialPilot on the desktop in 2025:
Step 1: Connect your account
To get started, log in to SocialPilot and link your Facebook page.
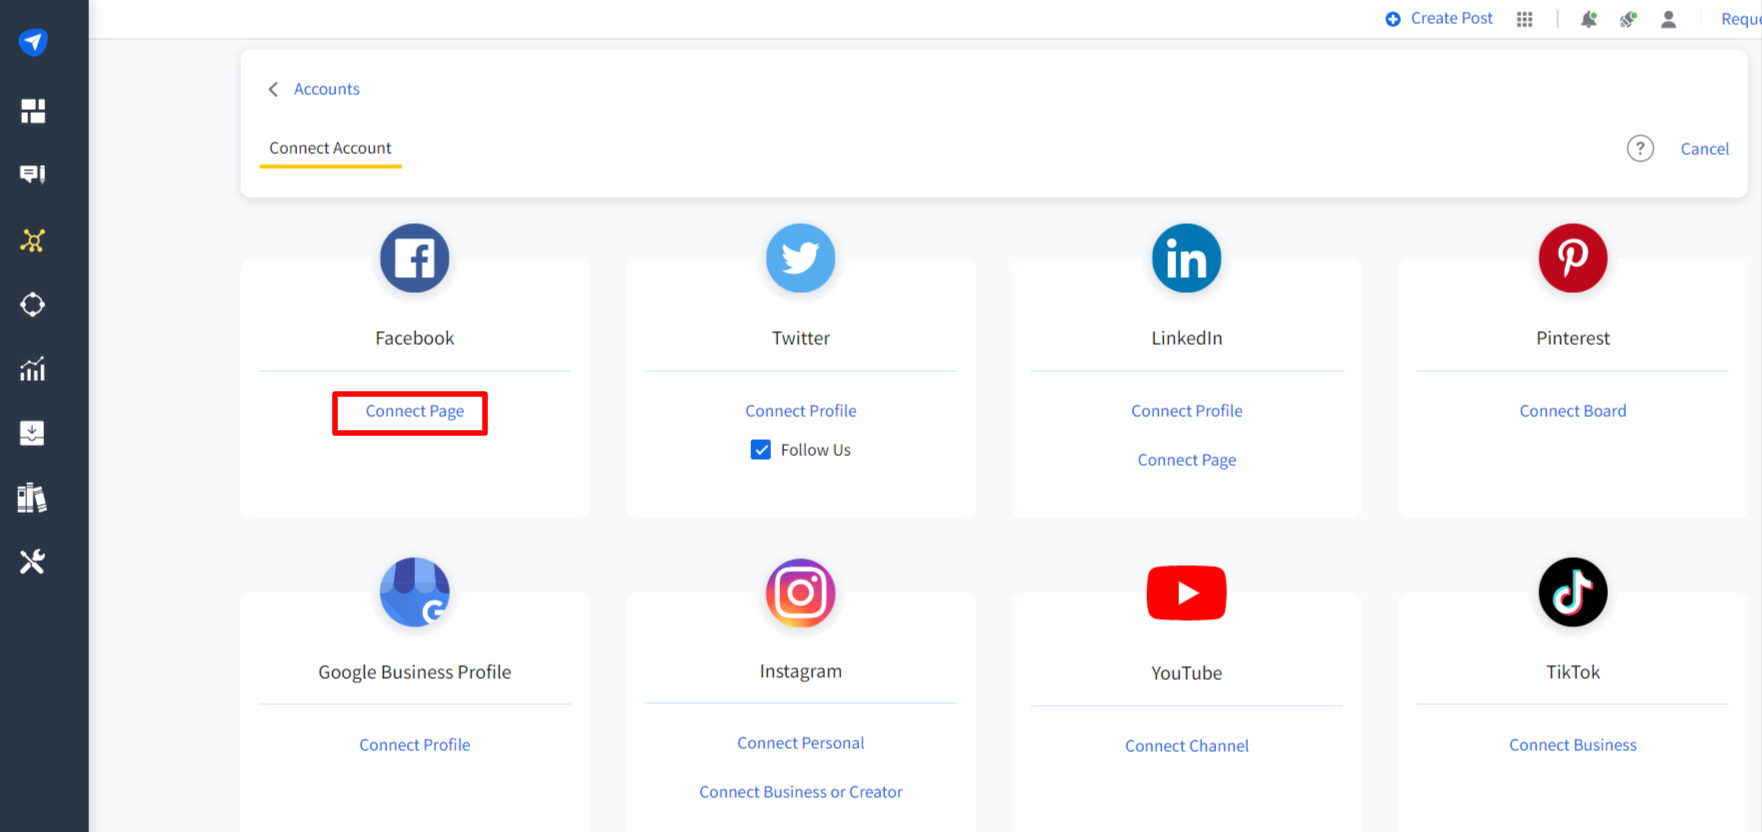
Step 2: Create a Facebook post
Now that the Facebook page is connected, it’s time to create some posts!
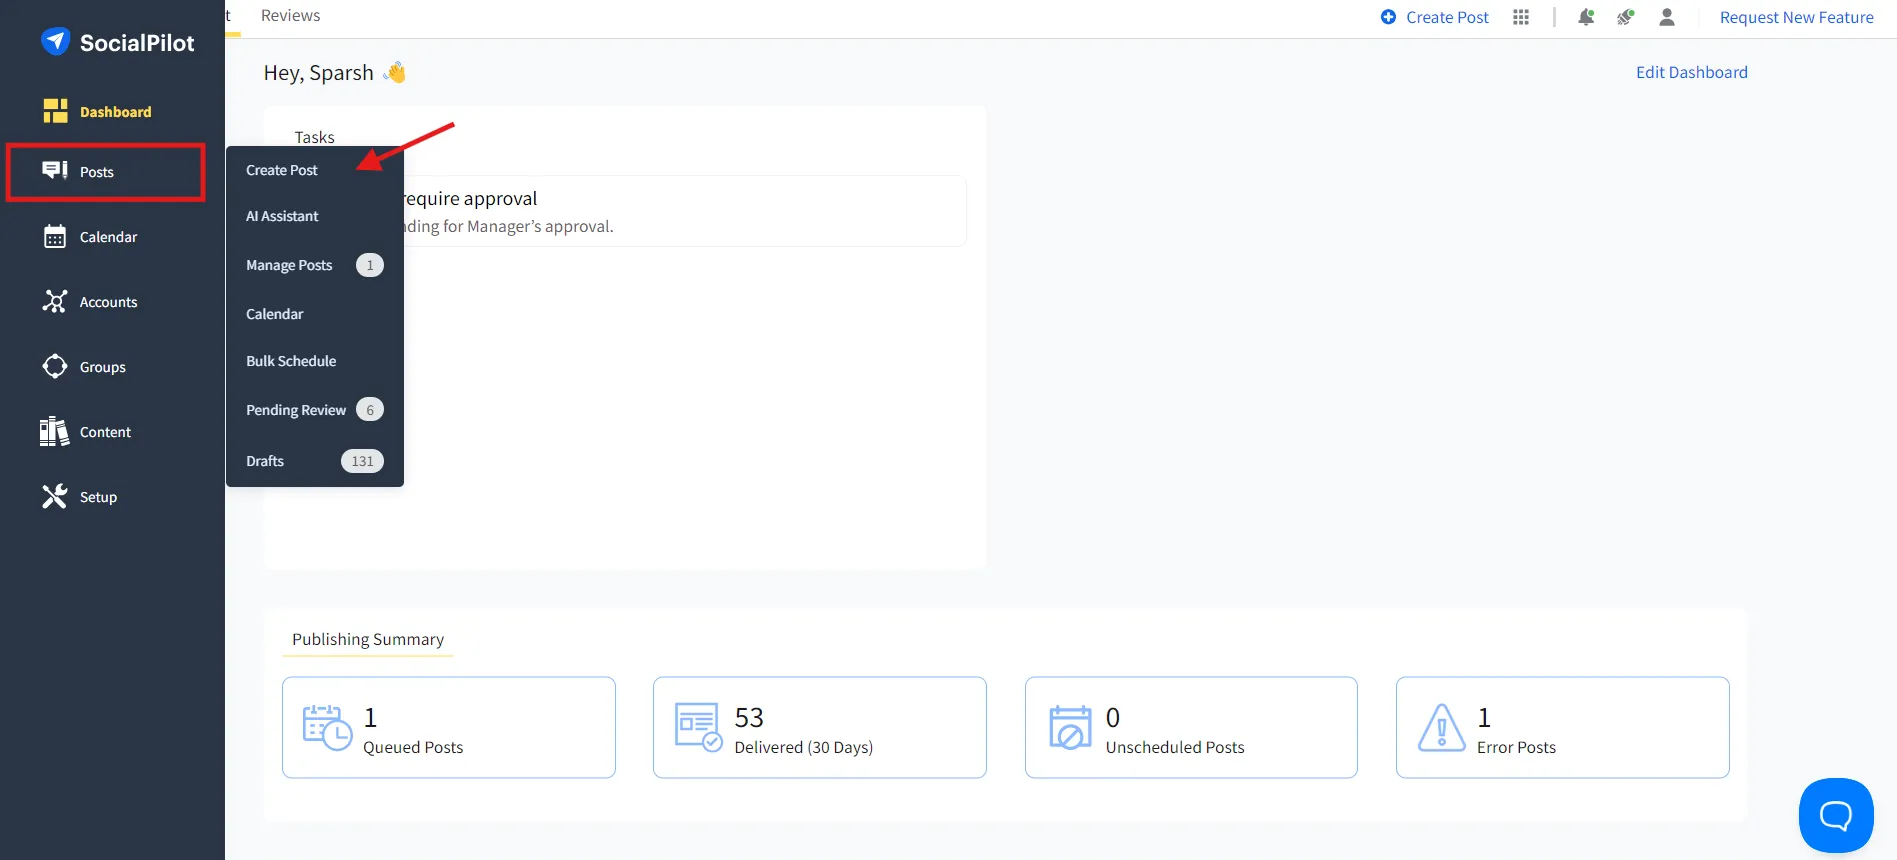
From the dashboard, go to the left sidebar and click on Posts > Create Post, and then select Facebook.
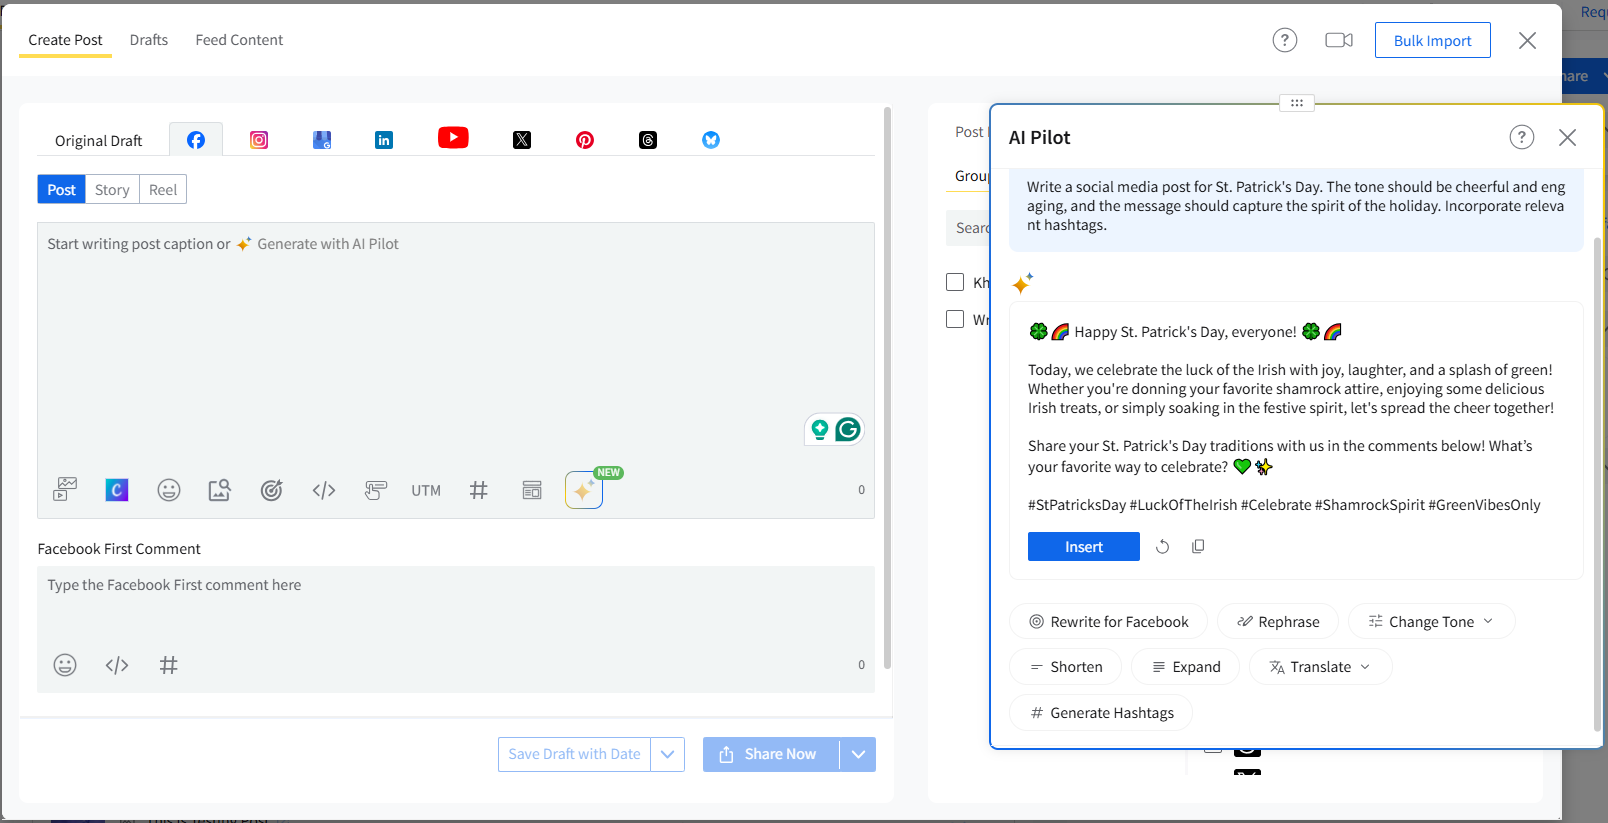
When you select Facebook, you can see the “Post,” “Story,” and “Reel” tabs. You can upload your content and add captions. For captions, you can use the built-in “AI Pilot” to craft compelling captions for your Facebook posts. You can choose the tone for your posts, generate hashtags, and more.
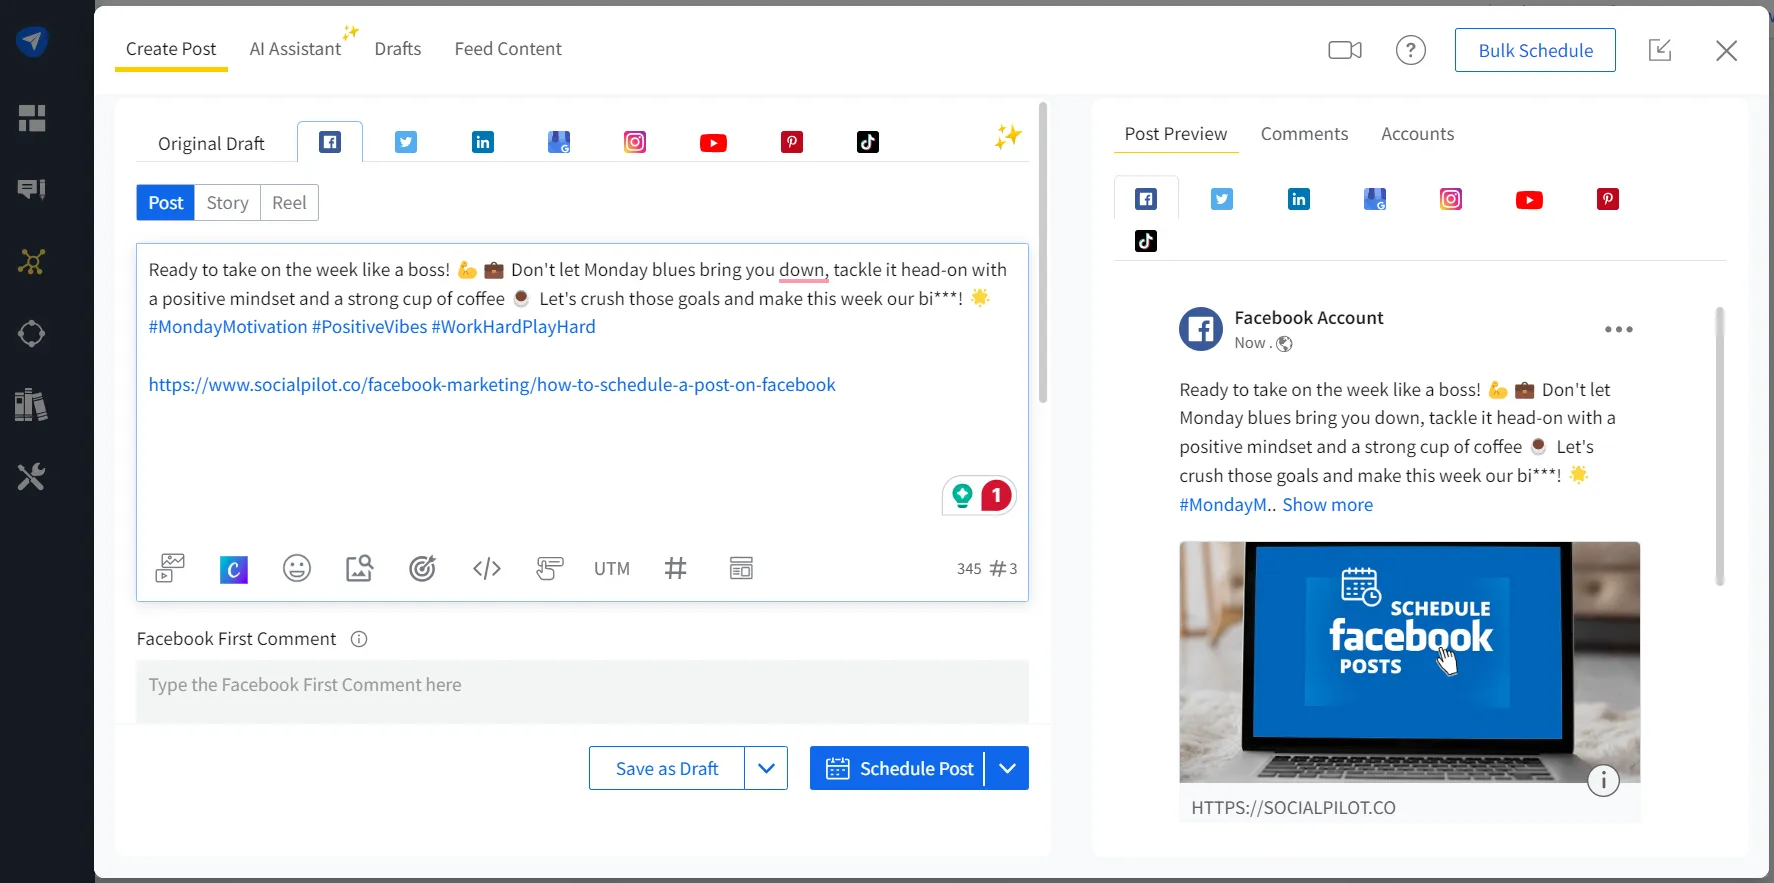
Once your post is ready, you can also see a preview by clicking on “Post Preview.” Tweak your post if you aren’t satisfied with how it looks on the feed.
Completed this? Let’s move on to schedule your Facebook post!
Step 3: Schedule your Facebook post
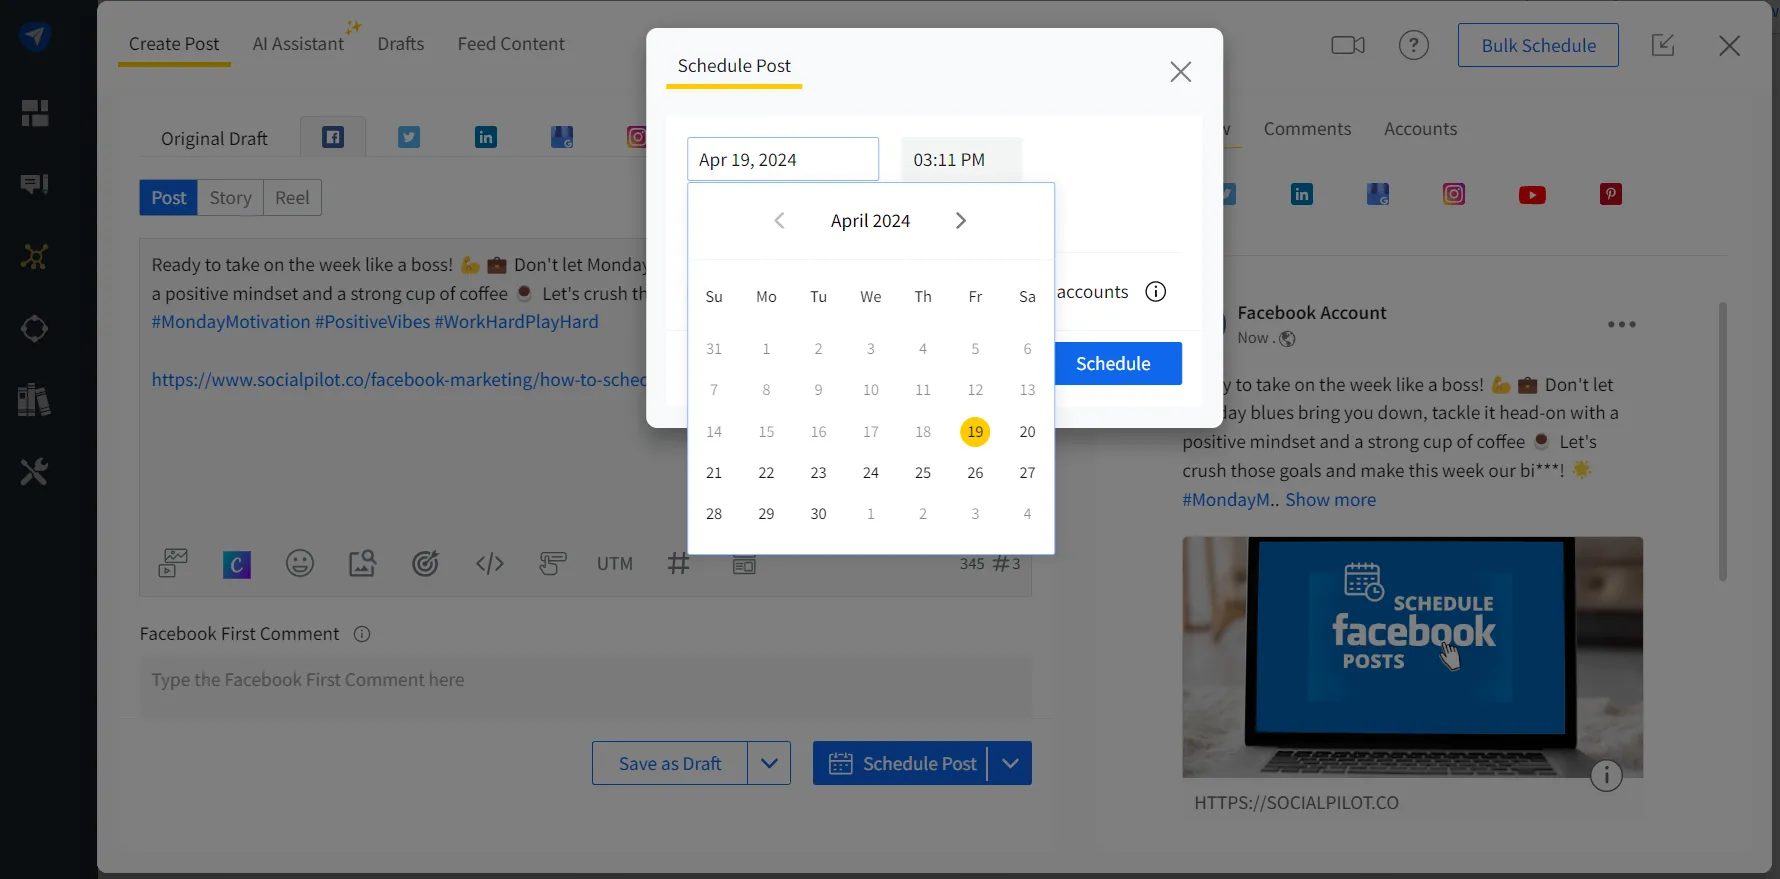
After creating the post, select the pages or accounts you want to publish (applicable if you have connected multiple pages). Go to the bottom and click “Schedule Post”. Select your date and time and click “Schedule.” Voila! Your Facebook post is scheduled!
Step 4: Bulk Schedule Posts on Facebook Using SocialPilot
If you plan your posts a month in advance, scheduling each post individually can be a bit annoying. Unlike the native Meta Business Suite, SocialPilot can bulk schedule up to 500 posts at once!
And here’s how you can do it:
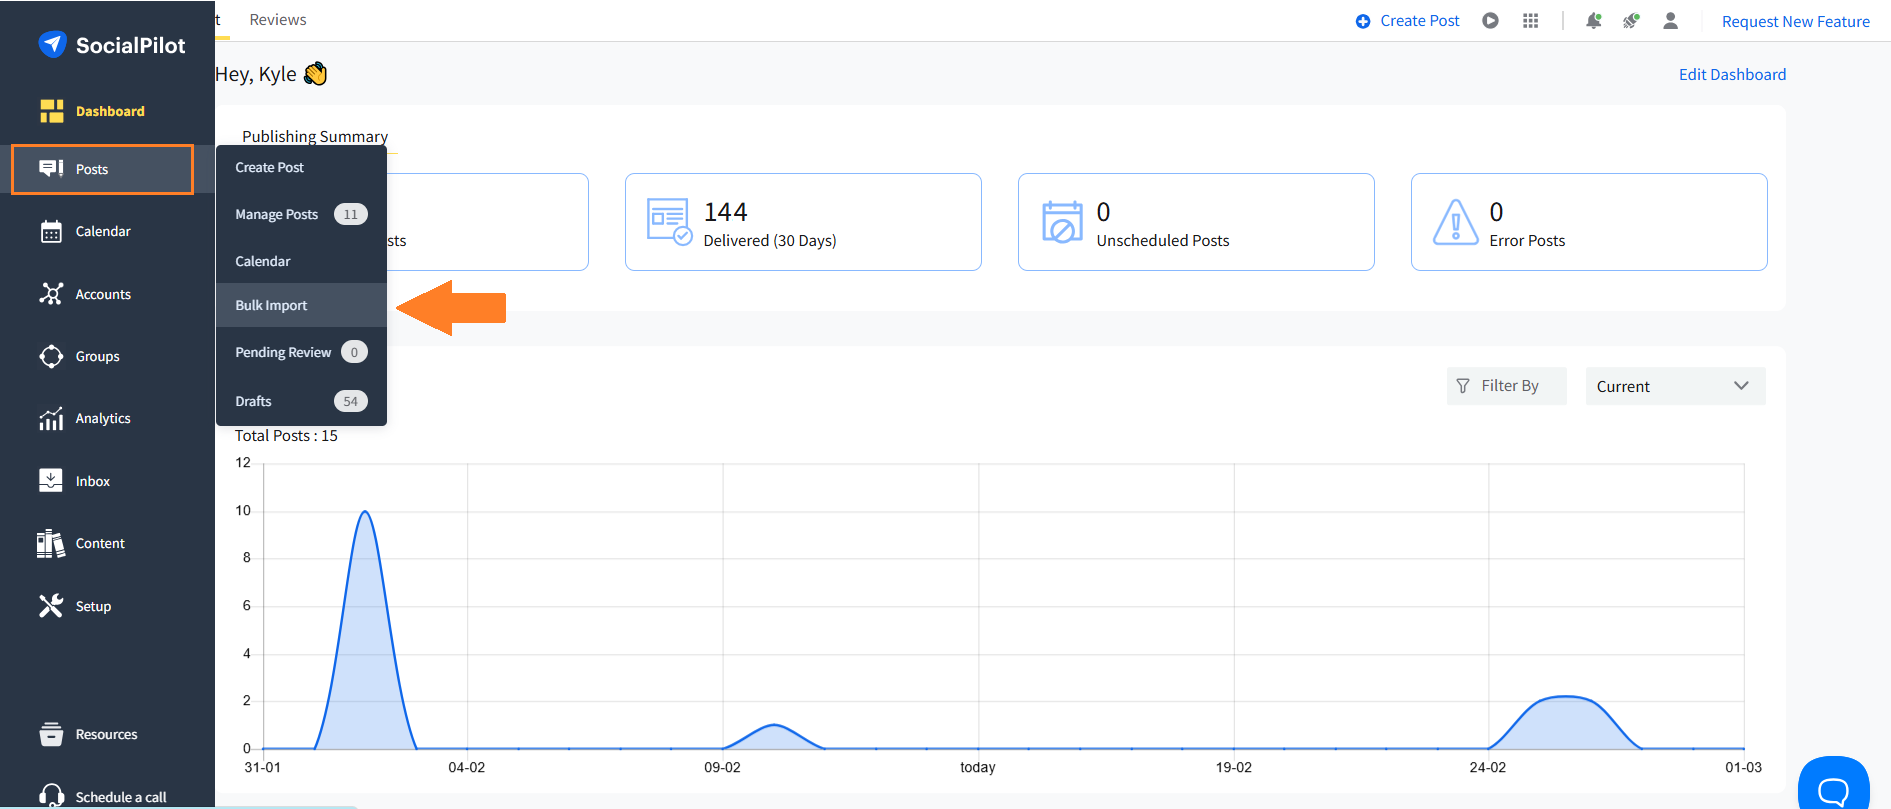
Navigate to “Posts” on the sidebar and click the “Bulk Import” option.
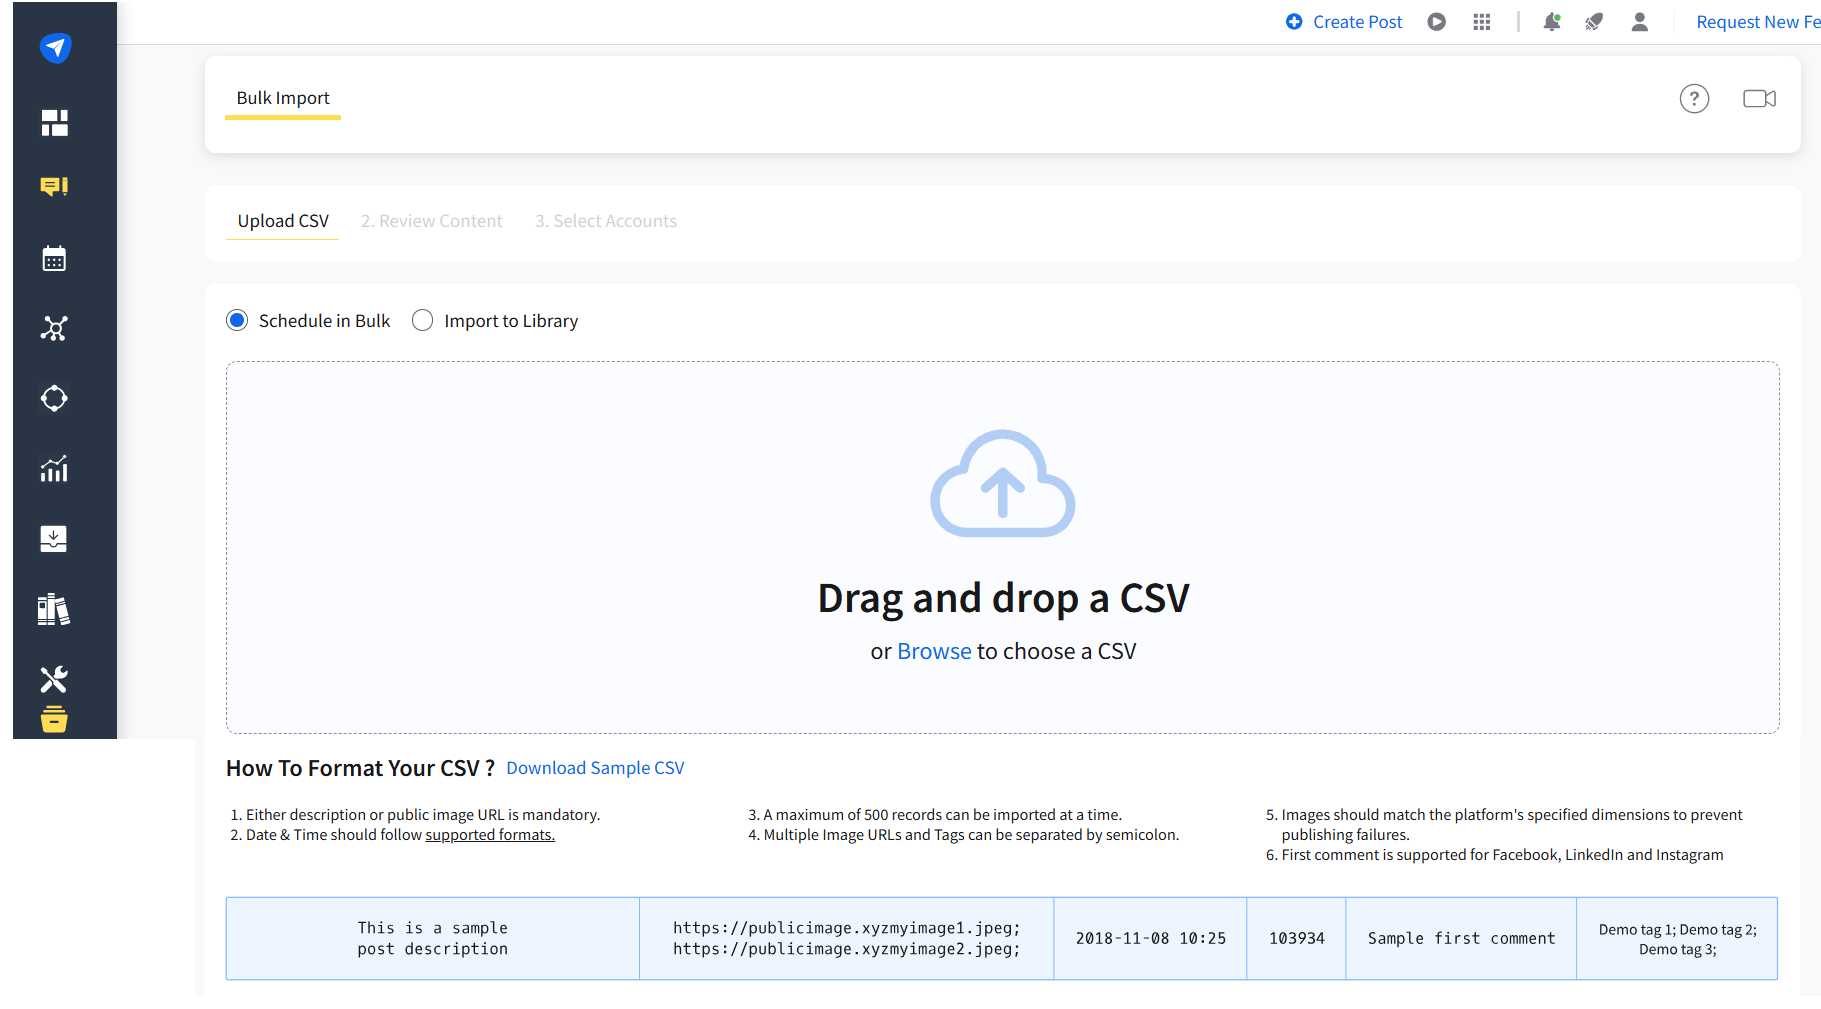
On the Bulk Import screen, ensure the Schedule in Bulk option is active. Then drag and drop your CSV file. Your CSV file should have no more than 500 records.
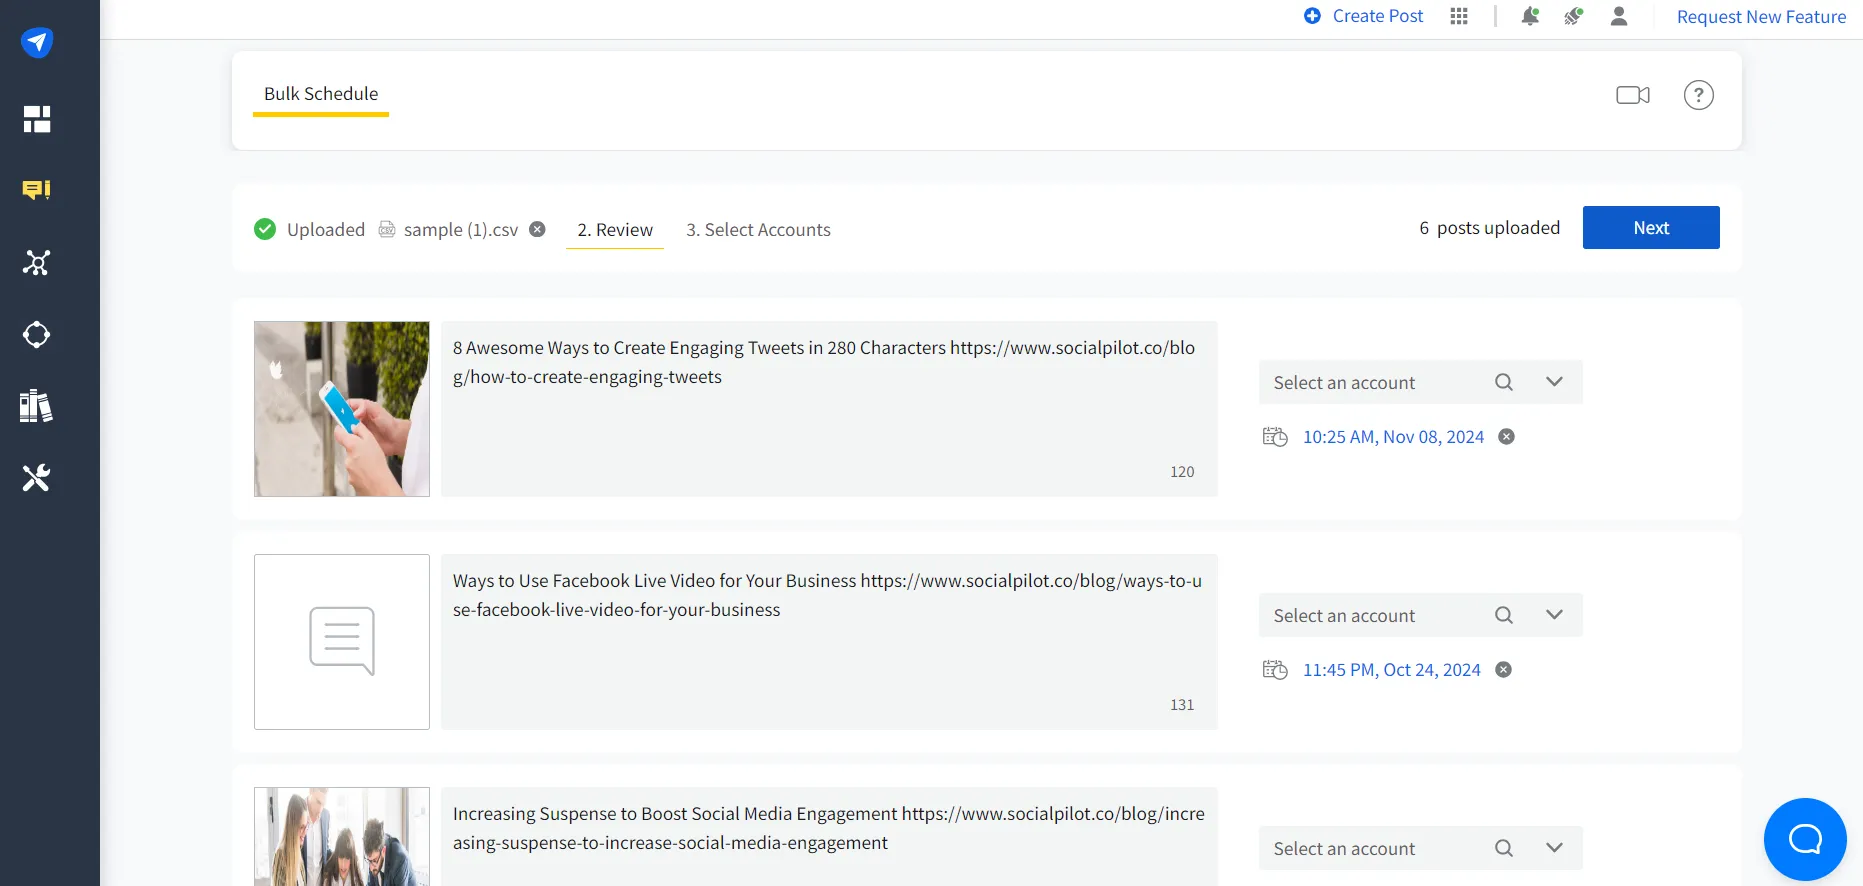
After the file gets uploaded, you’ll be directed to the preview window. You can review each post along with the text content and then click “Next.”
Select the page you want to post content to and click on “Schedule Posts.”
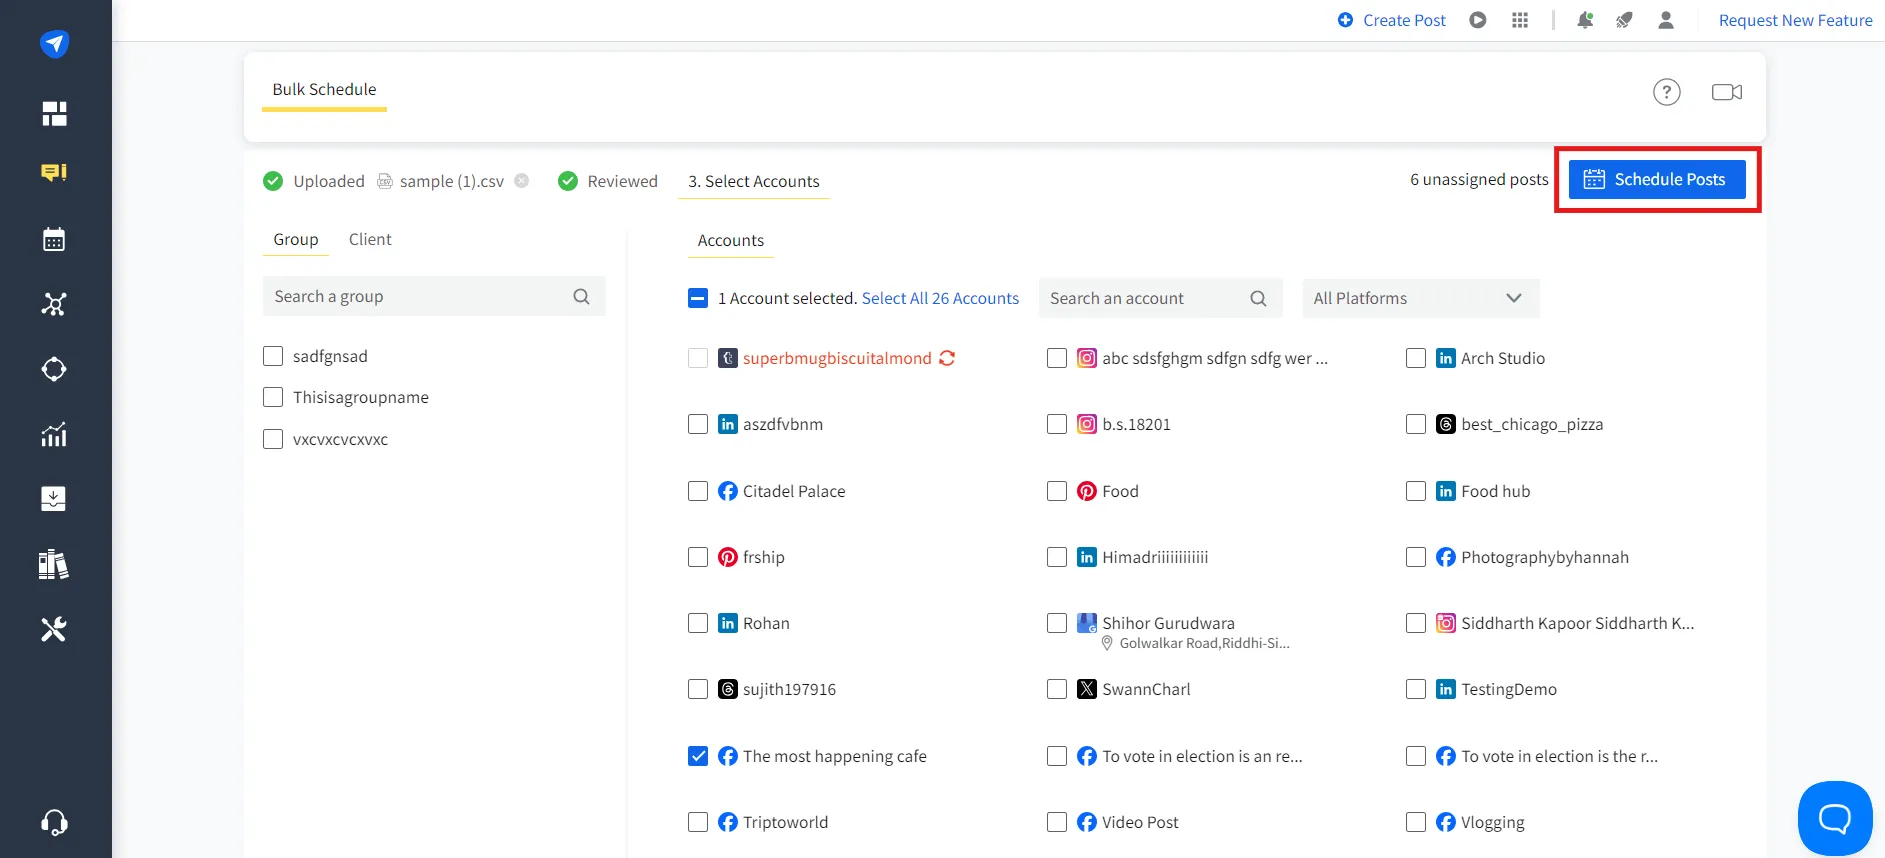
It’s done! Scheduling multiple Facebook posts at once is that simple!
How to Schedule a Post on a Facebook Group or Community?
Consistency matters in groups and communities, too. Scheduling posts helps you keep discussions flowing without needing to post manually every time. But, if you think, can you schedule a post on a Facebook group or community? Then yes, if you’re an admin or moderator.
Here’s how you can do it:
Step 1: Go to Your Facebook Group
Log in to your account and open the group or community where you want to post. Make sure you’re an admin or moderator, as only they have scheduling permissions.
Step 2: Start Creating a Post
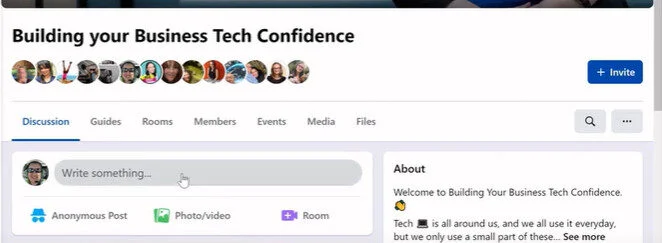
In the group’s feed, click inside the “Write something…” box. Add your text, links, images, videos, or polls, just like you would for a regular post.
Step 3: Click the Clock Icon (Schedule Option)
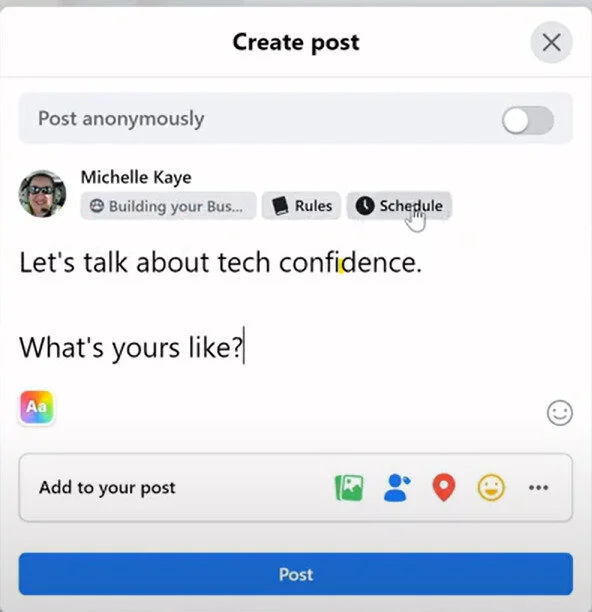
Next to the “Post” button, you’ll see a calendar/clock icon. Click it to open the scheduling menu.
Step 4: Pick Date & Time
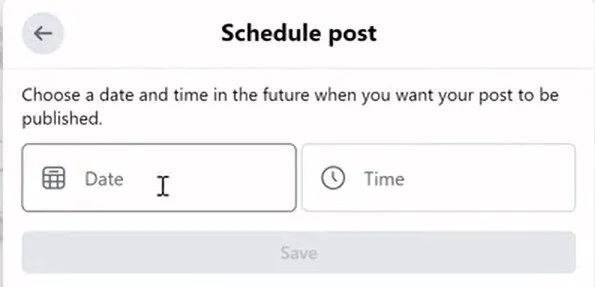
Choose the date and time you want your post to go live. Be mindful of when your group members are most active to maximize engagement.
Step 5: Schedule Post
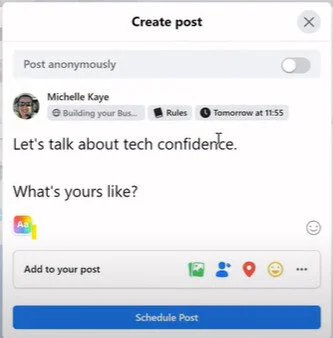
Click “Schedule” and your post will automatically publish at the chosen time. You can manage, edit, or reschedule it later in the group’s Scheduled Posts section.
How to Schedule Post on Facebook Using AI?
These days, many marketers use ChatGPT to quickly generate engaging social media content. And if you’re wondering, Can I schedule a Facebook post using AI? – the answer is yes. With SocialPilot’s AI Scheduler, integrated directly into ChatGPT, you can take it a step further: create, customize, and schedule your Facebook posts seamlessly without ever leaving the chat.
Step 1: Open AI Scheduler
To get started, launch the SocialPilot AI Scheduler Custom GPT. You need to type a simple prompt such as “Log me into my SocialPilot account.” Enter your login details, and you’re ready to start.

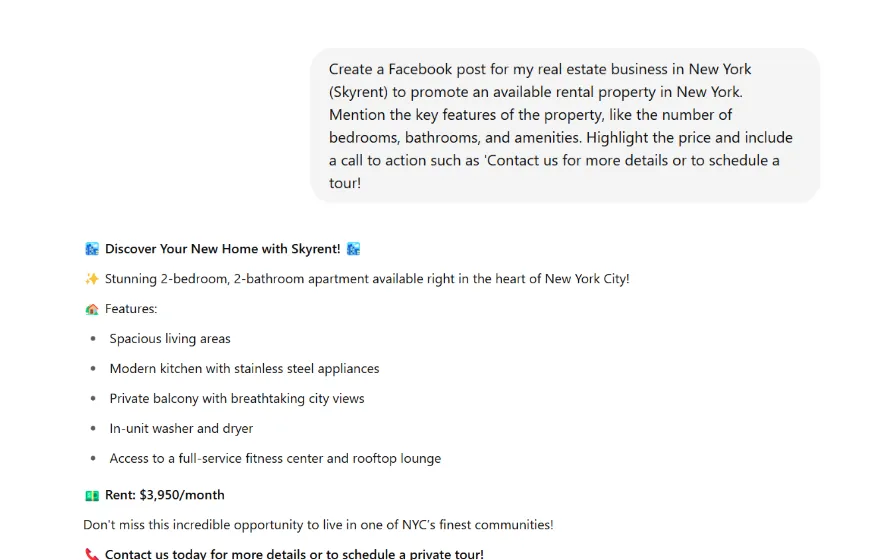
Step 2: Create Your Post
Type your content idea into the AI Scheduler or briefly describe the post you want to create.
The AI will generate engaging captions, suggest hashtags, and even offer visual content ideas based on your prompt.
Step 3: Customize Your Content
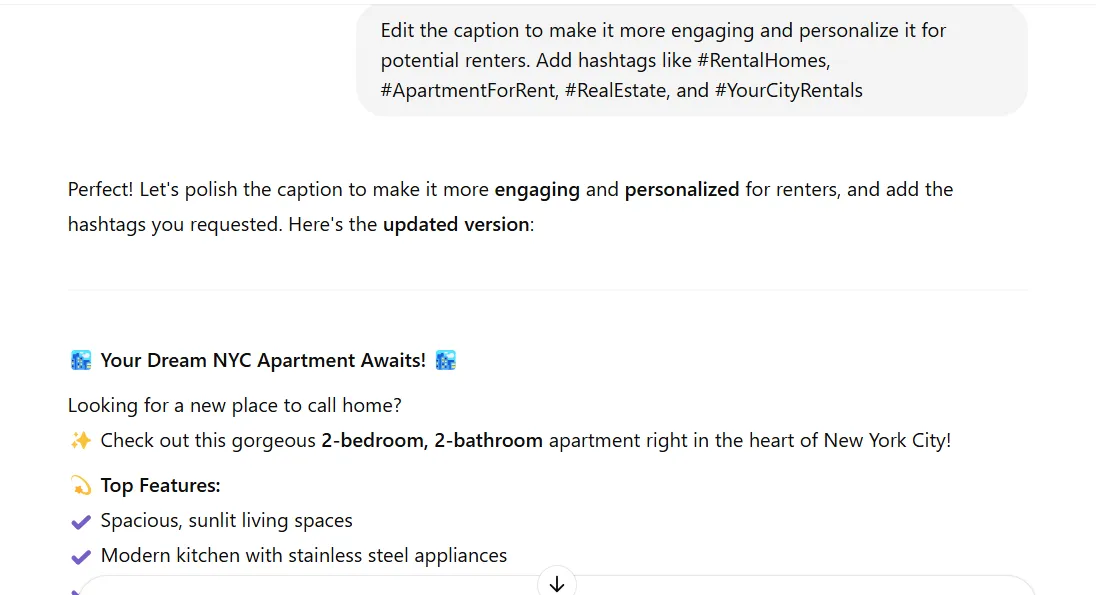
Refine your generated content if needed. You can edit the captions, choose the best visual posts, and tailor the content to match your brand voice.
Step 4: Choose a Facebook account and a date and time for scheduling
Choose your Facebook account from the connected list where the post will go live.
Pick the date and time for your post to be scheduled. The AI Scheduler makes it easy to set posts for the future, ensuring you maintain a consistent content flow.
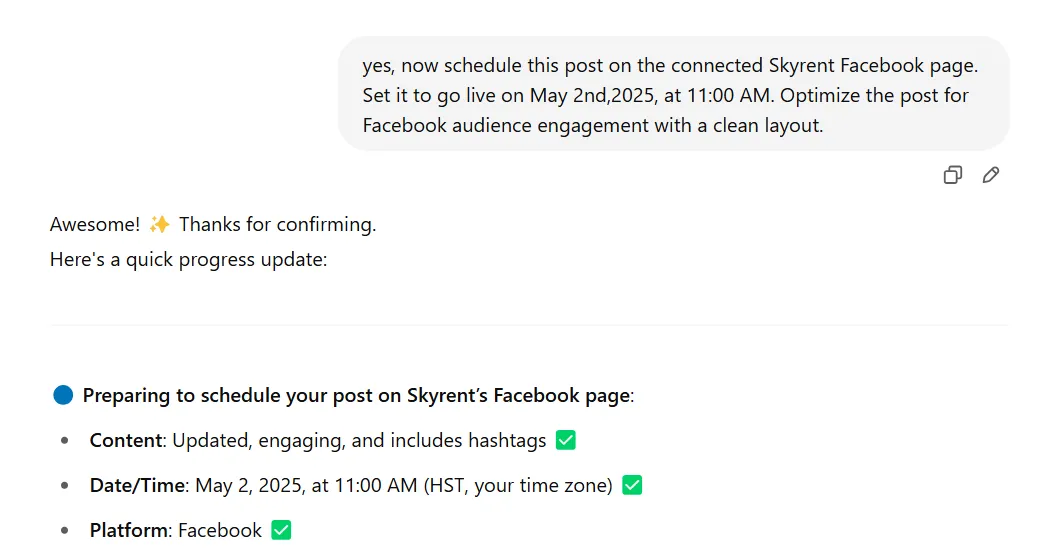
And then confirm it, with “Yes.”

Step 5: Bulk Scheduling
If you have multiple posts to schedule, simply upload a CSV file containing your posts. The AI will automatically assign them to the appropriate platforms and accounts, scheduling them across multiple platforms in seconds.
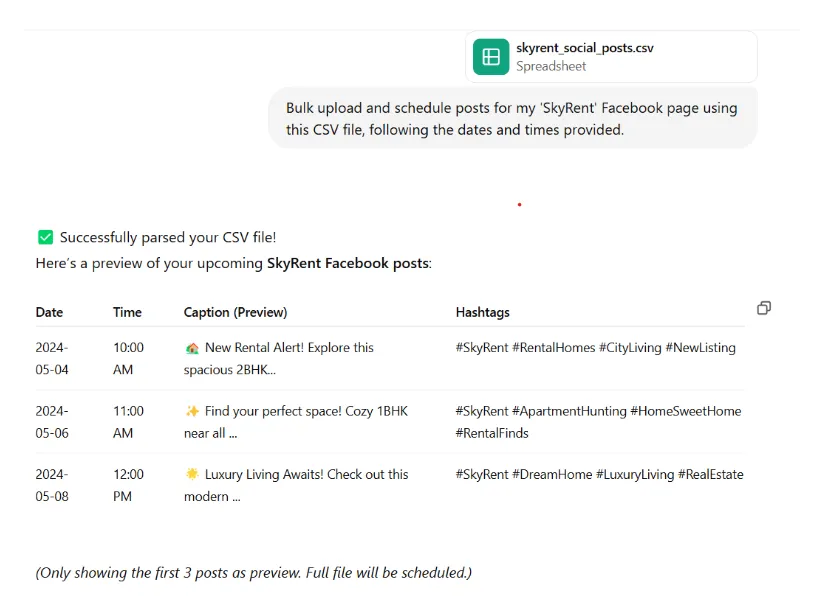
Now everything is set; just confirm the schedule. SocialPilot AI Scheduler will handle the rest, ensuring your post goes live at the chosen time.
Experience the ease of managing your Facebook content with just a few prompts. Explore the SocialPilot AI Scheduler and see how effortless Facebook planning can truly be.
How to Schedule a Facebook Story?
Stories aren’t just for Instagram; Facebook Stories are one of the most engaging formats for business pages in 2025. The best part? You can plan and schedule them in advance to stay consistent without being online 24/7.
Here’s how:
Step 1: Open Meta Business Suite
Log in to your Facebook account and head over to Meta Business Suite (available on desktop or mobile). Select the business page you want to post from.
Step 2: Create a Story
Click “Create Story” from the dashboard. Choose whether you want to upload an image, video, or create text-based content using the Story editor.

Step 3: Customize Your Story
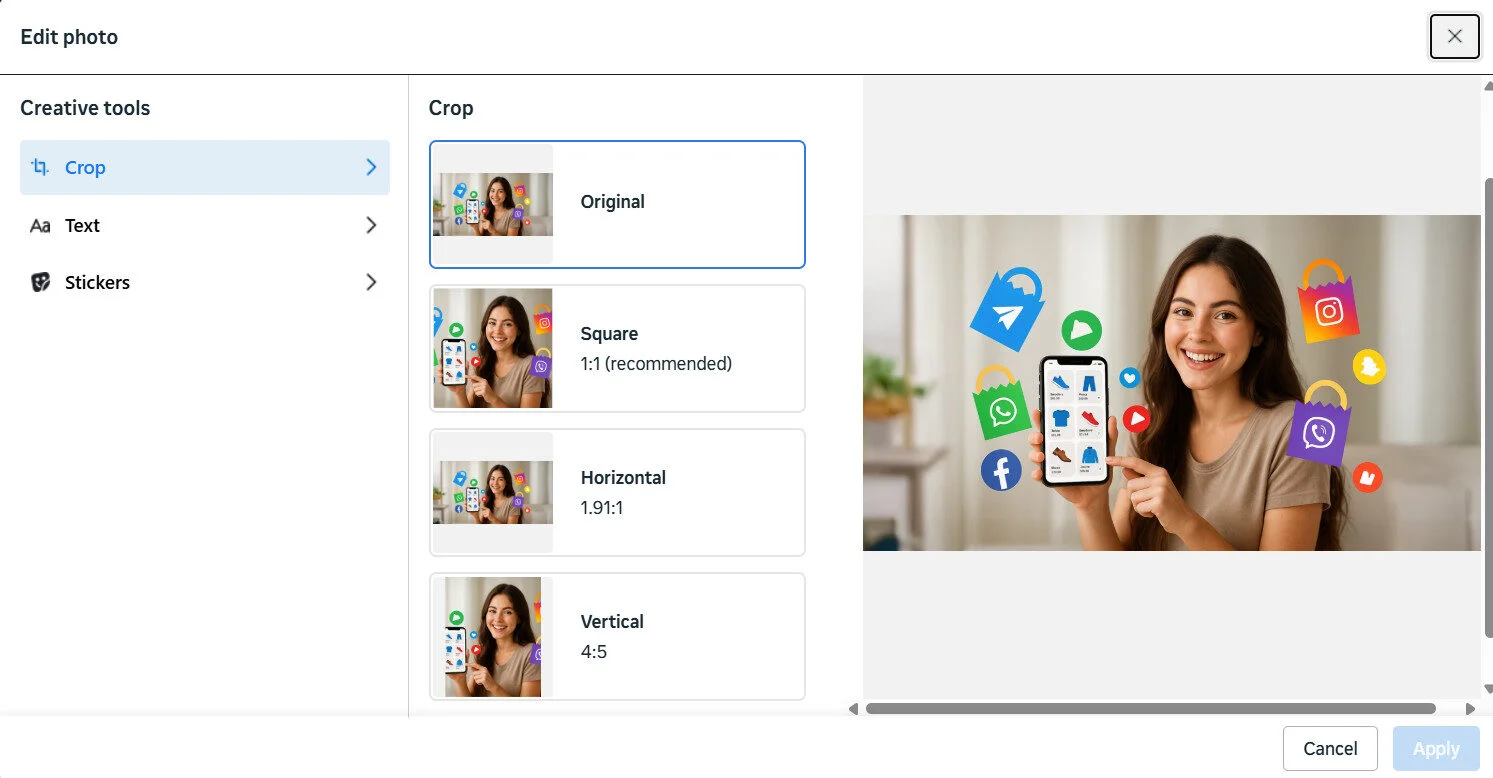
Add captions, stickers, music, or links (if available) to make the Story more engaging. Ensure it aligns with your brand style and messaging.
Step 4: Choose “Schedule” Instead of “Publish”
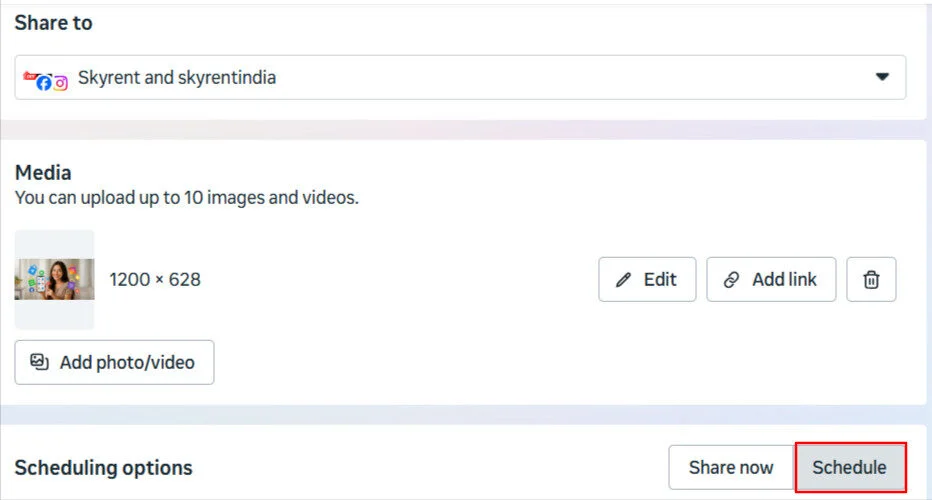
After creating your Story, click the arrow next to “Publish” and select “Schedule Story.”
Step 5: Select Date & Time
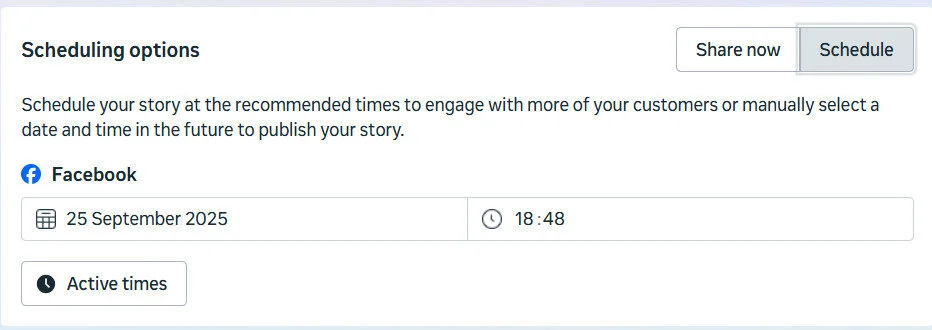
Pick the exact date and time when you want the Story to go live. Pro tip: Use your audience insights to schedule when your followers are most active.
How to Manage Scheduled Posts on Facebook?
Once your posts are scheduled, you’re finally free to work on more impactful tasks. But what happens when you need to rework, make edits, or delete the post in the scheduled posts?
We have shared methods through which you can make edits to your scheduled posts.
Edit and Reschedule Facebook Posts Using Meta Business Suite
If you have scheduled your post and you want to reschedule it or make edits to the content, here is how you do it:
Step 1: Log in to the Meta Business account
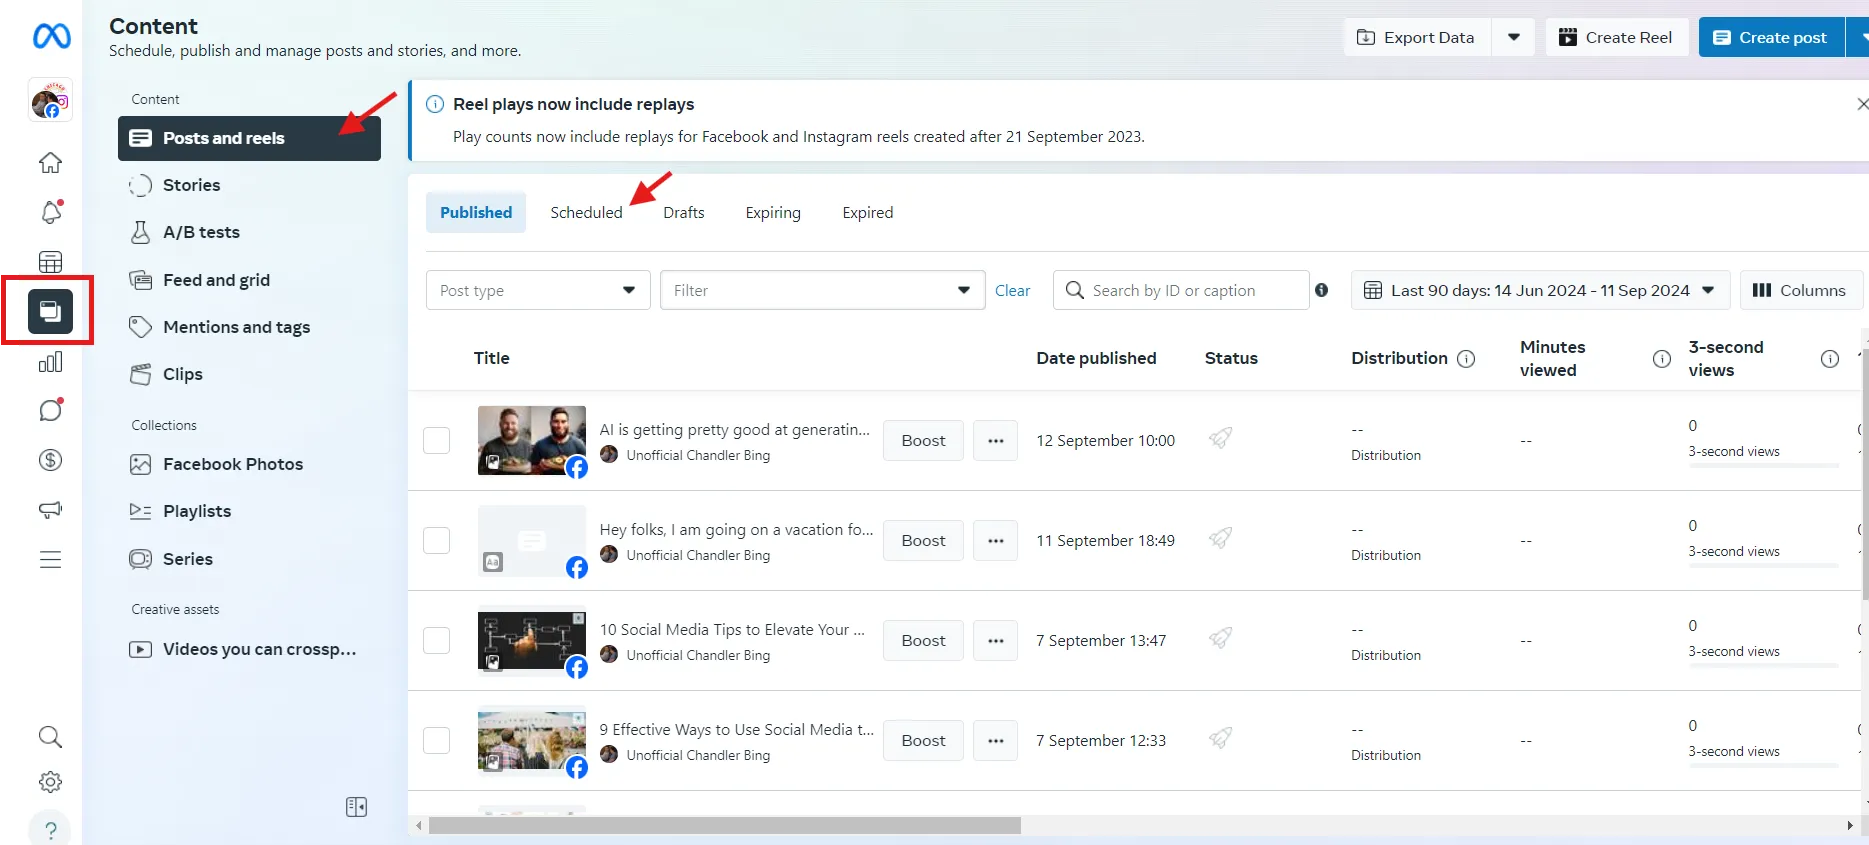
Log in to your account, click “Content” from the left sidebar, and click “Posts and reels.” Select “Scheduled” to see the planned content.
Step 2: Edit your post
Select the content you want to change and click on the three dots (…). Select Edit Post or Reschedule Post to make the changes.
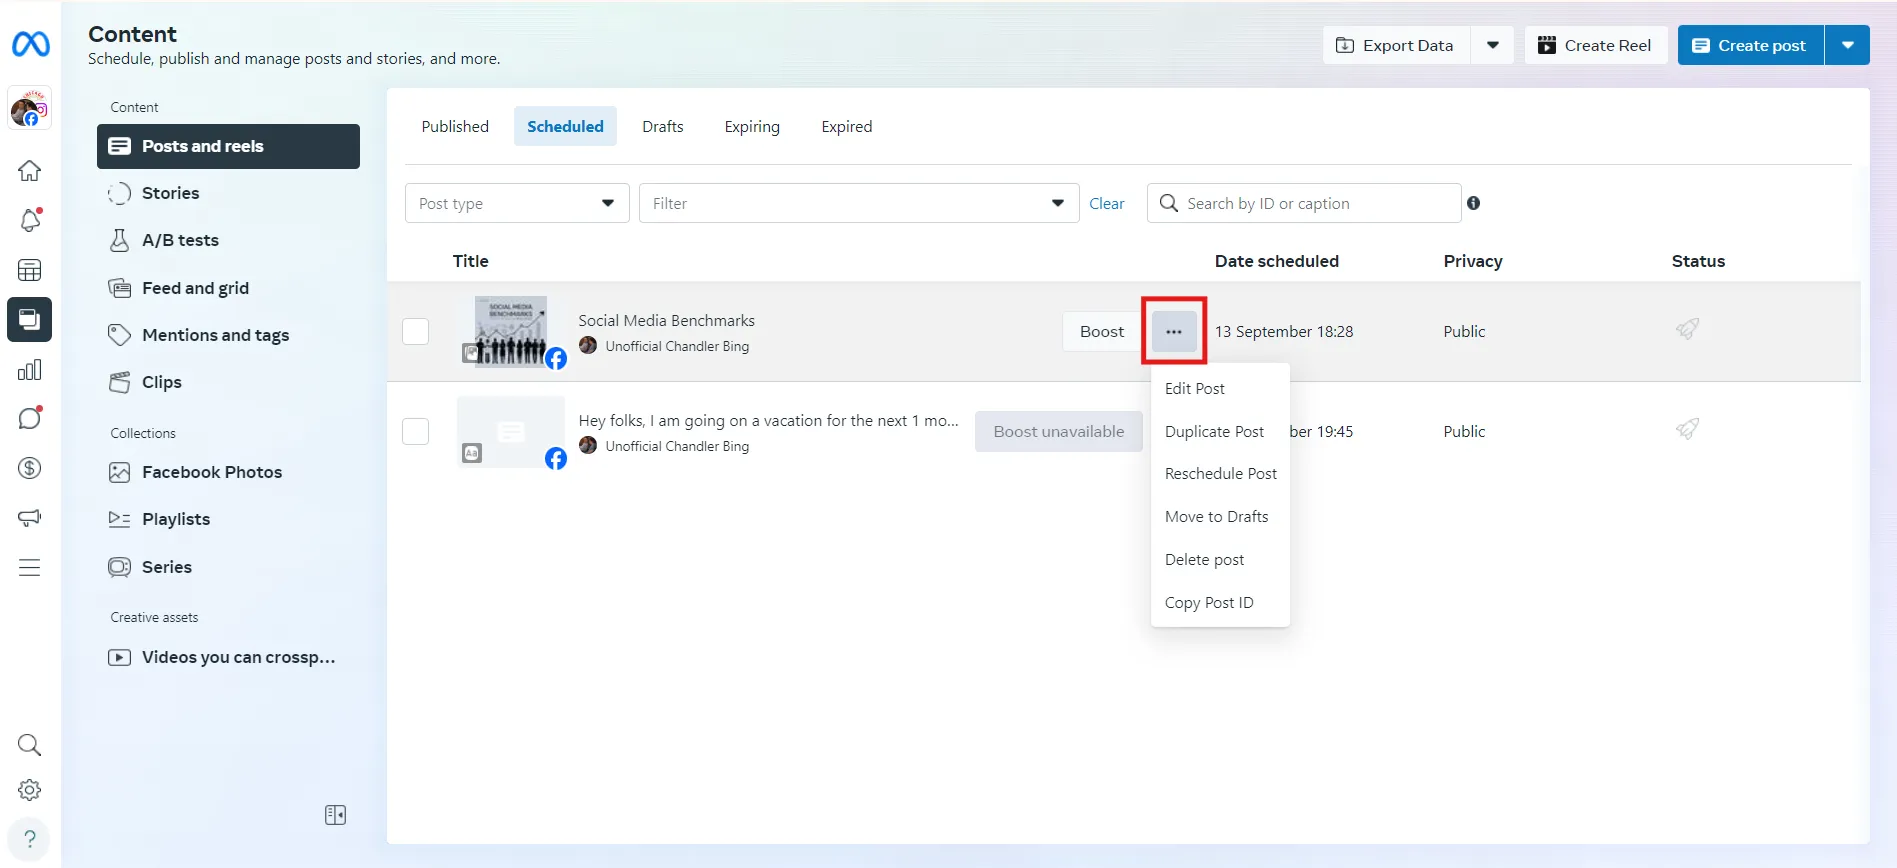
Note: If you are using a Meta Business Suite mobile app, follow the same process to make the changes.
Delete Scheduled Facebook Posts Using Meta Business Suite
If you are using Meta Business Suite, here are the steps:
Step 1: Log in to Meta Business Suite from your desktop.
Step 2: Click on Posts & Stories in the left-hand menu and then select Scheduled Posts.
Step 3: Locate the post you want to delete. You can browse through the list or use the search function.
Step 4: Click on the post to open it. Select the three dots (…) and choose Delete posts.
Step 5: Confirm that you want to delete the post by clicking Delete again.
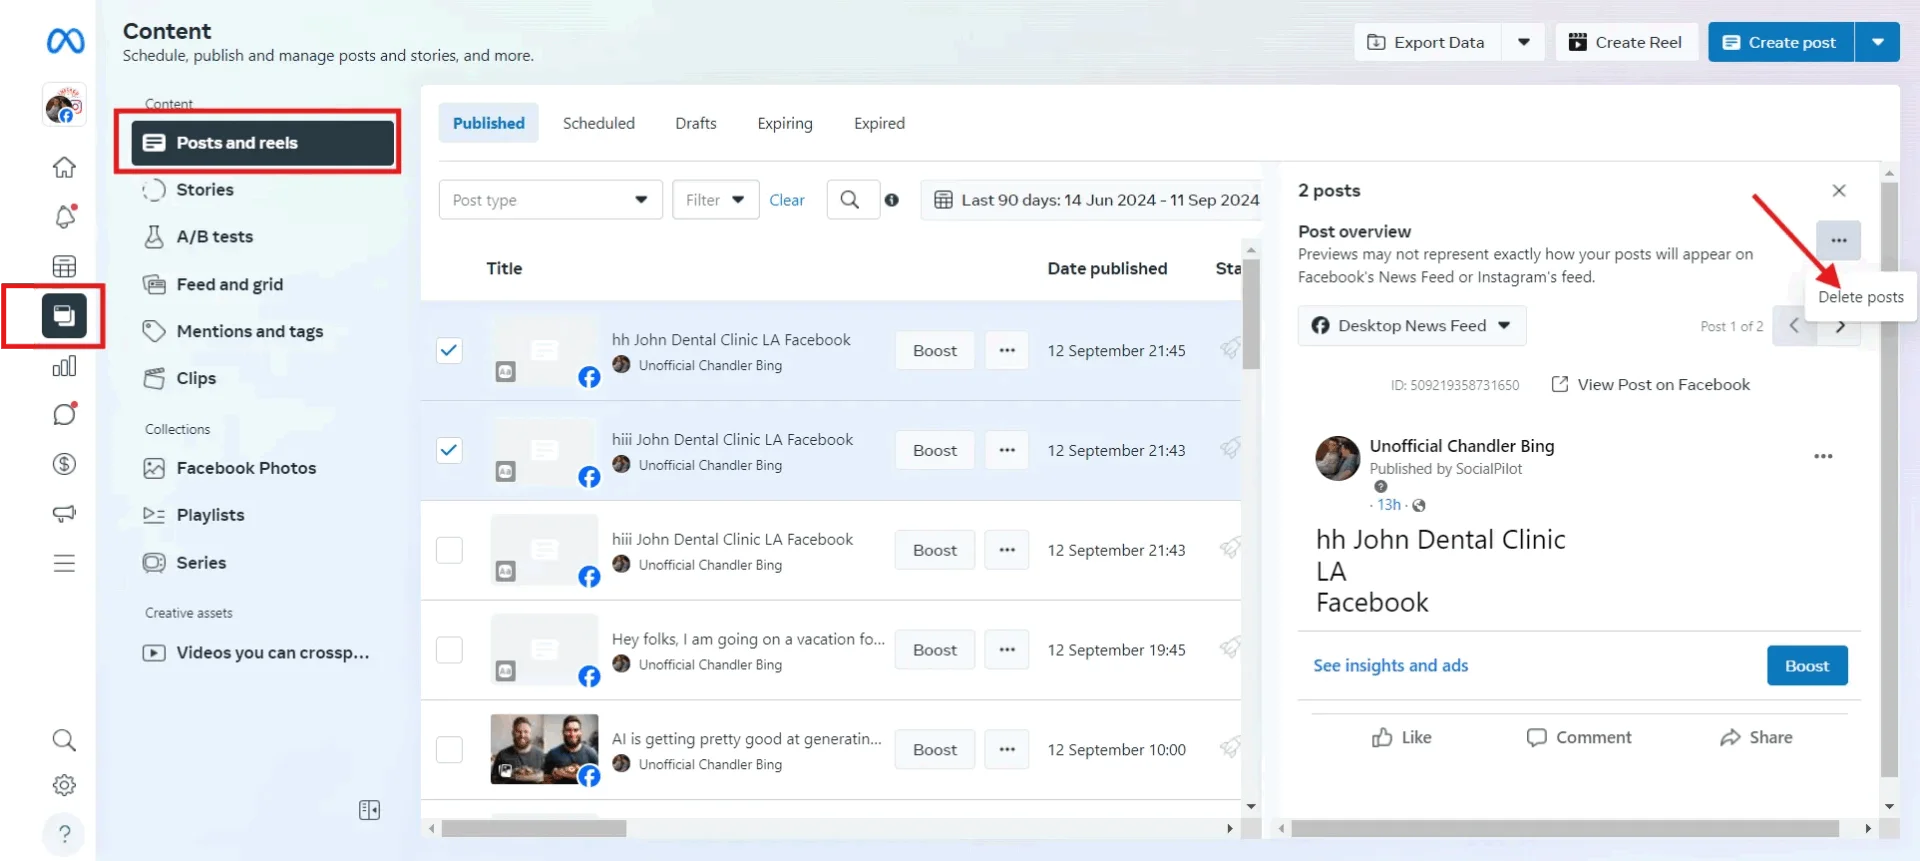
Your post will be removed from the schedule and will not be published.
Note: You can delete a scheduled post from the Meta Business Suite through the mobile app following the same process.
How to Reschedule Scheduled Facebook Posts
If you have scheduled your post and you want to reschedule it or make edits to the content, here is how you do it:
Step 1: Log in to the Meta Business account
Log in to your account, click “Content” from the left sidebar, and click “Posts and reels.” Select “Scheduled” to see the planned content.

Step 2: Edit your post
Select the content you want to change and click on the three dots (…). Select Edit Post or Reschedule Post to make the changes.

Note: If you are using a Meta Business Suite mobile app, follow the same process to make the changes.
Things to Know Before Scheduling Facebook Posts
Scheduling your posts is one way to automate tasks and free up your time for productive work. But if you are putting your effort into marketing, it will drive fruitful results. Here are some key considerations you should keep in mind to improve the ROI of your efforts:
1. Choose Your Scheduling Time Wisely
You need to be wise when selecting your scheduled time and date. If you don’t know when the post will receive high engagement, then a Facebook post scheduler won’t help. You need to know when your target audience uses Facebook and is more likely to engage with your post.
Research your target audience and find the best time to post on Facebook, and only then proceed with your scheduling.
2. Be Consistent with the Brand Voice & Image
Don’t be hasty while creating your content. The primary purpose of scheduling posts on Facebook is to alleviate the burden of posting, allowing you to focus on maintaining the quality of your content.
So, remember to follow all your brand guidelines and create quality content without rushing. Always keep the essence of your brand in mind when scheduling multiple pieces of content.
3. Be Flexible with Your Content Scheduling
The internet space is constantly changing, and new trends are disrupting the social space. You don’t want to be too rigid with your content posts and forget them once set in the Facebook scheduler. Make sure you post relevant, trendy, and engaging content every single time.
Always check your scheduled posts to avoid any potential backlash if you have any scheduled content that is not aligned with the present scenario.
4. Don’t Over-schedule
According to Facebook data, there are 1 billion stories that get posted across Facebook apps. That’s a staggering number, right?
And that’s just stories. Imagine the number of posts being shared across Facebook apps!
So, you don’t want to overwhelm your target audience by bombarding them with social media posts. But don’t under-schedule your posts, either. You need to maintain a balance with your scheduling patterns.
Understanding the frequency of your posts is essential, and you should adjust it according to your business goals and industry.
Now, you’re all set!
5. Analyze Your Performance Timely
You’ve spent time crafting and scheduling your Facebook content – now it’s time to see how it’s actually doing.
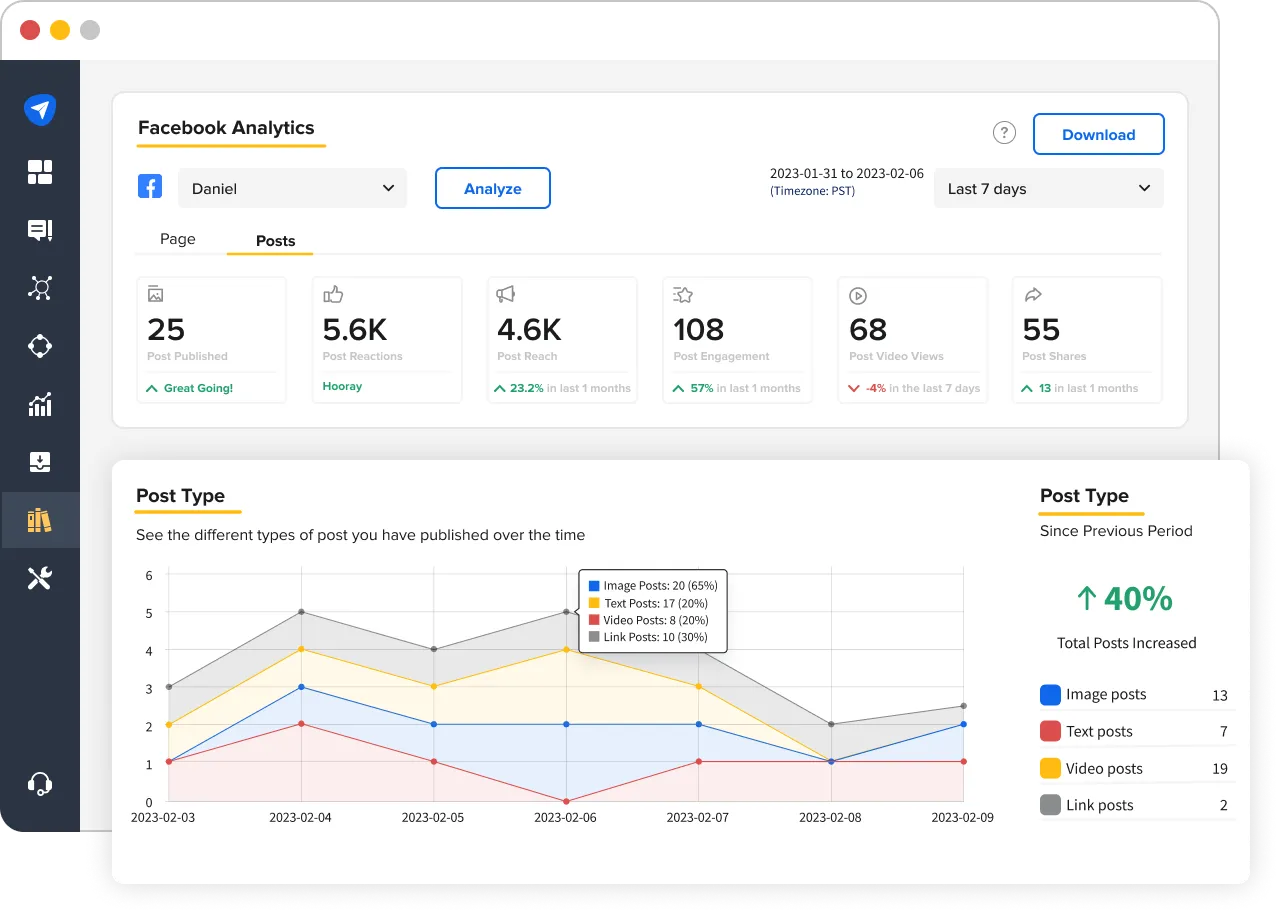
That’s where the upgraded SocialPilot Facebook Analytics makes a difference.
Instead of just showing numbers, it gives you clear, easy-to-understand insights, like how many people saw your posts, who engaged, what type of content worked best, and even who your audience really is. All from one smooth, clutter-free dashboard.
But it doesn’t stop at Facebook. Now you can combine analytics from multiple social media platforms into a single, unified report. Whether it’s Facebook, Instagram, LinkedIn, or more – view it all in one place.
Need to present your results? You can create fully customizable reports with your own branding. Add or remove metrics, write custom notes, and shape your reports the way you want. Then, download clean, white-label reports
Now, you’re all set!
Create. Schedule. Publish.
If you want to save yourself from the repetitive grind of manual posting and focus more on the creative, strategic side of social media marketing, a Facebook post scheduler isn’t just helpful — it’s essential.
While Facebook’s built-in scheduling tools work for the basics, they come with limitations that can hold back your strategy. That’s where an advanced platform like SocialPilot makes all the difference by offering bulk scheduling, AI-suggested posting times, analytics, collaboration features, and more.
Ready to level up your Facebook marketing? Check out SocialPilot’s pricing plans and find the perfect fit for your business. You can even try it for free before you commit.
Make the smart move today and give your Facebook content the consistency, reach, and engagement it deserves.
