Video marketing has been in practice since the advent of television.
However, video marketing is now bigger than ever due to websites like YouTube.
You know that YouTube is a video streaming website with massive daily traffic. Of course, that is why video marketing on YouTube makes sense.
Your products and services are advertised to people targeted based on their likelihood of being interested in what you offer.
It is genius!
However, in order to succeed with YouTube video marketing, the first thing you need to understand is the enormity of the platform and the scope of video marketing opportunities.
Why is YouTube so popular?
Actual Monthly Users
YouTube has 2.3 billion active monthly users. That, in itself, is an enormous number of people, but these are just the number of people who sign into the platform to watch videos.
YouTube also enables watching videos without signing in. So, the actual number of users is anybody’s guess.

Add to that the in-app YouTube video viewing option provided by the biggest online chatting app, WhatsApp. The reach of YouTube is virtually limitless.
One of the Top Search Engines
YouTube is the second most popular search engine in the world. While Google is synonymous with searching for anything online, YouTube comes immediately after.
Users search for educational videos, funny videos, music videos, video game playthroughs, and more. Whatever you want, it is there on YouTube. This phenomenon makes YouTube a highly desirable marketable space.
Localized for Success
YouTube is available in 100 countries, but it does not stop there. The platform is available in different languages and localized for users in specific geographical locations.
This genius move makes YouTube an even stronger platform for both local and international advertisers.
5 YouTube Video Marketing Video Formats
YouTube marketing videos must be conversational, engaging, actionable, and measurable. Here are the different YouTube video types that check all the boxes, if done correctly.
1. Demo Videos
These videos show your audience exactly how your product or service works. Demo videos are not just user manuals shifted to video format, but they also give insight into a product for potential customers to be excited about.

Engaging demo videos include unboxing, testing the product against the brand’s claims, and showing how to use it.
2. Event Videos
Suppose your business is holding a conference, launching a new product, or hosting a fundraiser for a social cause. Whatever the occasion, getting it on video and uploading the fun parts, like highlights, is a great way to spread the word about your company.

These videos work because they educate the audience about something new and spread awareness.
3. ‘How-To’ or ‘DIY’ videos
According to ThinkWithGoogle, How-To videos hold more user attention than any other content category on YouTube.

Utilize this space wisely by uploading tutorial-style videos of tasks. These tasks can be anything from cleaning one’s desktop computer successfully without harming the machine. Or, perhaps how one can make pizza at home, or maybe how one should go about fixing a household appliance.
4. Vlogs
In 2024, vlogging is as important, if not more, than any other YouTube video marketing strategy. Vlogging is logging one’s activities in video format. Companies get vloggers, belonging to the locality they want to serve, to endorse their products or services through their naturally flowing video blogs.

Why this works is that the audience easily relates to their local vlogger. Conveying the convenience of getting a product or service in a personalized manner generates more conversions than most other forms of sales pitches.
5. Live Videos
Live videos are special because they cannot be viewed by anyone after you have ended the session. Of course, you can choose to upload the video after the session ends, but it often defeats the purpose of a live stream.
Use live videos to give the audience a behind-the-scenes peek into your company. You can live-stream an interview with a celebrity or do a live presentation and urge the audience to ask questions. Live videos are a great way to engage your audience.
Whatever the kind of video, it is essential to make sure that your videos are mobile device-friendly because your audience is very likely to watch them on their phones.
Given that a large portion of your audience will watch your videos on mobile, ensuring your videos are optimized for all screen sizes is crucial. To maintain high-quality visuals across all devices, be sure to understand the right YouTube video dimensions and create videos that fit perfectly on screens of all sizes.
How to Create Successful YouTube Video Marketing Videos?
The very first step to creating successful YouTube Video Marketing videos is to define your purpose. Below are the things you need to keep in mind.

Know your Target Audience
You can segment YouTube users based on their age, gender, likes, dislikes, and many other categories. It will help you design a video that is most attractive to the group you want to address about your products or services.
Once you’ve identified your target audience, it’s time to work on getting them to watch your videos. It’s not just about creating great content but also promoting it effectively. Learn how to get more views on YouTube by applying advanced optimization techniques like creating engaging thumbnails and writing compelling descriptions that resonate with viewers.
Know your goals
Your goal may vary depending on what you want your audience to do after watching your video. You may want them to place an order for your product. Or, perhaps you want to spread awareness about your business.
You may aim to get the audience to sign up for your future updates. Keeping a goal in mind will enable you to narrow down your options regarding the ways in which you can make videos.
Know when to publish videos
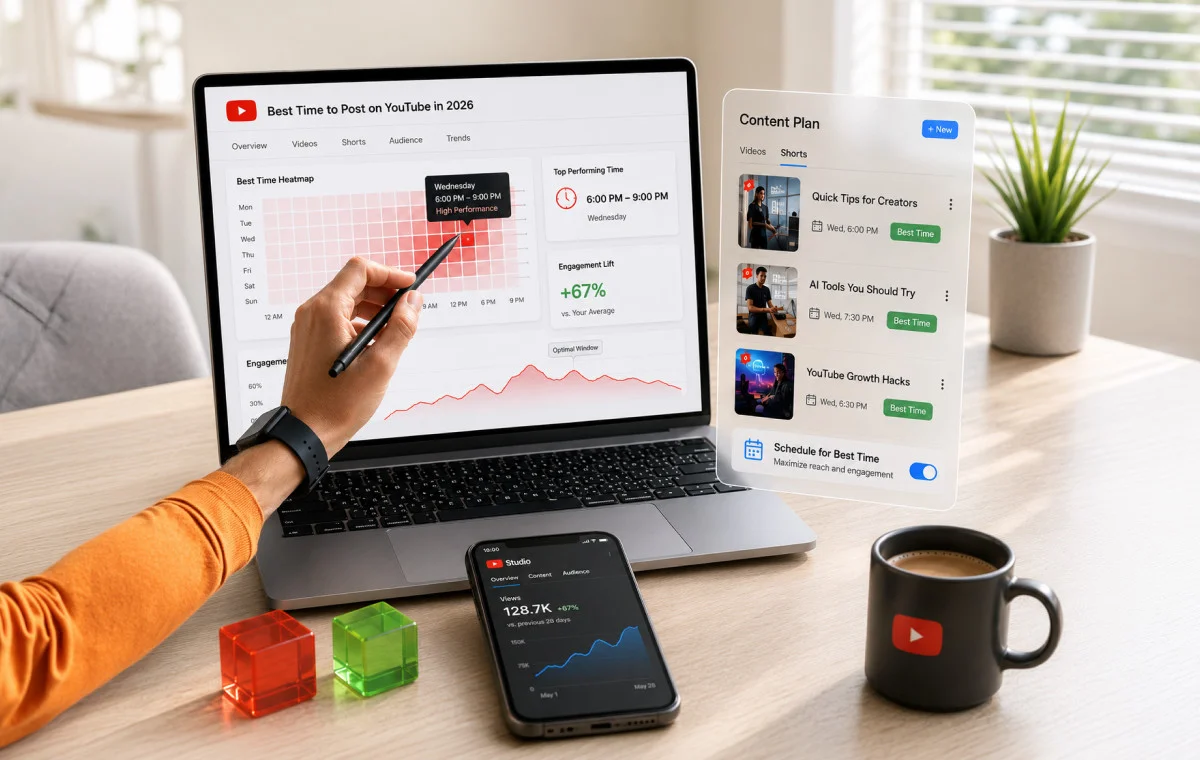
Time is always of the essence when it comes to marketing your products or services. For instance, you may want to announce a big sale that will happen on a public holiday. It is crucial that you publish the video at the right time for people to plan their visit to your physical or online store. Did you know that every channel has its personal best time to post on YouTube? Find out yours!
To boost visibility and engagement, you must optimize your videos for searchability. Hashtags can help categorize your content and make it easier for your target audience to find. Learn how to add hashtags to your YouTube videos and get more views by using relevant keywords and phrases that resonate with your audience.
Know your budget
Sometimes, budget constraints play a vital role in limiting the appropriate and timely production of videos. Giving shape to your YouTube video marketing vision may require actors, graphic designers, or other professionals. Hence, always create a budget before beginning video production.
Know how to measure performance
Making a good-looking video is not enough for your YouTube Video Marketing campaign. Measuring the success of your video marketing efforts is important for improving yourself.
Now, what are the different methods of measuring YouTube Video Marketing success? You must know how to use YouTube Analytics to outrank your competition.
Here are some metrics for measuring your YouTube Video Marketing Success.
1. Shares, Likes, and Comments
Engagement is the name of the game. It has always been one of the key metrics in measuring YouTube Video Marketing success.
The more people share your videos, the more you know that you have provided something of value that the audience wants to share with their friends and family.
The Likes your video gets indicate that your audience appreciates what you are doing and what you stand for.
The Comments on your videos can tell you that your video is compelling enough for the audience to leave their thoughts about it after watching it. Often, comments can be criticisms or praises. Whichever it is, it is ultimately displaying audience engagement.
2. Click-Through Rate
Depending on what you want to achieve with your YouTube Video, Click-Through Rate (CTR) may be of major importance. If your video asks the audience to click on a link that is provided as an on-video card or in the description box, you should definitely count how many individuals click on it. CTR is the most significant measure of success for lots of brands.
3. Return on Investment
Producing a YouTube video for your business is an investment. Your measure of success can mean tracking how much you spent on the video versus how much money you made from the marketing effort. If this is the case, it is a good idea to decide how much you hope to make. Your profits can show if your video was a success or if it needs improvements. You can use a YouTube marketing tool to measure performance as well as create content, keeping you on budget.
Takeaway
You must find a way to create engaging videos for your audience by understanding their interests. According to Google/Insight Strategy Group, for most people, watching something they are passionate about was 1.6 times more important than the production quality of the video.
So, allocate your budget and time towards content that speaks to your audience instead of going all out on making a flashy video.
Always define your goal, audience, timeframe, and measure of success before producing your marketing video.
You must interact with your audience by keeping them engaged with consistently scheduled posts and videos. One way to ensure that you don’t miss uploading your video content on YouTube is by using an advanced YouTube scheduler tool, like SocialPilot.
Simply connect all your YouTube channels to a single dashboard, upload your videos or shorts, add all your details like title, description, thumbnails, tags, restriction settings, etc, and schedule your video as per your calendar. Explore our pricing plans today.